
As I have an invested interest in consistent electricity back home (see my other recent post on Solar for details) and have been in discussion with the council about net metering and grid tie, I’ve been doing quite a bit of random reading regarding electricity distribution and its various facets.
Not many of us know that the power company / municipality also uses in-line signalling (aka ripple control) to implement power control and load shedding, so I thought I’d do a little writeup on that.
Many of us have noticed that streetlights don’t always come on, or go off when its light or dark – they appear to be on a timer system.
What most people don’t know is that the timer system controls are actually implemented centrally at substations, and these add signals to the power lines to tell the equipment to turn off / on when instructed.
This is done using ripple control codes.
With ripple control, a small signal is added to the incoming A/C at a distribution location – eg a substation. This signal is read by a special relay in place on the larger circuits (typically the Geyser), and turns power off or on when the electricity company requires – usually when power is scarce, and they need to shed some load.
As this signalling can work on multiple channels, each listening relay can be set to listen to a specific channel, and used to power specific things on / off remotely (e.g. Streetlights).
In South Africa, we use DECABIT signalling to tell things to turn off and on, as well as the older K22 signalling standard.
When load shedding needs to occur, the electricity distribution system needs to act fast to avoid system failures. Most things are automated, and happen in order of timing.
Implementations of the protection mechanisms in place have a specific time to occur – eg a latency. Responses to conditions also have a latency – eg getting additional idle power plants online to provide more power when needed, so its important to the grid to have multiple control and response mechanisms to respond to loads. Each response mechanism also has a different cost impact, so its also important to the electricity provider to best manage these.
A diagram of this is below (Excerpted from http://www.anime-za.net/tech/literature/Enermet_Farad.pdf ):
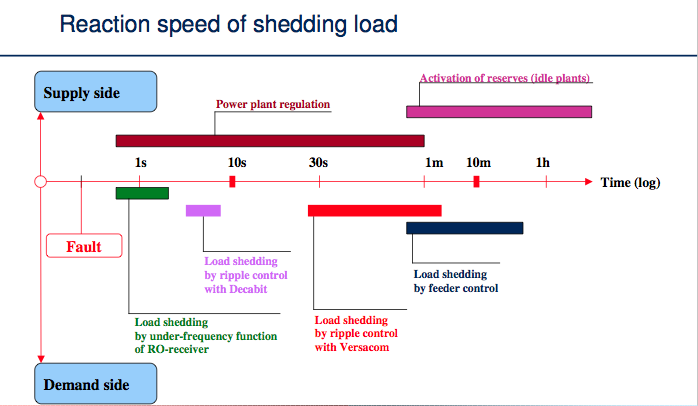
For light variances in load, frequency changes as generators speed up or slow down to supply enough electricity to the supply. If there isn’t enough supply to meet load, then frequency drops, and large scale equipment will disconnect until load decreases. This happens almost instantaneously – responses to these issues resolve with a latency of within a few milliseconds to a second. This is called Under-Frequency Load Shedding (UFLS).
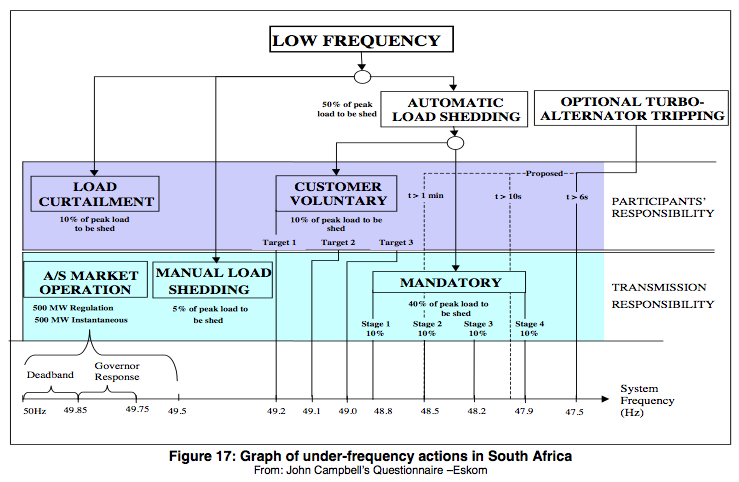
As seen in the diagram above Eskom implements automated under frequency load shedding in an increasing percentage margin based off frequency rates.
(Additional details are in the PDF below)
The next set of load shedding is the one we’re interested in – ripple signalling. If the system still has too much load after 1 second, then it sends out a signal over DECABIT to turn off more equipment. DECABIT signalling has a latency of about 7 seconds – a minimum DECABIT signal frame is 6.6 seconds, so this is a second stage response to issues.
As each substation can be connected to up to 20,000 homes/customers (depending on substation load capacity), this allows localized load shedding where its needed, when its needed.
Eskom calls this Demand Market Participation, and has roughly 800MW of systems added into this mechanism. Municipalities are particularly keen on putting loads onto these mechanisms via DECABIT compliant relays, as this saves them peak power fee’s when loads are high – if they can temporarily cut off power to consumers for 10 seconds – 10 minutes for non-essential high loads, then they can substantially reduce what power costs them from Eskom, and make additional profits.
A good writeup on Demand Market Participation is below:
Eskom benefits as they can temporarily avoid adding more infrastructure to cope with growth.
This has been the case for a few years now, but it only delays the inevitable – you do need to invest in infrastructure, not incentivize clients to use less.
Eskom also has a secondary mechanism (using the same theory – lets encourage you to turn off power) called VPS. They have an additional 50,000MW of connections using this on a contractual basis – typically industrial users., and are looking to increase this number.
Its only been through introduction of these mechanisms that we’ve been able to stave off grid collapse. Its gotten so bad, that industrial users have been looking closely at what they can do to provide their own power when Eskom can’t.
Other countries – notably Germany, and the UK, have allowed consumers to become producers, by encouraging localized small scale production of electricity, thus helping the grid without requiring additional investment from the incumbents. This is called net metering – where both inputs and outputs are metered.
Eg – if you have a solar system that provides excess power during the day, it can feed into the grid – (when it needs it most), and they’ll credit you for your participation.
So far, South Africa has been rather reticent to implement this, as the short sighted vision is that its “stealing” from the incumbents profits.
A choice excerpt from that PDF is this –
Residential load can also be incorporated within the VPS, particularly when integrated with Smart Metering systems. Numerous pilot and small scale projects are being undertaken within both Municipalities and Eskom in response to the DOE’s Regulation 773 of 18 July 2008.
The Department of Energies regulation can be found here –
http://www.energy.gov.za/files/policies/Electricity%20Regulations%20on%20Compulsory%20Norms%20and%20standards%20for%20reticulation%20services%2018Jul2008.pdf
These state that all systems over a certain size require that smart metering be installed by 2012. As you may have guessed, quite a few municipalities have not met this deadline, and Eskom has been dragging its feet on that too.
Ironically, introduction of smart metering would actually help the grid here in South Africa, as IPP’s (independant power producers) would make the grid more stable by providing additional energy when needed, and at a lower cost than the incumbents can create it for.
This however does have its issues – most municipalities generate revenues from Electricity, and so are loath to change the status quo, even when it would benefit the country from a whole.
So, its unlikely to be implemented in the short-medium term, unless the government drags them kicking and screaming through the process.
In summation, this –

Lawrence.
———
References:
http://en.wikipedia.org/wiki/Zellweger_off-peak
http://www.anime-za.net/tech/ripple_index.html
http://mybroadband.co.za/vb/showthread.php/134334-And-so-I-have-proved-the-ripple-control-system-is-buggered
DECABIT Ripple Signal Guide
Thesis on the financial implications of relaxing frequency control as a mechanism.
http://www.energy.gov.za/files/policies/Electricity%20Regulations%20on%20Compulsory%20Norms%20and%20standards%20for%20reticulation%20services%2018Jul2008.pdf – DoE Regulations
http://www.enerweb.co.za/brochures/AMEU%20Conference%20-%20Enerweb%20VPS%20Paper%20-%20201109%20-%20%20V1.0.pdf – Demand Market Participation
http://www.systemoperator.co.nz/f3210,36010947/Appendix_A_-_A_Collation_of_International_Policies_for_Under_Frequency_Load_Shedding.pdf – Load Shedding in International operators
18
Let there be light
Humans have always wanted light at home, from thousands of years of fire based light through to 18th century gas lighting, through to the early 19th century and 20th century with electric lighting.
In the 21st century, lighting is something we’ve taken for granted.
You come into a room, flick a switch, and you have light.
While the technologies have changed over the years with incandescents and neon through to modern LED based lighting, the user interface has remained the same.
There have been remarkably few changes over the years to the user interface – press a switch, and let there be light.
While there have been a few specific use case divergences – i.e. motion based or sound based activation (eg for security lighting, or public lighting in buildings), or marginal modifications to output (eg dimmers), those haven’t really changed the way we work, as the original interface is just so simple and succinct .
It has been something we’ve taken for granted, but what if you want more?
Timbuk3 claimed that the future is always brighter, so where are our sophisticated lighting solutions?
The answer is Smart Lighting.
The smart lighting space has been an interesting one to look at.
In some ways, its a solution looking for a problem – its cool, but its not something that most people really need. Currently the market appears to consist of sophisticated consumers – eg ones looking for automated solutions for their upmarket cinema / projector rooms or similar, through to geeks that want to play with fun new tech.
Your average home user isn’t likely to want to try it, as its still nowhere near as easy as the incumbent solution.
That said, its getting to the point where its worth taking a look at so one can tip toes in so to speak.
Currently there are 2 mass market implementations that are out there that provide additional smart features over and above the typical light on / light off provided by a switch.
Both systems do pretty much the same thing – they provide features over and above the normal set of functionality.
First the downside – they’re parasites. In order to be controllable remotely, they need to be permanently drawing power. Its minimal, but its still a current draw – green, these are not.
They also complicate lighting slightly – If you’re used to turning the lights off and on via a switch, you still can, but you’ll need to flick the switch off/on again to turn them on if they’re currently set to off via the app.
To sum up – you can still turn the lights on or off via the wall switch, but if you leave the switch on, then you can also control the lights via your computer or smartphone.
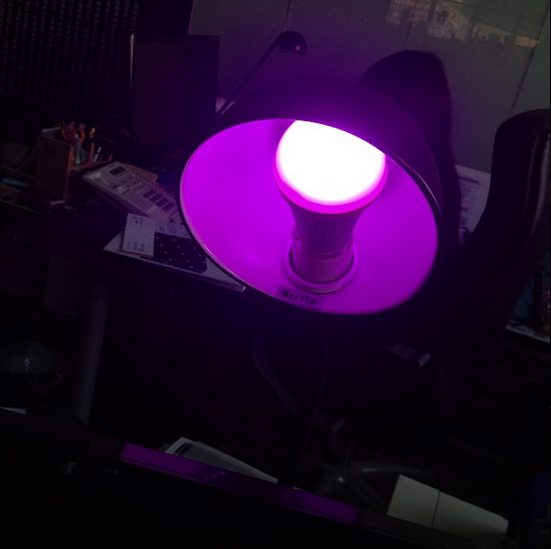
The app for both solutions has fairly similar functionality. You can change the color of the light output, from white light, through to yellow, red, and blue lighting. You can also dim the lighting.
Both of these solutions are similar –
Philips Hue, and YeeLink.
Philips has been attempting to sell their smart lighting system for a few years now – it hasn’t really set the world on fire, but it has been a slow if unsteady seller.
The Philips solution is based on a small ST Micro 32 bit processor running the base station, listening over ethernet, which then communicates to the bulbs, via Zigbee wireless (Ti2530 chipset).
Bulb plus base station looks like this:
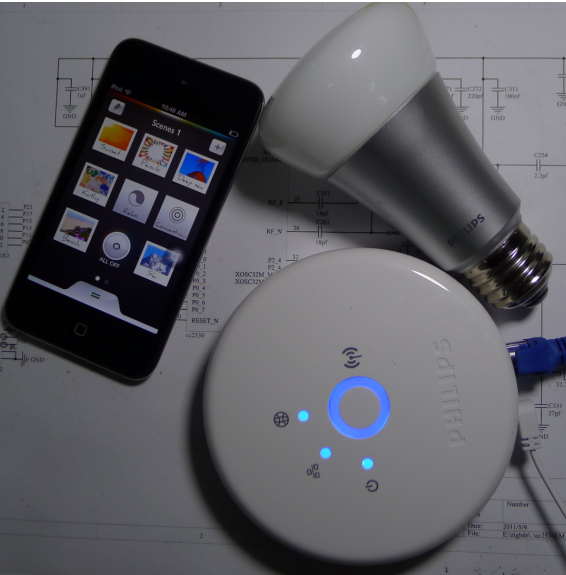
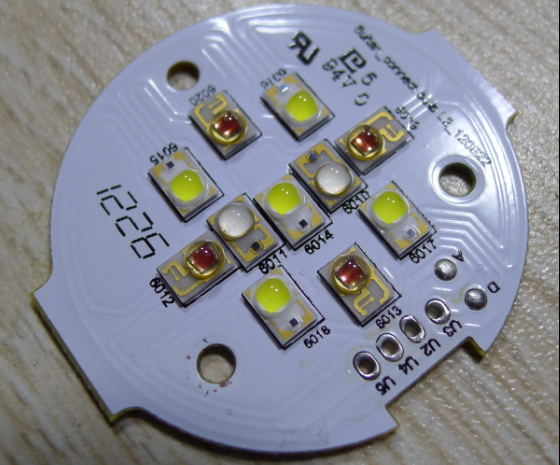
Inside, the bulb has a number of LED’s that control the light output, and light colouring.
The Philips solution is ok, but its not as open as it could be. They do have apps with functionality, but the main complaint is that features haven’t been added, and they’re buggy.
Their solution is here –
http://www.meethue.com/en-US
Onto the Chinese solution!
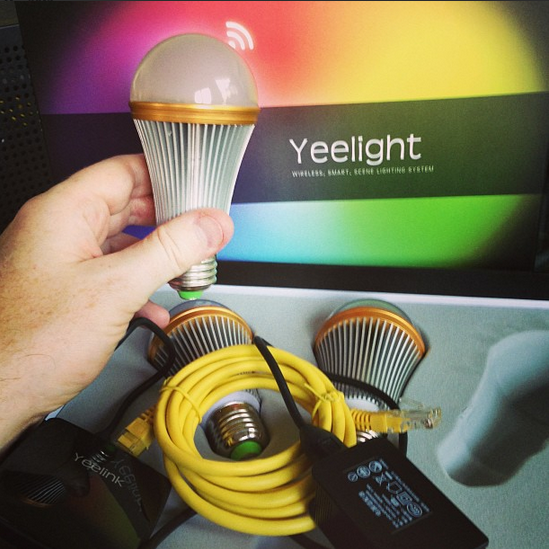
Yeelink has a fairly similar product that came out around the same time as the Philips one.
Theirs is Arduino based, and a lot more open.
They have a github site with code for the basestation (arduino based), which communicates over Zigbee (noticing a trend here!).
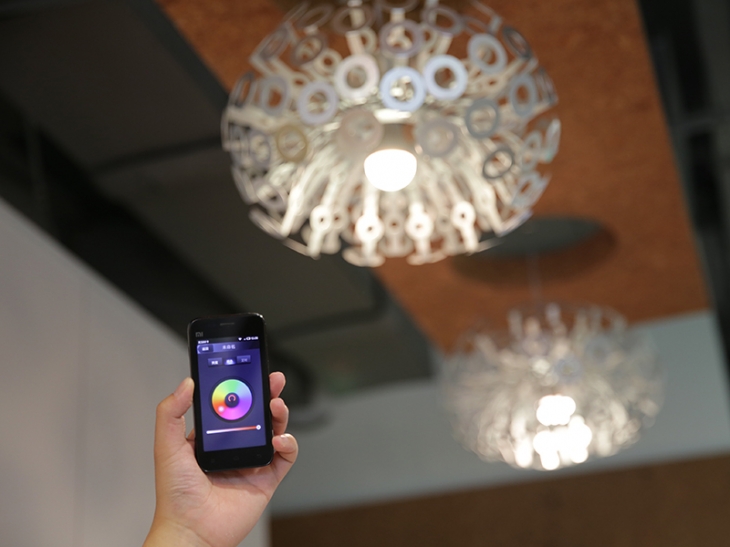
Take a look below at a demo of functionality
What makes the Yeelink different is that they have a better UI and a better API.
They’re also not just staying with lighting. They’re adding temperature sensors and other sensors that will be tied to the base station for future upgrades.
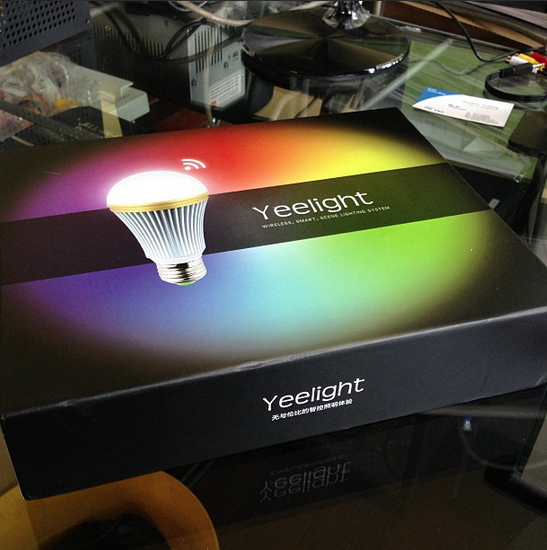
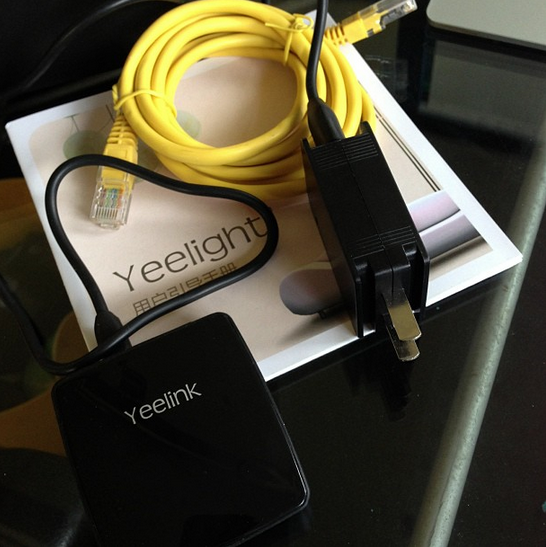
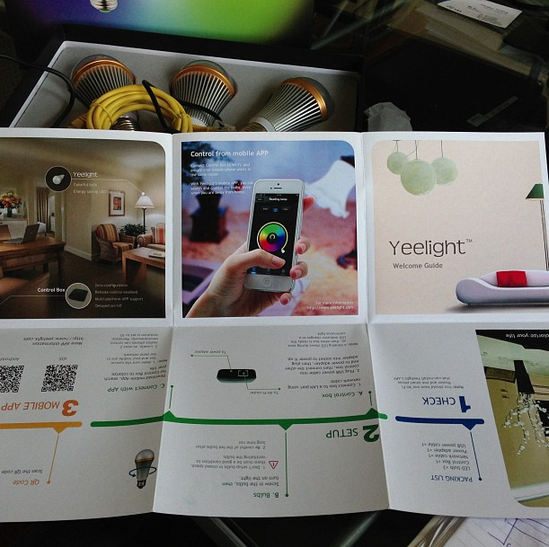
Future is future, and now is now. Lets take a look at what comes in the box – firstly, its impressive packaging for a Chinese company – it looks good, and is well packaged. Kudos for good design.
Box packaging –
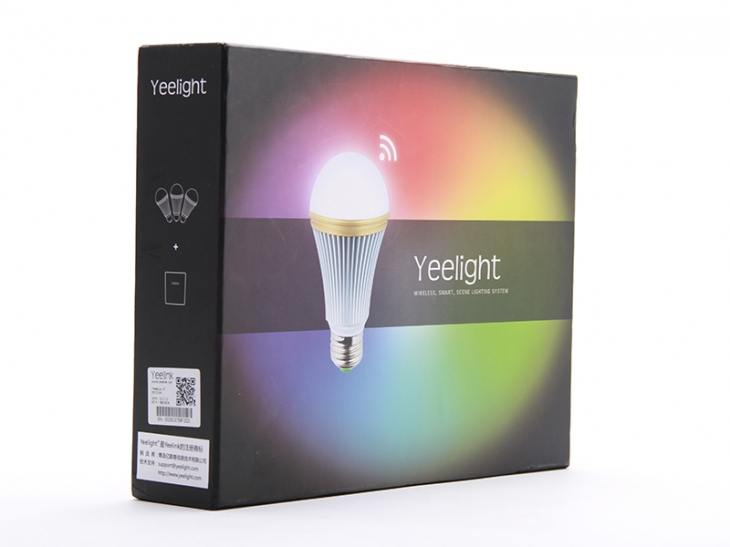

Base system with 3 bulbs. This retails at 600RMB/ $99

Base station

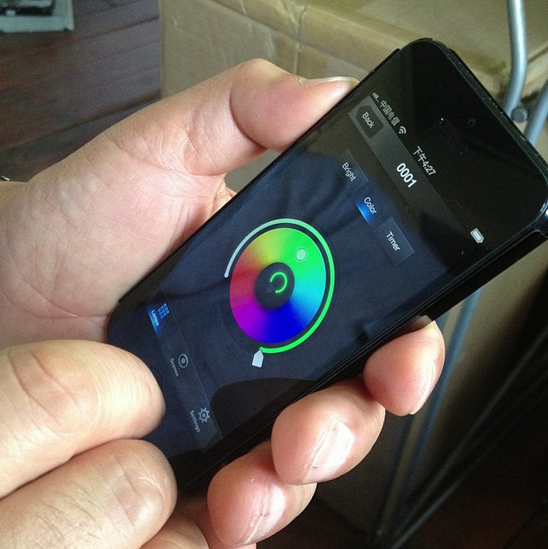
iPhone app (comes in English and Chinese)
All in all, I think the Chinese one is better than the Philips one, purely for the openness – its fairly easy to integrate into other things.
Its still a toy vs a must have, but its a fun toy.
Would I buy one – yes.
Site:
http://www.yeelight.com
Taobao:
http://yeelink.taobao.com/search.htm?spm=a1z10.1.w5002-232341356.1.qYAuEW&search=y
Update –
Received mine, and semi-happy. Its still expensive, but it does work.
Downsides –
There is a slight latency on the color changes – maybe 300ms or so, but otherwise can’t complain.
It doesn’t turn on when you turn the light off / on (which I would have expected). You really have to turn on the light with the App or not at all.
Price!
Upsides –
Works.
Fun.
Will be happy when the next set of items comes out that can interface with it.
Still have to play a little with the API side – might link it to Zoneminder for initial testing similar to the eBuddy we use. Everyone had a go with the app and enjoyed
the iPhone side. Price needs to come down to RMB50 a bulb + R100 for controller before it feels like I’d want to get more of them. As an early adopter though, I’m fairly happy.
Some actual photos below:


13
Going Solar
I’ve been interested in going completely solar for a while now back home in South Africa, as pricing for electricity has rapidly increased past the pricing for solar; return on investment is in the 3 year range currently.
It will get close to 1 1/2 year return on investment when Eskom new pricing increases happen, so its a no brainer to install.
I’ve already replaced our geyser (hot water system) with a solar based system, plus all the lighting in the house is already LED based (yay China!), so our base load of electricity is low for the size of the house. I can still improve though by installing solar, to make the electrical costs approach zero, and at some indeterminate point in the future when Eskom allows for legalized grid tie, a profit center!
As I’ll nominally be a 10KW producer (I can add 2 panels to get there), I should be able to at some point pump back into the grid sooner rather than later – as the trial projects for Cape Town all sit at the 10KW range and up…
From what I read –
Eskom will pay out R 1.20 per kilowatt hour
generated by your solar system for the first three years, 70% immediately after installation
and the balance at 10% for the next three years.
More here – http://www.capetown.gov.za/en/EnergyForum/Documents/Eskom%20IDM%20small-scale%20renew%20energy%20-%20Lodine%20Redelinghuys_31Aug2012.pdf
(Yes, currently this is only available for commercial use, but I do expect that to change at some point. My system should be in use for at least 25 years, so I should get some benefit at some point in the future.)
—-
Before I get to pricing though, I need to explain how it all works.
For any system, you’ll need some kind of input.
As I’m looking at Solar, thats my input. I can also look at thermal or wind based. Wind based is a distinct possibility in Cape Town, but I have been advised that its probably too windy to use! (turbines can’t run during extremely windy weather or you break the turbines).
So, I’m going with Solar.
There are 2 types of solar panel out there. Monocrystalline and Polycrystalline.
Monocrystalline is more expensive per watt, as its a more difficult process to make panels from.
Mono panels are also slightly smaller per watt of output. On average mono panels are about 14% smaller. They also work better in hot climates.
Aside from those differences, they’re fairly similar.
Panels are typically rated in watt terms.
A 300w panel will give you 300W of power at peak output (eg mid-day).
This 300w of power is at DC voltage though, and for house use, we need A/C
The 300w panels I’ve been looking at give 36V @ 8.3A.
I’ll probably go with polycrystalline, as the pricing isn’t really worth the extra 30% for mono crystalline for my needs.
Panel info below – (click me for pdf)

Basic calculation for power output is P = V * A
This works out to 300W a panel (303W = 37.6V * 8.06A)
I’ll be getting 30 panels, as thats about the max I can fit on my roof in theory.

(My brother hasn’t gotten me the exact sizing yet).
To use this, we need an inverter though, as something has to convert the DC power into AC.
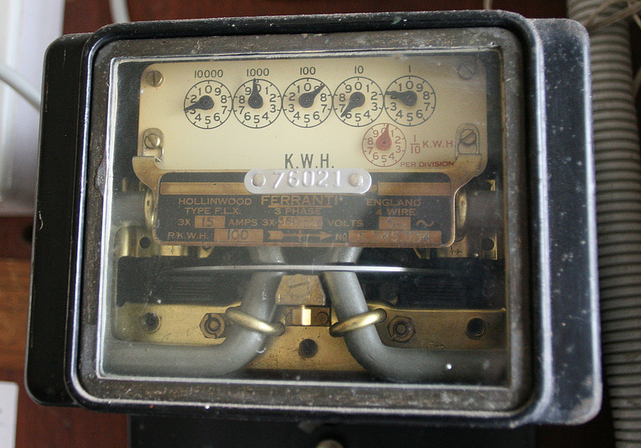
In my house, I have 3 phase power, and an antique metering system.
3 Phase is good, as i have sufficient power for my needs, but its bad as I need a more advanced inverter to give me 3 phase.
I could use 3 x single phase inverters, but for simplicity, I’ll be going with a single 3 phase inverter.
If you see the cabling here – you’ll see we have 3 phases + 1 neutral = 4 cables.
To work out what sort of inverter I can use, I need to do some basic math.
I’ll have 30 Panels total.
Each panel gives out 36V @ 8A., and that will give me approximately 9KW output. As the smallest *decent* 3 phase inverters I could find are 10KW ones, thats a good size.
I have a choice of running the panels in series or in parallel.
If I run them in series, then the Voltage increases.
Eg 1 panel = 37v, 2 panels = 74v @ 8A…
If I run them in parallel, then the Ampage increases.
Eg 1 panel = 8A, 2 panels = 16A @ 37v
If you’ve ever seen welding cables or car battery cables, you’ll see what sort of cabling is required for high Amps. So, everyone wires using DC voltage.
My inverter of choice is probably going to be this: Growatt10000UE

That 3 phase inverter has the following characteristics.
It will power up from 300V (min voltage to run), and accepts voltage up to 1000V.
It also has 4 inputs for panels.
Generally each input is called a “string”.
As I’ll have 30 panels, I’ll probably be balancing them out in 2 x 15 piece strings -> the inverter.
Each string will work like this
37V * 15 = 564V DC * 8A (4.54KW of power)
37V * 15 = 564V DC * 8A (4.54KW of power)
This will give me a rough total of 9W peak power.
As conversions are never perfect, and panels can output more during peak than they are rated for, I’m getting a 10KW inverter. This will allow for some small headroom in future if I need to expand slightly.
It also is fine for something I haven’t talked about yet – open circuit. The panels I’m looking at run at 36v open circuit (i.e. before they kick in), the inverter also needs to be able to work without issue at open circuit voltages. As the inverter supports 1000v, open circuit of 564v isn’t an issue.
So far, costs are:
30 Panels = 720RMB / poly panel = 21,600 (mono panels are about 900-1000 per piece). Poly panels are physically 1.9M x 1M @ 300w / 28KG , Mono 1.9M x 1M @ 300W / 25kg
10KW 3 Phase inverter = 9,000RMB
Weight = 1000KG with packing.
Shipping + clearance – roughly 15,000 + duties @ 20%
Total landed in Cape Town = 45,000RMB / R60,000
That gives me a rough pricing of R6.6 a watt *installed*.
It also gives me a system that I can hook into the grid (illegally currently!), but won’t provide for power in case of failure.
I actually don’t need something that size, but sadly, due to the cost of clearance being a complete rip off, it doesn’t make sense to ship less 🙁
Currently our power bill sits at about 700-1000 rand a month, over a year this is around R12,000 using worst case scenario maths 😉
My intended system will cost me about R60,000 + install labour. At current electricity pricing, I should see a complete payback for the system in about 5 years. Given that electricity prices are going to be *doubling* over the next 5 years in Cape Town, this will actually be achieved in about 3 years or so.
Not too shabby!
Our current monthly electricity usage looks like this for those who may be interested.

You’ll note that electricity use spikes on certain days (mainly weekends) – this generally ties into when the maid is there, as then the washing machine, dish washer etc get run, or on the rare occasion that my brother actually cooks 😉
Initially I’ll be feeding excess power back into the grid, and using that as a “battery”.
How will that work?
Well, as I have an older meter, it can run backwards. So, daytime when I have _substantial_ excess, i’ll be running backwards, and nighttime, when the solar panels are not generating, I’ll be running forwards.
Essentially, using the grid as my battery..
Eskom will be benefiting from all this, as I’ll be a net producer far over what I consume – so they’ll get all the free electricity I’ll be generating.
Its also safe – as the inverter will not feed back into the grid if its offline – eg when we have one of our rather too regular power outages (3 in the last month from my logs).
Longer term I’ll be installing a battery system to allow for complete off grid, but funds don’t currently stretch to that yet..
Do note that the above is for my needs – your needs might not be my needs!
I need a 3 phase system. Most people _don’t_. I’m also going grid tied for the moment due to funding available. Others might find it better to have a hybrid grid tie/ battery system. If I could afford it, I’d go that route!
I’m also *heavily* overspeccing the output – clearance costs are substantial for South Africa (highest in the world almost), so it doesn’t make sense for me to ship a small system, as there is only a marginal cost for what I’m speccing.
A suitably sized system for us would be 8 panels, and a 3kw inverter. I’d be crazy to ship that though, as the clearance is more than the cost of the system. So, I’m heavily overspeccing on requirements so that it makes sense. Long term its also a no-brainer for me, as I’ll have substantial excess I can sell back to the grid.
In case anyone is interested how I’ll retrofit this sort of system with a battery backup – here is a diagram of a single phase implementation – I’d be doing something similar:

That said, I do have another easier solution – I’ll probably go cheap – stick the things that may not lose power(tm) circuit on a 2KV UPS, and have an isolator switch in circuit for when the grid goes down so its isolated from Eskom. This will accomplish the same thing pretty much, and should tide us over for the average 3-4hour outages we seem to experience every few weeks. It will also sit nicely in the computer rack that will contain the media side of the house and data storage needs 🙂
Debian 7 was released, and like all good sysadmin’s we updated our servers to the newer OS version.
Unfortunately there have been a few minor issues where functionality has changed.
One of those relates to FTP.
We generally use VSFTP as its relatively secure, and has chroot functionality out of the box (i.e. users can only see their own folders).
Today a user complained that they couldn’t login, and on checking we saw this little error:
500 OOPS: vsftpd: refusing to run with writable root inside chroot ()
A quick google showed that 2.3.5 breaks backward compatibility somewhat by changing functionality, oops!
This was done for safety reasons, but is a bit of a questionable change to functionality when it breaks things.
The suggestions on the internet were to add this line:
allow_writeable_chroot=YES
Which didn’t work – VSFTP wouldn’t restart, as it didn’t recognize it. What to do?
Well, the quick solution is to use Debian unstable, as that uses a newer version of VSFTP 3.x which does recognize that line.
So:
(assuming you have the testing repo’s in apt.sources)
apt-get install -t testing vsftpd

echo allow_writeable_chroot=YES >> /etc/vsftpd.conf

/etc/init.d/vsftpd restart
As one of the main contention points people have with mail service is either the amount of spam they receive, or the amount of legitimate email we block, we’ve decided to put the solution in your hands.
We’ve added user access to the blocking implementation we use at Computer Solutions.
For a quite rerun on this our incoming mail rules are as follows:
- Sending Server has a valid Reverse DNS Entry
- Sending Server conforms to mail RFC’s
- Sending Server is not listed in any of the following Antispam Service Lists zen.spamhaus.org cblplus.anti-spam.org.cn cdl.anti-spam.org.cn bl.spamcop.net dnsbl.njabl.org
- Mail does not contain a virus, malware or similar content.
- Mail is addressed to a valid sender.
- Recipients mailbox is not full.
We’re giving you access to do what you want with regards to incoming spam blocks.
If you decide that our heinous blocking of senders who’s servers are _definitely_ listed in spam listings is not to your taste, then you can change that.
If you want to whitelist any incoming mail you can do the following:
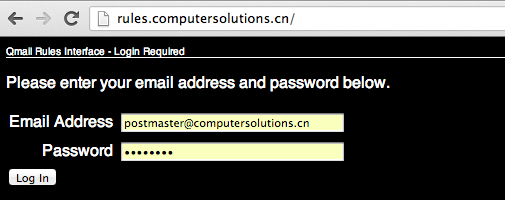
1) Login as the postmaster account for your domain at http://rules.computersolutions.cn (in the example below, I’m editing my own account, you’ll need to use YOUR postmaster@yourdomain.com / password!)
2) Select Domain Wide Focus

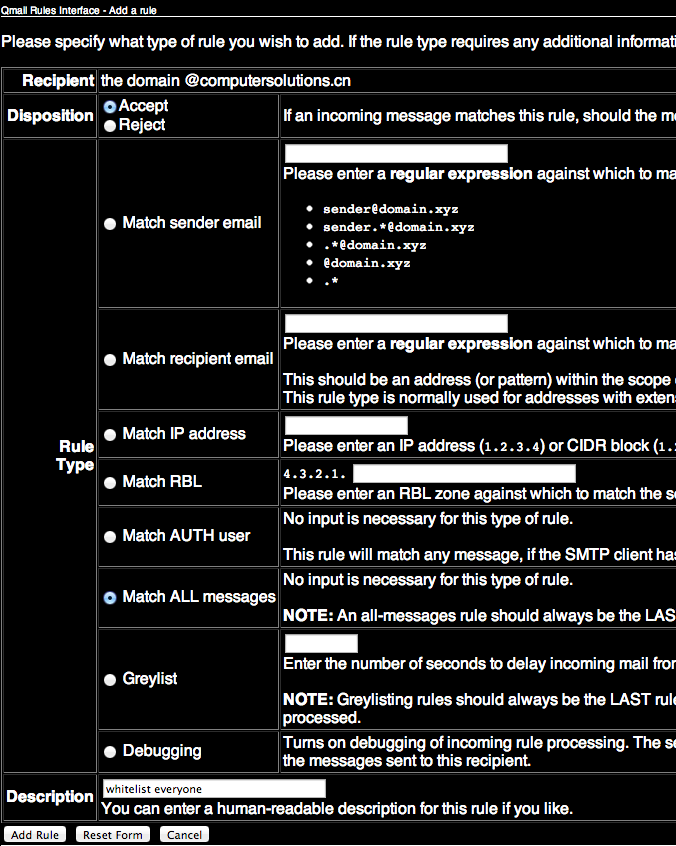
3) Click Add a domain specific rule (this will apply to all messages received for your domain – i.e. anything @yourdomainname.com)
![]()
4) Setup appropriate rules (there are a number of options – in the example below I’m whitelisting all incoming mail).
5) Note that the System rules below are now greyed out (assuming you whitelisted as per example above).
Thats because they no longer apply!

In future we will be pushing clients to use this interface for their unblocking / blocking requirements, so that the needs of the few outvote the needs of the many, and your incoming email can go where no wo/man has gone before.
Lawrence.
Over the last few weeks, we’ve been noticing an increase on hack attempts on wordpress installs and other CMS’s (eg joomla).
Most of these attack attempts are from Russian IP space (typically Ukraine), although there are also a lot of botnet attacks from hosed windows computers also (these come from a variety of countries).
To counter this, we have been pro-actively implementing a number of different mitigation solutions, ranging from upgrading clients CMS installs and adding captcha plugins where possible to prevent brute force password attacks, through to scanning for vulnerable files throughout all clients website, and updating them to non-vulnerable versions (timthumb.php being the major issue/problem child that we’ve found to be vulnerable/exploitable).
We have also implemented server-wide lockout systems for failed logins for wordpress using one of our existing protection mechanisms (fail2ban).
Some of you may already have noticed an additional question or captcha being asked during login to your systems.
(example below)
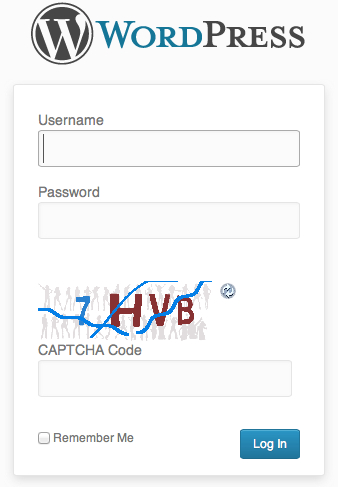
This is for your safety – if someone hacks into an install, they typically then attempt to run additional items within an install such as malware.
We also have live monitoring for malware running on all servers, and have been quite proactive in upgrading installs which are capable of being compromised.
In the case of a site being compromised and malware being dropped into the site, our live scanner sends us an automated email and we actively investigate.
If we cannot resolve the immediate issue, and find the security hole, we disable the clients site and inform them of an issue, and the need to take further action.
(To date, we haven’t had to go that far though).
We’re not the only people seeing this, although its not well known outside of the web hosting community at this present time.
We believe in proactive solutions for these kinds of attacks, and our multilayered approach appears to have spared us from most of the problems facing others at this time.
Lawrence.
References:
http://blog.hostgator.com/2013/04/11/global-wordpress-brute-force-flood/
http://blog.sucuri.net/2013/04/protecting-against-wordpress-brute-force-attacks.html
http://blog.cloudflare.com/patching-the-internet-fixing-the-wordpress-br
We often have clients that complain about wifi in different area’s of their apartment being weak.
While there are a number of solutions to that, such as running additional cabling, adding additional routers via WDS, using 电力猫 (ethernet over power) adaptors etc, we decided to try out a newish all in one solution from TP Link.
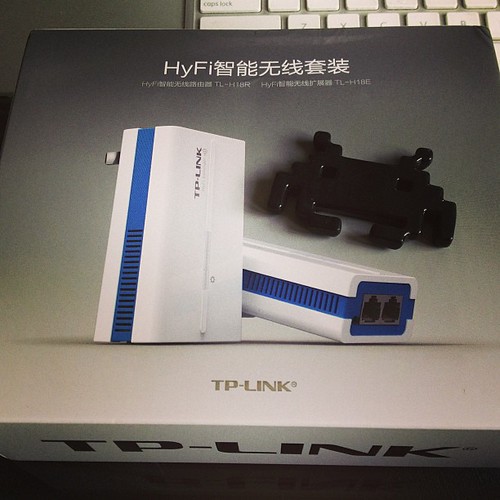
This ties together 2 paired mini wifi routers via power over ethernet (HomeAV).
See the Chinese diagram below for a clear example.

What does it do?
Well, you can plug one router in where your internet connection is, then plug the other router where your signal isn’t 😉 With a bit of luck, it will connect successfully over your power lines automagically, and there is no configuration needed other than adding in your internet settings at the router side.
The units provide both Ethernet and Wifi at both ends, so they’re a good solution for both wired and wireless access.
The units we bought only have Chinese firmware at the moment, but its pretty much set, and forget for most users.
They also come reasonably well documented – each unit has a sticker with its ip address and user/pass. Yay!
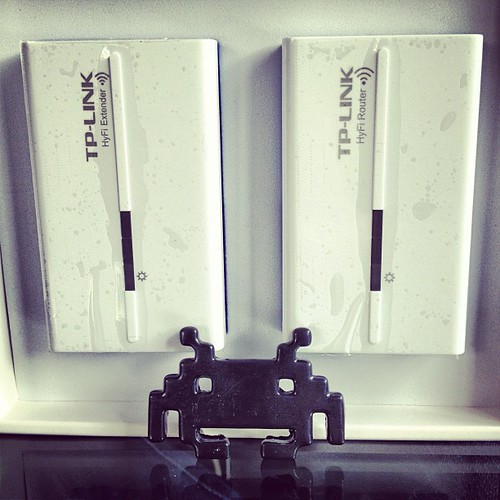
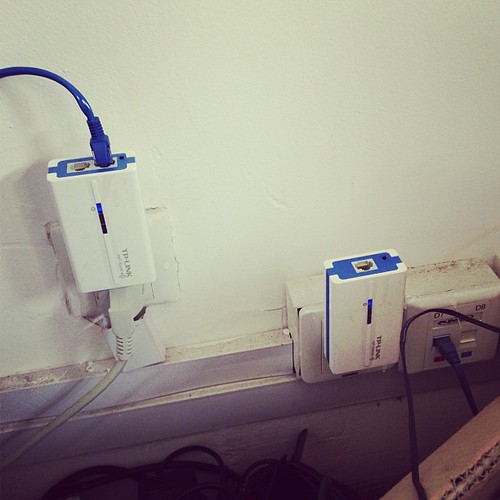
As you can see below, one unit has 2 ethernet connectors, and the other has 1 ethernet connector.
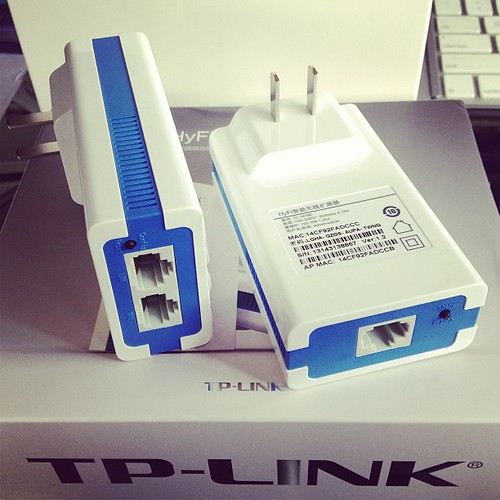
The unit with 2 connectors sits at your modem side (it can also extend an existing network if you have another wifi router already).
The WAN port plugs into your modem or network (as appropriate for your needs).
The LAN port provides a network port for use.
The other unit plugs in elsewhere (eg in a suitable location where you need wifi or wired connection).
I initially thought our initial unit was faulty, as it would only pair to the second adaptor for a few seconds, then stop pinging its ip address (192.168.1.254 as per its label)
–
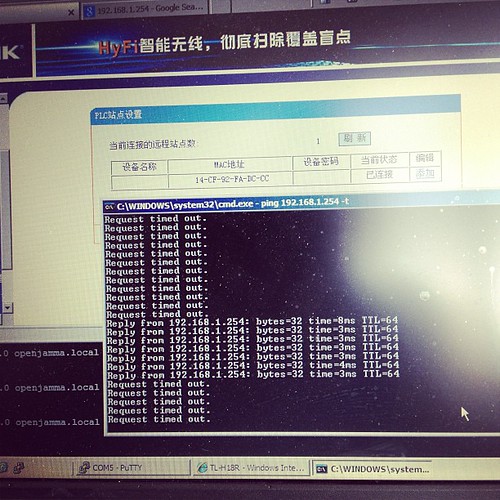
Turns out that once its booted up and paired, it gets an address via DHCP from the main
device, so whats written on the back of the unit no longer applies. Stumped me for a few seconds till I realised and went doh!
Here is our suitable test bed.
I’m pinging one device from the other –
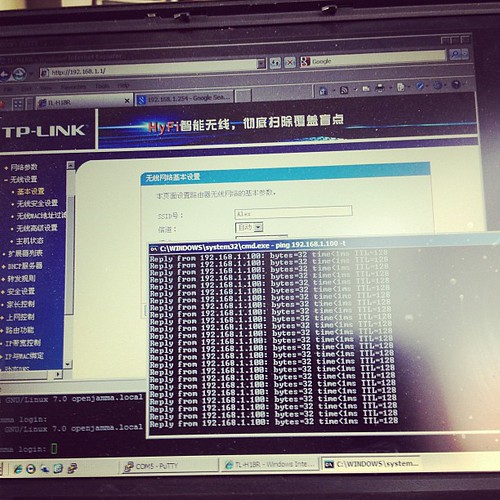
..and it works.
The units are a bit flimsy, but seem to work fine in our limited testing.
Price – RMB258 + shipping for a paired set via http://tp-link.tmall.com/ online store (price correct at time of writing)
Extra units – RMB133 (you can have up to 7 units tied together to extend your network).
I’d give these a rating of 7/10 – they’re cheap, and they work.
Further reading (and tools):
http://www.zibri.org/2009/03/powerline-ethernet-fun-and-secrets.html
1
Debian with Time Machine
As most of the posts out there are horribly outdated, or provide incorrect information for the current versions in use, here are my quick notes on setting up a time machine share.
First up –
apt-get install netatalk
Check /etc/netatalk/afpd.conf has something similarish to this:
# This line goes in /etc/netatalk/afpd.conf

- -tcp -noddp -uamlist uams_guest.so,uams_dhx.so,uams_dhx2.so -nosavepassword
Add a line for your required shares into /etc/netatalk/AppleVolumes.default
# Time machine share

/nas/backup/timemachine "TimeMachine" cnidscheme:dbd options:usedots,upriv,tm  allow:lawrence,eugene,janice
Change the folder / names / users to your own ones obviously!
If its not going to be a time machine share, remove the “,tm”
Restart Netatalk
/etc/init.d/netatalk restart
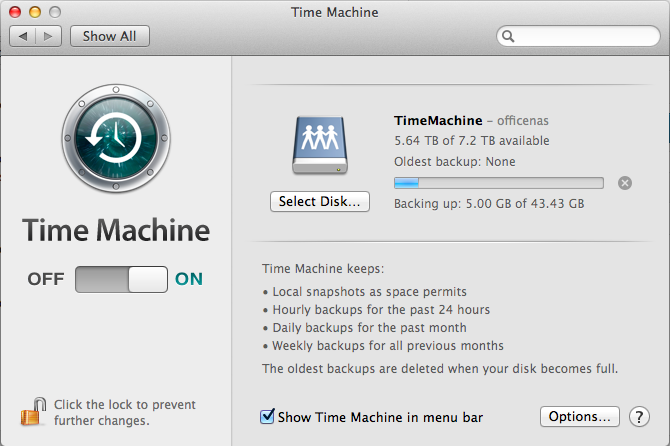
You should be able to see the share in Time Machine Preferences.
See if you can backup. If you get a failure eg “Error 2”, make sure that the folder you use has write privileges for your user, then try again.
All in all pretty painless.
Proof it works –
I usually do most of my work these days on an Air. While its decent, it is rather dinky spacewise, and I tend to keep it empty of music so I have (barely) enough space for my dev stuff, and various embedded cross compile environments.
I still like listening to music though, so I keep that on secondary and even tertiary storage. This typically is one of the fine HP N36L / N40L NAS devices that I’m fond of buying. I have a few HP N36/N40L nas boxen in various places, some of which contain my music, but most of which contain backups, onsite, and offsite, as you can never be too careful!
I know this quite intimately, as the very machine I’m typing this on had a catastrophic SSD failure only a week ago.
Luckily I didn’t lose too much work!
Enough with the background, and back to the plot.
As I was saying, I needed some tunes to harass the staff with listen to at work.
I looked at a couple of solutions, and decided on forked-daapd, as that allegedly could share music to iTunes from the NAS music folder without too many headaches.
Most instructions were of the sort:
apt-get install forked-daapd
pico /etc/forked-daapd.conf
[edit music folder, save file]
/etc/init.d/forked-daapd restart
In my case it didn’t work.
It also didn’t really give much clue that it wasn’t working, and their website didn’t have much to go on.
I looked at compiling from scratch, but the guy making it uses Clang and Java stuff to build, and it just looked like too much hassle.
So, I had to troubleshoot even though I didn’t really want to spend the time.
My initial issue was something like the below:
forked-daapd wouldn’t run successfully (but it also didn’t complain, sigh). I could see that it wasn’t running on any port specified, and checking kern.log showed it was crapping out silently.
Mar 20 21:03:09 officenas kernel: [ 3392.026612] forked-daapd[9848] trap invalid opcode ip:7f8d8772958e sp:7f8d8176bf60 error:0 in libdispatch.so.0.0.0[7f8d87722000+c000]
Running it in the foreground showed it was having issues creating the mDNS bits.
mdns: Failed to create service browser: Bad state
This eventually worked out to editing /etc/nsswitch.conf, adding the following to the host lines:
hosts: files mdns4_minimal dns mdns4
then restarting avahi
/etc/init.d/avahi-daemon restart
This got me past the bad state error, but then it was bombing out with a missing symbol avl_alloc_tree error.
I did an strace on the thing and found it was looking for libav under /lib vs under /var/lib
This was also documented here – http://blog.openmediavault.org/?p=552&cpage=1#comment-8376, although sadly not until I found out myself.
Looks like the zfsonlinux is the culprit here, as that puts libav files in that folder. Tsk tsk.
I removed those libav files – rm /lib/libav* ****as I know what I’m doing**** (don’t randomly erase stuff unless you’re 3000% sure!), and sure enough, forked-daapd started up, and started blatting tons of output to the logs in a happy manner.
iTunes was also finally happy, and could see my music. Yay.
Took me about 2 hours to figure out sadly, but at least I sorted it out.
Hopefully this will save someone else the headache when they google for the error(s)!
27
Ruby ruby ruby…
As my friends in high places have been talking about Ruby for a long long time now, I thought I might take a look at installing a Ruby based app on one of our servers. Sure, I could have hosted it on Heroku or similar (as I know people that know people), but I tend to do stuff in-house as China often decides to arbitrarily block useful 3rd party services at the drop of a hat.
Looked fairly simple I thought.
Bzzzt, wrong. (This is a bit of a diatribe, but hey, I have to whine somehow 😉 )
Seems Ruby has a little bit to go in terms of friendliness.
First up, was to follow the fairly simple instructions for installing the App I chose – (Kandan).
My first issue was this –
Installing eventmachine (0.12.10) with native extensions

Gem::Installer::ExtensionBuildError: ERROR: Failed to build gem native extension.
/usr/bin/ruby1.8 extconf.rb
extconf.rb:1:in `require': no such file to load -- mkmf (LoadError)
from extconf.rb:1
Gem files will remain installed in /var/lib/gems/1.8/gems/eventmachine-0.12.10 for inspection.
Results logged to /var/lib/gems/1.8/gems/eventmachine-0.12.10/ext/gem_make.out
An error occurred while installing eventmachine (0.12.10), and Bundler cannot continue.
Make sure that `gem install eventmachine -v '0.12.10'` succeeds before bundling.
Hmm, mkmf, whats that?
No idea, lets take a quick look at apt-cache.
Ok, so looks like we need ruby headers to compile.
A quick look google shows that at RubyForge shows that this has been an issue since oh, at least 2005.
http://rubyforge.org/forum/forum.php?thread_id=4161&forum_id=4050
Perhaps a nicer message might be – “Hey, I see you don’t have the ruby development headers installed, install some”, and maybe even download them.
Even Perl is more user friendly than that when it comes to missing libraries, and Perl is famous for being obscure.
Once I overcame that minor hurdle, the installer trundled away merrily, and failed on the next message
Gem::InstallError: cloudfuji_paperclip requires Ruby version >= 1.9.2.

An error occurred while installing cloudfuji_paperclip (3.0.3), and Bundler cannot continue.

Make sure that `gem install cloudfuji_paperclip -v '3.0.3'` succeeds before bundling.
Debian has Ruby 1.91, and Ruby 1.8 in stable.
*and* the previous compiled gem (eventmachine) required 1.8 specifically.
I’m already smelling versionitis…
[more wizened geeks will say apologetic things like:
#1 ah, but yes there is rb!
– Yes, but I’m coming at this from a fresh angle, and I don’t necessarily know about that.
#2 This is quite debian specific!
– Yes, but it is a rather major distro..
]
Lets see whats available from testing repo.
apt-cache search -t testing ^ruby | grep 1.9
...
ruby1.9.1 - Interpreter of object-oriented scripting language Ruby
ruby1.9.1-dev - Header files for compiling extension modules for the Ruby 1.9.1
ruby1.9.1-examples - Examples for Ruby 1.9
ruby1.9.1-full - Ruby 1.9.1 full installation
ruby1.9.3 - Interpreter of object-oriented scripting language Ruby, version 1.9.3
Ok, so 1.9.3 should do it, lets install that.
apt-get install -t testing ruby1.9.3
Re-run the Bundle installer, and…
Installing cloudfuji_paperclip (3.0.3)

Gem::InstallError: cloudfuji_paperclip requires Ruby version >= 1.9.2.

An error occurred while installing cloudfuji_paperclip (3.0.3), and Bundler cannot continue.

Make sure that `gem install cloudfuji_paperclip -v '3.0.3'` succeeds before bundling.
Hmm…
Lets double check.
> ruby --version

ruby 1.9.3p194 (2012-04-20 revision 35410) [x86_64-linux]
Lets see. Ruby 1.9.3 >= 1.9.2 in my math book, so wtf.
I can even install it fine manually, via “gem install cloudfuji_paperclip -v ‘3.0.3’” so its really full of poop.
I decide to take a different tack –
Looking at the gems folder though, I don’t see the gem libraries for 1.9.3 there, so I guess Ruby is full of crap again, and lying about the error, although then why does building the gem manually NOT fail. Sigh.
I decided to take the rvm route
https://rvm.io -> curl -L https://get.rvm.io | bash -s stable –ruby
then
source /etc/profile.d/rvm.sh
(still need to add to apache www-data group, but first lets get this compiled)
rvm trundled away and installed 1.9.3 gems, so that *finally* cloudfuji_paperclip wasn’t bitching.
…and we get to the next error.
An error occurred while installing pg (0.12.2), and Bundler cannot continue.

Make sure that `gem install pg -v '0.12.2'` succeeds before bundling.
I run that manually, and
gem install pg -v '0.12.2'

Building native extensions.  This could take a while...

ERROR:  Error installing pg:

	ERROR: Failed to build gem native extension.
/usr/local/rvm/rubies/ruby-1.9.3-p374/bin/ruby extconf.rb
checking for pg_config... no
No pg_config... trying anyway. If building fails, please try again with
--with-pg-config=/path/to/pg_config
checking for libpq-fe.h... no
Can't find the 'libpq-fe.h header
apt-get install libpq-dev solves that one.
…and
bombing on sqlite.
apt-get install sqlite3
retry
Its at this point I start thinking about puppet and how that does dependencies in a graceful manner, but I digress.
..and because I forget the development libraries, I need to also get those.
apt-get install libsqlite3-dev
Retry the bundle install, and *finally* getting a build.
Oh joy.
So, lets try run it.
bundle exec rake db:create db:migrate kandan:bootstrap
==  CreateAttachments: migrating ==============================================

-- create_table(:attachments)

   -> 0.0015s

==  CreateAttachments: migrated (0.0016s) =====================================
== AddSessionsTable: migrating ===============================================
-- create_table(:sessions)
-> 0.0011s
-- add_index(:sessions, :session_id)
-> 0.0004s
-- add_index(:sessions, :updated_at)
-> 0.0004s
== AddSessionsTable: migrated (0.0020s) ======================================
== DeviseCreateUsers: migrating ==============================================
-- create_table(:users)
-> 0.0435s
-- add_index(:users, :email, {:unique=>true})
-> 0.0005s
-- add_index(:users, :ido_id, {:unique=>true})
-> 0.0005s
-- add_index(:users, :authentication_token, {:unique=>true})
-> 0.0005s
== DeviseCreateUsers: migrated (0.0452s) =====================================
== CreateChannels: migrating =================================================
-- create_table(:channels)
-> 0.0011s
== CreateChannels: migrated (0.0011s) ========================================
== CreateActivities: migrating ===============================================
-- create_table(:activities)
-> 0.0012s
== CreateActivities: migrated (0.0013s) ======================================
== AddGravatarHashToUsers: migrating =========================================
-- add_column(:users, :gravatar_hash, :text)
-> 0.0007s
== AddGravatarHashToUsers: migrated (0.0007s) ================================
== AddActiveToUsers: migrating ===============================================
-- add_column(:users, :active, :boolean, {:default=>true})
-> 0.0007s
== AddActiveToUsers: migrated (0.0007s) ======================================
Creating default user...
Creating default channel...
rake aborted!
undefined method `to_i' for #
/usr/local/rvm/gems/ruby-1.9.3-p374/gems/activemodel-3.2.11/lib/active_model/attribute_methods.rb:407:in `method_missing'
/usr/local/rvm/gems/ruby-1.9.3-p374/gems/activerecord-3.2.11/lib/active_record/attribute_methods.rb:149:in `method_missing'
/usr/local/rvm/gems/ruby-1.9.3-p374/gems/activerecord-3.2.11/lib/active_record/connection_adapters/column.rb:178:in `value_to_integer'
/usr/local/rvm/gems/ruby-1.9.3-p374/gems/activerecord-3.2.11/lib/active_record/connection_adapters/column.rb:78:in `type_cast'
/usr/local/rvm/gems/ruby-1.9.3-p374/gems/activerecord-3.2.11/lib/active_record/attribute_methods/dirty.rb:86:in `_field_changed?'
/usr/local/rvm/gems/ruby-1.9.3-p374/gems/activerecord-3.2.11/lib/active_record/attribute_methods/dirty.rb:63:in `write_attribute'
/usr/local/rvm/gems/ruby-1.9.3-p374/gems/activerecord-3.2.11/lib/active_record/attribute_methods/write.rb:14:in `channel_id='
/home/cubieboard/chat/kandan/lib/tasks/kandan.rake:35:in `block (3 levels) in
/home/cubieboard/chat/kandan/lib/tasks/kandan.rake:23:in `each'
/home/cubieboard/chat/kandan/lib/tasks/kandan.rake:23:in `block (2 levels) in
/usr/local/rvm/gems/ruby-1.9.3-p374/bin/ruby_noexec_wrapper:14:in `eval'
/usr/local/rvm/gems/ruby-1.9.3-p374/bin/ruby_noexec_wrapper:14:in `
Tasks: TOP => kandan:bootstrap
(See full trace by running task with --trace)
Oh look, *what* a suprise. Another error.
I’m starting to think that nobody actually tests this stuff in real life.
undefined method `to_i’
A bit of googling, and it looks like Ruby has changed functionality, and broken things in 3.2.3
See – http://stackoverflow.com/questions/13348980/activerecord-to-i-method-removed-in-rails-3-2-9
Plus, there are some security issues to in Rails (of course).
*and* Kandan guys have cancelled it.
However someone else has forked it, and is updating it.
So, lets wipe all of that, and start again, shall we.
-> https://github.com/kandanapp/kandan
cd ..
rm -r kandan –with-prejudice
git clone https://github.com/kandanapp/kandan
edit the config/database.yaml
Add some sqlite3 (hey, the rest is, and at this point I just want something testable, I can tweak later).
production:
adapter: sqlite3
host: localhost
database: db/production.sqlite3
pool: 5
timeout: 5000
save.
exec rake db:create db:migrate kandan:bootstrap
Done. Yay.
Now to test.
bundle exec thin start
>> Using rack adapter
>> Thin web server (v1.3.1 codename Triple Espresso)
>> Maximum connections set to 1024
>> Listening on 0.0.0.0:3000, CTRL+C to stop
Ok, now *thats* finally working, I just need to setup a apache_proxy to that port on the actual url it will be sitting on, and finally it should work.
*Famous last words*.
Way more painful than it really needed to be. Grr…
Archives
- November 2024
- November 2019
- October 2019
- August 2019
- April 2019
- February 2017
- September 2016
- June 2016
- May 2016
- September 2015
- August 2015
- June 2015
- April 2015
- December 2014
- October 2014
- September 2014
- July 2014
- June 2014
- April 2014
- October 2013
- July 2013
- May 2013
- April 2013
- March 2013
- January 2013
- December 2012
- October 2012
- August 2012
- July 2012
- June 2012
- May 2012
- April 2012
- March 2012
- December 2011
- November 2011
- October 2011
- September 2011
- July 2011
- May 2011
- April 2011
- March 2011
- February 2011
- January 2011
- December 2010
- November 2010
- October 2010
- September 2010
- August 2010
- July 2010
- June 2010
- May 2010
- April 2010
- March 2010
- February 2010
- January 2010
- December 2009
- November 2009
- October 2009
- May 2009
- April 2009
- March 2009
- February 2009
- January 2009
- December 2008
- November 2008
- October 2008
- September 2008
Categories
- Apple
- Arcade Machines
- Badges
- BMW
- China Related
- Cool Hunting
- Exploits
- Firmware
- Food
- General Talk
- government
- IP Cam
- iPhone
- Lasers
- legislation
- MODx
- MySQL
- notice
- qmail
- requirements
- Reviews
- Service Issues
- Tao Bao
- Technical Mumbo Jumbo
- Things that will get me censored
- Travel
- Uncategorized
- Useful Info