Our underlying hardware uses Dell equipment for the most part inside China.
We use Debian as an OS, and Dell has some software available on their linux repo’s specifically tailored for their (often rebranded from other peoples) hardware.
Eg RAC (Remote Access) bits and pieces, RAID hardware, and BIOS updates.
So, enough about why, how do we use their repo?
First add it as a source
echo 'deb http://linux.dell.com/repo/community/deb/latest /' > /etc/apt/sources.list.d/linux.dell.com.sources.list
…then add gpg keys –
gpg --keyserver pool.sks-keyservers.net --recv-key 1285491434D8786F

gpg -a --export 1285491434D8786F | apt-key add -
apt-get update, to make sure that you have the latest repo bits added, then you can install their goodies.
apt-cache search dell will show you whats in their repo. Pick wisely!
1
Debian with Time Machine
As most of the posts out there are horribly outdated, or provide incorrect information for the current versions in use, here are my quick notes on setting up a time machine share.
First up –
apt-get install netatalk
Check /etc/netatalk/afpd.conf has something similarish to this:
# This line goes in /etc/netatalk/afpd.conf

- -tcp -noddp -uamlist uams_guest.so,uams_dhx.so,uams_dhx2.so -nosavepassword
Add a line for your required shares into /etc/netatalk/AppleVolumes.default
# Time machine share

/nas/backup/timemachine "TimeMachine" cnidscheme:dbd options:usedots,upriv,tm  allow:lawrence,eugene,janice
Change the folder / names / users to your own ones obviously!
If its not going to be a time machine share, remove the “,tm”
Restart Netatalk
/etc/init.d/netatalk restart
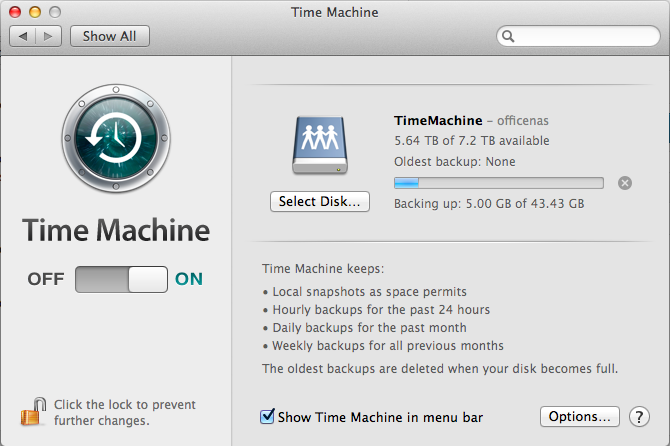
You should be able to see the share in Time Machine Preferences.
See if you can backup. If you get a failure eg “Error 2”, make sure that the folder you use has write privileges for your user, then try again.
All in all pretty painless.
Proof it works –
I usually do most of my work these days on an Air. While its decent, it is rather dinky spacewise, and I tend to keep it empty of music so I have (barely) enough space for my dev stuff, and various embedded cross compile environments.
I still like listening to music though, so I keep that on secondary and even tertiary storage. This typically is one of the fine HP N36L / N40L NAS devices that I’m fond of buying. I have a few HP N36/N40L nas boxen in various places, some of which contain my music, but most of which contain backups, onsite, and offsite, as you can never be too careful!
I know this quite intimately, as the very machine I’m typing this on had a catastrophic SSD failure only a week ago.
Luckily I didn’t lose too much work!
Enough with the background, and back to the plot.
As I was saying, I needed some tunes to harass the staff with listen to at work.
I looked at a couple of solutions, and decided on forked-daapd, as that allegedly could share music to iTunes from the NAS music folder without too many headaches.
Most instructions were of the sort:
apt-get install forked-daapd
pico /etc/forked-daapd.conf
[edit music folder, save file]
/etc/init.d/forked-daapd restart
In my case it didn’t work.
It also didn’t really give much clue that it wasn’t working, and their website didn’t have much to go on.
I looked at compiling from scratch, but the guy making it uses Clang and Java stuff to build, and it just looked like too much hassle.
So, I had to troubleshoot even though I didn’t really want to spend the time.
My initial issue was something like the below:
forked-daapd wouldn’t run successfully (but it also didn’t complain, sigh). I could see that it wasn’t running on any port specified, and checking kern.log showed it was crapping out silently.
Mar 20 21:03:09 officenas kernel: [ 3392.026612] forked-daapd[9848] trap invalid opcode ip:7f8d8772958e sp:7f8d8176bf60 error:0 in libdispatch.so.0.0.0[7f8d87722000+c000]
Running it in the foreground showed it was having issues creating the mDNS bits.
mdns: Failed to create service browser: Bad state
This eventually worked out to editing /etc/nsswitch.conf, adding the following to the host lines:
hosts: files mdns4_minimal dns mdns4
then restarting avahi
/etc/init.d/avahi-daemon restart
This got me past the bad state error, but then it was bombing out with a missing symbol avl_alloc_tree error.
I did an strace on the thing and found it was looking for libav under /lib vs under /var/lib
This was also documented here – http://blog.openmediavault.org/?p=552&cpage=1#comment-8376, although sadly not until I found out myself.
Looks like the zfsonlinux is the culprit here, as that puts libav files in that folder. Tsk tsk.
I removed those libav files – rm /lib/libav* ****as I know what I’m doing**** (don’t randomly erase stuff unless you’re 3000% sure!), and sure enough, forked-daapd started up, and started blatting tons of output to the logs in a happy manner.
iTunes was also finally happy, and could see my music. Yay.
Took me about 2 hours to figure out sadly, but at least I sorted it out.
Hopefully this will save someone else the headache when they google for the error(s)!
A while ago I wrote a post about sysfence. http://www.computersolutions.cn/blog/2010/12/debian-system-load-monitoring/
As it really was a while ago, I’ll recap quickly.
Sysfence is a small, light system monitoring app that has a nice heavy hand. If load goes over user defined limits, it will kill processes specified in its config (with extreme prejudice), and only start them up again once load is back under a certain level.
Got that?
Ok.
sysfence is rather good at what it does, fits my needs, so I’ve continued to use it over the years. One of the things I never got around to doing was making a startup script for it – this is mostly as it works as advertised – i’ve had zero issues!
That said, someone finally called my bluff and asked me for my startup script, which of course, I didn’t have, so I made one this morning.
The script is debian biased, and depends on where you installed sysfence.
You’ll need 3 files as below. Change settings to your needs.
1) Basic settings for sysfence
/etc/default/sysfence
SYSFENCE_ENABLE=true                       #Are we enabled (er, yes!)

DAEMON_OPTS=" /etc/sysfence/sysfence.conf" #Where is our ruleset

MAILTO="root"                              #Who to call in case of issues.
2) Config file for sysfence
/etc/sysfence/sysfence.conf
#[Your sysfence watch rules goes here]

#My example below
rule "Apache" {
la1 >= 6.00 or la5 >= 3.5
}
run '/usr/sbin/apache2ctl stop; sleep 120; /usr/sbin/apache2ctl start'
rule "warning" { la1 >= 6.00 } run once 'echo "Load High: $HOSTNAME" | mail $MAILTO'
3) Debian Startup script
#!/bin/sh

### BEGIN INIT INFO

# Provides:             sysfence

# Required-Start:       $local_fs $remote_fs

# Required-Stop:        $local_fs $remote_fs

# Should-Start:         $network

# Should-Stop:          $network

# Default-Start:        2 3 4 5

# Default-Stop:         0 1 6

# Short-Description:    Daemonized version of sysfence

# Description:          Starts the sysfence daemon

#                       /etc/default/sysfence.

### END INIT INFO

# Author: L. Sheed
#The complete default command that is being run is:
#sysfence " /etc/sysfence/sysfence.conf"
#obviously this will change with your variables,
#but the entire command is here for testing
# uses /etc/default/sysfence
NAME="sysfence"
SYSFENCE_ENABLE=false
DESC="sysfence Daemon"
DAEMON=`which sysfence`
DAEMON1="sffetch"
DAEMON2="sfwatch"
LOGFILE="/var/log/sysfence.log"
test -x $DAEMON || exit 0
if [ ! -e "${LOGFILE}" ]
then
touch "${LOGFILE}"
chmod 640 "${LOGFILE}"
chown root:adm "${LOGFILE}"
fi
. /lib/lsb/init-functions
if [ -f /etc/default/$NAME ]; then
. /etc/default/$NAME
case "x$SYSFENCE_ENABLE" in
xtrue|x1|xyes)
SYSFENCE_ENABLE=true
;;
*)
SYSFENCE_ENABLE=false
exit 1;
;;
esac
fi
case "$1" in
start)
PID=`ps aux | grep "$DAEMON1 " | grep -v grep | awk '{print $2}'`
if [ "x$PID" != "x" ]; then
echo `date` " * $NAME appears to be already running!" | tee -a $LOGFILE
exit
fi
if $SYSFENCE_ENABLE; then
echo "Starting $DESC"
log_daemon_msg "Starting $DESC" "$NAME"
$DAEMON $DAEMON_OPTS
PID=`ps aux | grep "$DAEMON1 " | grep -v grep | awk '{print $2}'`
echo " * $NAME PID is $PID"
echo "Watching:"
ps -ef | grep "$DAEMON2 " | grep "$PID"
else
log_warning_msg "Not starting $DESC $NAME, disabled via /etc/default/$NAME"
fi
;;
stop)
if $SYSFENCE_ENABLE; then
PID=`ps aux | grep "$DAEMON1 " | grep -v grep | awk '{print $2}'`
if [ "x$PID" = "x" ]; then
echo " * $NAME is not running"
else
echo " Stopping $NAME"
log_daemon_msg "Stopping $DESC" "$NAME"
kill $PID
fi
fi
;;
status)
PID=`ps aux | grep "$DAEMON1 " | grep -v grep | awk '{print $2}'`
if [ "x$PID" = "x" ]; then
echo " * $NAME is not running"
else
echo " * $NAME PID is $PID"
echo "Watching:"
ps -ef | grep "$DAEMON2 " | grep "$PID"
fi
;;
*)
N=/etc/init.d/$NAME
echo "Usage: $N {start|stop|status}" >&2
exit 1
;;
esac
exit 0;
You can download the init script here – sysfence init script for debian
Yikes, I almost forgot the other bit of this post. Tsk tsk…
The makefile doesn’t make in some of my servers. Its probably that dash shell expansion breaks stuff vs bash, but haven’t investigated it properly.
This is a simple fix
open up the makefile and change the expansion stuff to explicitly list the .o files.
eg
Makefile says:
CC=gcc

LDFLAGS=

CFLAGS=-Wall -O2

objects=conditions.o getstats.o mainloop.o cp2memory.o datastruct.o sysfence.o

parseopt=parseopt/{confread,lex,parse}.o

sys=sys/{exit,xalloc,log,communication,sighandlers,processtitle,users}.o

... (rest of the file)
Change to:
CC=gcc

LDFLAGS=

CFLAGS=-Wall -O2

objects=conditions.o getstats.o mainloop.o cp2memory.o datastruct.o sysfence.o

parseopt=parseopt/confread.o parseopt/lex.o parseopt/parse.o

sys=sys/exit.o sys/xalloc.o sys/log.o  sys/communication.o sys/sighandlers.o  sys/processtitle.o  sys/users.o

... (rest of the file)
make clean
and
make
Simple!
If you get similar messages to this when you use apt-get
perl: warning: Setting locale failed.
perl: warning: Please check that your locale settings:
	LANGUAGE = (unset),
	LC_ALL = (unset),
	LC_CTYPE = "UTF-8",
	LANG = "en_US"
    are supported and installed on your system.
perl: warning: Falling back to the standard locale ("C").
locale: Cannot set LC_CTYPE to default locale: No such file or directory
locale: Cannot set LC_MESSAGES to default locale: No such file or directory
locale: Cannot set LC_ALL to default locale: No such file or directory
and the advice to
dpkg-reconfigure locales
doesn’t work, then try this –
export LANGUAGE=en_US.UTF-8
export LANG=en_US.UTF-8
export LC_ALL=en_US.UTF-8
locale-gen en_US.UTF-8
dpkg-reconfigure locales
Short and sweet solution.
23
IPCam Hacking Part #7
Its been a while since I did any IPCam stuff, but I’ve now got most of the bits I needed together again, as well as a new laptop for dev work (curse the thieves that stole my last one!)
As we recall from previous work, the main binary for the IPCam runs off a file called “camera”.
As some people have discovered, it likes to reboot the equipment when its not happy (eg when the camera is unplugged, it has issues talking to hardware, or when someone has flashed the wrong firmware).
So, lets take a look at the executable to see what interesting bits we can find out from it.
#file camera tells us – BINFLT file format. Fileflags: RAM GZIP.
So we know its a compressed bflt elf – bflt stands for binary flat file, and it uses gzip compression. It also sits in ram.
A hex dump of camera shows this for the first few bytes:
62 46 4C 54 00 00 00 04 | bFLT . . . .
[Note – I had about 4 pages of #$%# work done on this, and WordPress decided to flake once finished due to an errant pasted 0x0 null byte above, cutting off the rest of my post, so this is going to be shorter and angrier than it was originally written.
Lesson learned, always save stuff elsewhere before posting.]
bFLT headers consist of 4 bytes identifier, then 4 bytes for the version number.
In this case, its a version 4 bFLT file.
If we take a look at the header file source for bflt at the uclinux site we see the below layout.
      struct flat_hdr {

      	char magic[4];

      	unsigned long rev;          /* version */

      	unsigned long entry;        /* Offset of first executable instruction with text segment from beginning of file */

      	unsigned long data_start;   /* Offset of data segment from beginning of file */

      	unsigned long data_end;     /* Offset of end of data segment from beginning of file */

      	unsigned long bss_end;      /* Offset of end of bss segment from beginning of file */

      	/* (It is assumed that data_end through bss_end forms the bss segment.) */

      	unsigned long stack_size;   /* Size of stack, in bytes */

      	unsigned long reloc_start;  /* Offset of relocation records from beginning of file */

      	unsigned long reloc_count;  /* Number of relocation records */

      	unsigned long flags;

      	unsigned long filler[6];    /* Reserved, set to zero */

      };
It doesn’t match up properly, as the sizes or code don’t make sense (yet).
If we take a closer look, the header file has this to say:
      #define FLAT_FLAG_RAM    0x0001 /* load program entirely into RAM */

      #define FLAT_FLAG_GOTPIC 0x0002 /* program is PIC with GOT */

      #define FLAT_FLAG_GZIP   0x0004 /* all but the header is compressed */
Ahah!
So, all but the header is compressed for a version 4 file.
Lets check this out, and see if its correct.
Excluding the initial file identifier (bFLT), our header consists of 10 longs. Thats 40 bytes long.
Lets jump to offset 40 in the file, and see what we have there.
1F 8B 08
Those of you familiar with gzipped files will recognize that – its the gzip header identifier. So, so far, so good.
Compressed files aren’t very useful to us, as they don’t show much text content.
So, we could unzip the file to take a look at whats inside.
There are a number of ways we can unzip this (zcat, gzip -d etc), but I’m going to be lazy, and use someone elses premade code.
See below for some perl to safely uncompress our binary , taken from here – http://www.openwiz.org/wiki/BWFWTools_Release
#!/usr/bin/perl
=pod
=head1 NAME
gunzip_bflt - convert gzip-compressed bFLT executable files into uncompressed bFLT
=head1 SYNOPSIS
gunzip_bflt zipped_blflt_files...
=head1 DESCRIPTION
Convert gzipped bFLT files into an uncompressed bFLT files.
The unzipped bFLT files have B<.unz> added to their file names.
If the file is already ungzipped bFLT, it isn't converted,
but a warning is printed.
=head1 PREREQUSITES
Uses packages C
=cut
use strict;
use warnings;
# gunzip_bflt zipped_blflt_files...
use IO::Uncompress::Gunzip qw/gunzip $GunzipError/;
use POSIX;
# Read and return the BFLT header
# prints a warning and returns undef on error.
# $bfltZfh is the BFLT file handle,
# $bfltZ is the BFLT file name (for error messages)
sub get_bflt_hdr($$) {
my ($bfltZfh, $bfltZ) = @_;
my $buf;
my $res = sysread $bfltZfh, $buf, 64;
if(!defined($res)) {
warn "$bfltZ: $!\n";
return undef;
}
if($res < 64) {
warn "$bfltZ: Too short!\n";
return undef;
}
# Align the buffered file handle with the unbuffered
seek $bfltZfh, sysseek($bfltZfh, 0, SEEK_CUR), SEEK_SET;
return $buf;
}
# Expand a gzipped BFLT intoi an ungziped BFLT
sub expand_blftZ($) {
my ($bfltZ) = @_;
my $bflt = $bfltZ . '.unz';
if(!open BFLTZ, '<' . $bfltZ) {
warn "$bfltZ: $!\n";
return;
}
my $hdr = get_bflt_hdr(\*BFLTZ, $bfltZ);
if(!defined $hdr) {
return;
}
if(substr($hdr, 0, 4) eq 'bFLT') {
# Pack/unpack template for the BFLT header, 4 bytes ACSII,
# 15 little-endian words
my $hdrFmt = 'a4 N15';
my @unpHdr = unpack $hdrFmt, $hdr;
# Test the header flags 'gzipped' bit
if($unpHdr[9] & 4) {
# Unset the header flags 'gzipped' bit, and make a new header
$unpHdr[9] &= ~4;
$hdr = pack $hdrFmt, @unpHdr;
if(open BFLT, '>' . $bflt) {
# Write the header
syswrite BFLT, $hdr;
# Align the buffered file handle with the unbuffered
seek BFLT, sysseek(BFLT, 0, SEEK_CUR), SEEK_SET;
# Ungzip from the compressed file into the uncompressed
# file
gunzip \*BFLTZ => \*BFLT
or die "gunzip failed: $GunzipError\n";
close BFLTZ;
} else {
warn "$bflt: $!\n";
return;
}
} else {
warn "$bfltZ: Not a compressed bFLT file, not gunzipped\n";
return;
}
} else {
warn "$bfltZ: Not a bFLT file\n";
}
close BFLT;
}
# Expand the arguments...
foreach my $bfltZ (@ARGV) {
expand_blftZ($bfltZ)
}
If we run that on our ‘camera’ executable, we should have an uncompressed bFLT file as output ‘camera.unz’.
Lets run strings on ‘camera.unz’, to see what interesting text content is in there.
Some interesting things of note:
From the variables list below, looks like there is a way to turn off the LED…
led_mode
ptz_center_onstart
ptz_auto_patrol_interval
ptz_auto_patrol_type
ptz_patrol_h_rounds
ptz_patrol_v_rounds
ptz_patrol_rate
ptz_patrol_up_rate
ptz_patrol_down_rate
ptz_patrol_left_rate
ptz_patrol_right_rate
We also have a full list of the internal cgi functions now, which might prove useful…
snapshot.cgi
get_status.cgi
get_camera_params.cgi
decoder_control.cgi
camera_control.cgi
reboot.cgi
restore_factory.cgi
upgrade_firmware.cgi
upgrade_htmls.cgi
get_params.cgi
set_alias.cgi
set_datetime.cgi
set_users.cgi
set_devices.cgi
set_network.cgi
set_wifi.cgi
set_pppoe.cgi
set_upnp.cgi
set_ddns.cgi
set_ftp.cgi
set_mail.cgi
set_alarm.cgi
videostream.cgi
video.cgi
test_ftp.cgi
test_mail.cgi
set_misc.cgi
get_misc.cgi
set_p2p.cgi
get_p2p.cgi
set_forbidden.cgi
get_forbidden.cgi
set_decoder.cgi
comm_write.cgi
wifi_scan.cgi
get_wifi_scan_result.cgi
get_log.cgi
check_user.cgi
check_user2.cgi
backup_params.cgi
restore_params.cgi
erase_allparams.cgi
set_mac.cgi
do_cgi: unknown cgi
You can see that Maverick decided to fake the X-Mailer smtp header (Foxmail is a commonly used Mail Program in China).
MIME-Version: 1.0
Content-Type: multipart/mixed;
boundary=”smtp_msg_boundary”
X-Mailer: Foxmail
–smtp_msg_boundary
Content-Type: image/jpeg;
name=”%s(%s)_%c%s.jpg”
Content-Transfer-Encoding: base64
–smtp_msg_boundary–
I’m interested in why the firmware reboots on some firmwares though, so lets take a deeper look at the code.
To do so, we’ll need to decompile it.
The better equipped than me will probably use something like the nice ARM decompiler plugin for IDA-Pro called Hex-Ray. Unfortunately that costs $$$, and I’m just a hobbyist.
Luckily there is a free windows decompiler called arm2html available here.
arm2html doesn’t handle compressed bFLT files though, so you’ll need to point it at the freshly ungzipped code you got from the perl script above.
As we know that the camera executable reboots after issuing i2c errors, the first piece of decompiled code I wanted to look at was the first piece of code related to i2c:
(excerpted piece below)
02588:  e1a0c00d	mov	ip, sp

00258c:  e92dd810	stmdb	sp!, {r4, fp, ip, lr, pc}

002590:  e24cb004	sub	fp, ip, #4	; 0x4

002594:  e24dd00c	sub	sp, sp, #12	; 0xc

002598:  e59f023c	ldr	r0, [pc, #572] ; [0027dc]	"/dev/i2c0"

00259c:  e3a01002	mov	r1, #2	; 0x2

0025a0:  eb00c9b8	bl	034c88(c9b8)

0025a4:  e1a04000	mov	r4, r0

0025a8:  e3540000	cmp	r4, #0	; 0x0

0025ac:  aa000003	bge	0025c0(3) ; jump

0025b0:  e59f0228	ldr	r0, [pc, #552] ; [0027e0]	"%s: can not open i2c device"

0025b4:  e59f1228	ldr	r1, [pc, #552] ; [0027e4]	"zoom_test"

0025b8:  eb00bc86	bl	0317d8(bc86)

0025bc:  e91ba810	ldmdb	fp, {r4, fp, sp, pc} ; return
The full piece of code essentially loops 7 times trying to open the i2c sensor to call the zoom_test code. If it fails, it calls for a reboot.
Success proceeds to setting up the camera.
We know from our boot log that my camera in this model is a Sonix288.
dvm usb cam driver 0.0.0.0 by Maverick Gao in 2006-8-12
usb.c: registered new driver dvm
dvm usb cam driver 0.1 for sonix288 by Maverick Gao in 2009-4-20
usb.c: registered new driver dvm usb cam driver for sonix288
The Sonix288 is a chipset SoC that will talk to an attached image sensor via i2c. I think that the Sonix288 is probably a standard USB 1.1/2.0 compatible UVC (USB Video Class) chipset from a bit of googling about it.
We don’t have the source for our particular camera though (its secret, much like the data sheets, grrr…).
What to do?
Linux generally uses spcaxxx (and UVC) drivers for talking to camera’s, so lets start taking a look there.
http://read.pudn.com/downloads127/sourcecode/unix_linux/539050/zc030x/zc030x_cameras.c__.htm
http://www.hackchina.com/r/54654/zc030x_i2c.c__html
Taking a look at some spcaxxx driver header files and code shows that i2c is setup by first getting the USB VID, USB PID of the hardware, then talking to the i2c device on that hardware.
So, we need to know what our USB VID and PID’s are.
Generally all devices from a given manufacturer will have a single VID as issued by the USB Forum.
If we search through the code for Sonix, it appears that Sonix’s VID is 0x0c45
{USB_DEVICE(0x0c45, 0x607c)}, /* Sonix sn9c102p Hv7131R */
(from http://linux.downloadatoz.com/linux-kernel-webcams-driver-gspca-spca5xx/ )
The Linux UVC page confirms this http://www.ideasonboard.org/uvc/.
(Listings of webcams excerpted – note the VID of 0c45)
0c45:6310 USB 2.0 Camera (Trust Chat Webcam) Sonix Technology
0c45:63e0 Sonix Integrated Webcam (Dell notebooks) Sonix Technology
0c45:63ea Laptop Integrated Webcam 2M (Dell Studio 1555 notebooks) Sonix Technology
0c45:6409 USB 2.0 Camera (Nokia Booklet 3G netbooks) Sonix Technology
0c45:6415 Laptop Integrated Webcam 1.3M (Dell Inspiron 13z notebooks) Sonix Technology
Ideally at this point, I’d have a data sheet for the Sonix288 chip, but the #$%#$ people at Sonix don’t seem to publish one for us mere mortals.
So, we’ll use the next best thing, and use one for their other chipsets.
SN9C1xx PC Camera Controllers –
http://ww2.cs.fsu.edu/~rosentha/linux/2.6.26.5/docs/video4linux/sn9c102.txt
There is a lot of good useful info in that particular file. We don’t know how much is useful yet, but generally chipsets are quite similar for a given range.
Image sensor / SN9C1xx bridge | SN9C10[12] SN9C103 SN9C105 SN9C120
——————————————————————————-
HV7131D Hynix Semiconductor | Yes No No No
HV7131R Hynix Semiconductor | No Yes Yes Yes
MI-0343 Micron Technology | Yes No No No
MI-0360 Micron Technology | No Yes Yes Yes
OV7630 OmniVision Technologies | Yes Yes Yes Yes
OV7660 OmniVision Technologies | No No Yes Yes
PAS106B PixArt Imaging | Yes No No No
PAS202B PixArt Imaging | Yes Yes No No
TAS5110C1B Taiwan Advanced Sensor | Yes No No No
TAS5110D Taiwan Advanced Sensor | Yes No No No
TAS5130D1B Taiwan Advanced Sensor | Yes No No No
Interesting… Hmm, so it seems that Sonix uses a SN9Cxxx for its product names.
Lets google for SN9C288 instead, and see if we get any results.
Bingo.
From here – www.lh-invest.com/en/showpro.asp?id=308&proid=3
* MCU: SONIX SN9C288
* Sensor: MICRON K14 1,300,000 pixels CMOS
* 5-glass lens,can reach 30 frames/sec. under 640*480
resolutions,software insertion value 1,300,000 pixels
* Focus range: 3CM to infinitude farness
* Dynamic video resolutions: 1280*960 pixels(max.)
* Support microsoft UVC driver-free function
* Support RGB24 and YUY2 two kinds of image formats
* USB 2.0 port,support plug and play
* Human face tracking function
Seems our chipset is finally getting some details.
Max resolution, video modes, face tracking capability, etc
We also know that it can be paired with a Micron K14 image sensor.
Further googling reveals it can also be paired with the MI-0360 (which is listed above).
SN9C288+MI0360
This page also gives us a possible pid:
“Device Name: ?USB Video Device
PnP Device ID: VID = 0C45 PID = 62C0
Serial Number: 6&&2BCAFCF3&&0&&0000
Revision: (Information not returned)Device Type: Standard USB device – USB2.0 High-Speed
Chip Vendor: SONiX
Chip Part-Number: SN9C288PFG
In Microsoft parlance, this looks like this USB\VID_0C45&PID_62C0
Googling that gives us a product with windows drivers (HP) and more.
http://www.downloadwindowsdrivers.info/usb/vid_0c45/pid_62c0/mi_00/
Also says that these product drivers also work.
USB\VID_0C45&PID_62C0 ;SN9C211/213/230
That means we can take a look at their inf file and see if anything useful in there. Unfortunately I did, and there isn’t much 🙁
Sonix has datasheets for some of their other products available though (SN9C2028AF).
First, a quick overview of UVC devices (snarfed from elsewhere).
USB devices are required by the USB specification to respond to the Host device (the computer) with a stream of data describing the device and the interface to the device. This “Device Descriptor” includes vendor, product, and version IDs specific to the manufacturer, the product, and the version of the product. In addition to the device information, the descriptor also includes information on how to talk to the device through a series of “Interface Descriptors”.
The device descriptor for Video is 13.
#define USB_DEVICE_CLASS_VIDEO 0x0E
In addition to the end points described in the interface descriptors, all USB devices support a control pipe to end point 0. This is used to manipulate some of the low level functions of the device such as power, and error status queries.
The USB Video specification describes two interfaces, a control interface to manage the camera, and a stream interface to send or receive video information from the camera.
The control interface is used to manipulate the camera parameters such as brightness and contrast as well as to negotiate a valid set of the video format, frame size, frame rate, and compression rates parameters that describe a video stream. In addition, the control interface can ask the camera for still frame.
In the datasheet for the 2028, it basically states that they use end point 0 for STD Commands, with a maximum packet size of 64 bytes.
Further googling reveals that there is no special driver for it, its a plain UVC 1.0 device.
usb 1-2: New USB device strings: Mfr=2, Product=1, SerialNumber=0
usb 1-2: Product: USB 2.0 Camera
usb 1-2: Manufacturer: Sonix Technology Co., Ltd.
Linux video capture interface: v2.00
uvcvideo: Found UVC 1.00 device USB 2.0 Camera
Further heavy baidu’ing in Chinese sites finds that the SN9C213 and SN9C288 are the same pretty much.
其内部编号是SN9C213,功能完全和SN9C288一样。From http://ep.cbifamily.com/2007/04/44/87819.html
David McCullough very nicely also compiled in usb debug support on his kernel and ran some tests too:
> > > T: Bus=01 Lev=01 Prnt=01 Port=00 Cnt=01 Dev#= 2 Spd=12 MxCh= 0
> > > D: Ver= 2.00 Cls=ef(unk. ) Sub=02 Prot=01 MxPS=64 #Cfgs= 1
> > > P: Vendor=0c45 ProdID=62f1 Rev= 1.00
> > > S: Manufacturer=Sonix Technology Co., Ltd.
> > > S: Product=USB 2.0 Camera
> > > C:* #Ifs= 2 Cfg#= 1 Atr=80 MxPwr=500mA
> > > I: If#= 0 Alt= 0 #EPs= 1 Cls=0e(unk. ) Sub=01 Prot=00 Driver=(none)
> > > E: Ad=83(I) Atr=03(Int.) MxPS= 16 Ivl=6ms
> > > I: If#= 1 Alt= 0 #EPs= 0 Cls=0e(unk. ) Sub=02 Prot=00 Driver=(none)
> > > I: If#= 1 Alt= 1 #EPs= 1 Cls=0e(unk. ) Sub=02 Prot=00 Driver=(none)
> > > E: Ad=81(I) Atr=05(Isoc) MxPS= 128 Ivl=1ms
> > > I: If#= 1 Alt= 2 #EPs= 1 Cls=0e(unk. ) Sub=02 Prot=00 Driver=(none)
> > > E: Ad=81(I) Atr=05(Isoc) MxPS= 256 Ivl=1ms
> > > I: If#= 1 Alt= 3 #EPs= 1 Cls=0e(unk. ) Sub=02 Prot=00 Driver=(none)
> > > E: Ad=81(I) Atr=05(Isoc) MxPS= 512 Ivl=1ms
> > > I: If#= 1 Alt= 4 #EPs= 1 Cls=0e(unk. ) Sub=02 Prot=00 Driver=(none)
> > > E: Ad=81(I) Atr=05(Isoc) MxPS= 600 Ivl=1ms
> > > I: If#= 1 Alt= 5 #EPs= 1 Cls=0e(unk. ) Sub=02 Prot=00 Driver=(none)
> > > E: Ad=81(I) Atr=05(Isoc) MxPS= 800 Ivl=1ms
> > > I: If#= 1 Alt= 6 #EPs= 1 Cls=0e(unk. ) Sub=02 Prot=00 Driver=(none)
> > > E: Ad=81(I) Atr=05(Isoc) MxPS= 956 Ivl=1ms
The uvc driver status is obviously an issue as we’re on a 2.4 Kernel. No uvc support on 2.4.
So…, we either compile 2.6 with UVC support, and reflash, or we continue to use Mavericks driver in lieu of any source.
With that, you have some background on things..
Now, why does this cause a reboot on some machines?
Well, the hardware is different, so the hardware isn’t seen by the driver.
From looking at a few different boards I have seen a few devices id’s used.
So far I have seen these:
vid_0c45/pid_62f1 – (The Sonix Chipset allows you to write pid’s into the device, so this can be changed, or alternately change the driver from 62c0 to 62f1 on these models)
vid_0c45/pid_62c0 – (Our driver is compiled for this)
For those of you with rebooting machines, remove ‘camera &’ from the boot sequence, recompile the kernel with USB verbose debug message logging, and start posting your vid/pid’s here so we can compare, and add to the list.
If someone twisted my arm I could probably oblige…
References:
http://www.beyondlogic.org/uClinux/bflt.htm – bFLT file format details.
http://www.garykessler.net/library/file_sigs.html – Common file format headers
http://www.openwiz.org/wiki/BWFWTools_Release – bFLT unzip and other tools
http://www.hex-rays.com – IDA Pro and Hex-Ray ARM Decompiler
http://www.sigmaplayer.com/filebase.php?d=1&id=13&c_old=5&what=c&page=1 – Arm Decompiler
http://www.ideasonboard.org/uvc/
http://read.pudn.com/downloads127/sourcecode/unix_linux/539050/zc030x/zc030x_cameras.c__.htm
http://www.hackchina.com/r/54654/zc030x_i2c.c__html
http://linux.downloadatoz.com/linux-kernel-webcams-driver-gspca-spca5xx/
http://ww2.cs.fsu.edu/~rosentha/linux/2.6.26.5/docs/video4linux/sn9c102.txt
Files from this post:
(arm2html.exe, bFLT gunzip perl script, original camera bFLT, uncompressed camera bFLT, and camera asm source )
Camera Disassembly, unpacked bFLT and Tools
One or two of our servers have been a little bit overloaded recently.
They’re going to be replaced with beefier machines, but due to a number of issues I haven’t been able to replace them yet.
Issue #1 – Pre expo, we weren’t allowed to replace anything.
Issue #2 – Post Expo, I’m no longer allowed in the data center!
We’re working on sorting issue #2 out, but in the interim I need to keep the older machines running.
I was previously using Monit to monitor system load.
Monit would be a good solution – it has a web ui, it can stop services if system load goes too high, and generally works when everything else is failed. This is great when things go poopy, but it has one fatal issue.
It doesn’t know how to restart stuff if load is back to normal.
This typically means that something will put the server load into unusability for a sustained period of time (due to lots of visitors), monit will go ooh, apache has gone awol, and stop it.
Unfortunately if its back to normal, monit doesn’t have a way to start it up again, so I need to manually go to the monit page, and start the service. I do get emailed on things like this, but it leads to complaints from the 2 clients that appear to monitor their particular websites more than monit does.
So, I’ve been looking at other solutions.
One such solution is sysfence
While sysfence is severly underdocumented, the examples provided don’t even work!, and appears to be abandoned, it does do the job.
Sysfence is a no bells and no whistles precursor to monit, but it has that killer feature that monit is missing.
So, how do we use sysfence?
apt-get install sysfence
Will install it, but unfortunately no config is installed.
So, start off by creating a /etc/sysfence folder
mkdir /etc/sysfence

cd /etc/sysfence
We’ll need to create a config file for it, so
pico sysfence.conf
My sample sysfence script is below (explanation underneath script)
rule "ApacheStop" {

   la1 >= 10.00 or la5 >= 6.0

}

run '/etc/init.d/apache2 stop;'
rule "ApacheStart" {

 la1 <=2
}
run once  '/etc/init.d/apache2 start;'
rule "warning" { la1 >= 8.00 } run once 'echo "Load High: BACKUP" | mail lawrence@computersolutions.cn'
I'm having issues with apache causing load to rocket, so I've setup some rules as follows:
If load average for 1 minute > 10 (ie server is going bonkers), and load average for the last 5 minutes > 6 then stop apache.
if load average for 1 minute > 8 send me an email.
if load average for 1 minute < 2 then start apache. This will only run one time if load is below 2.
The documentation http://sysfence.sourceforge.net/ goes over how to write a rule. Note that the examples are broken;
eg
if {

    la1 >= 8.00

} run once 'echo "SHOW FULL PROCESSLIST" | mysql | mail my@email.com'
Issue? All rules need to have a "rule name" specified.
So a corrected working version would be:
if  "some rule" {

    la1 >= 8.00

} run once 'echo "SHOW FULL PROCESSLIST" | mysql | mail my@email.com'
Back to our setup..
Now we've setup a ruleset, we need to run it. Calling sysfence /etc/sysfence.conf
Will run it as a daemon.
ps -ef shows our rulesets running:
root 7260 1 0 05:51 ? 00:00:01 sffetch
root 7261 7260 0 05:51 ? 00:00:00 sfwatch 'warning'
root 7262 7260 0 05:51 ? 00:00:00 sfwatch 'ApacheStop'
root 7263 7260 0 05:51 ? 00:00:00 sfwatch 'ApacheStart'
sffetch is the daemon, and sfwatch are the rules it runs.
As sysfence is quite rudimentary, you'll need to kill it if you change rules.
You'll also need to add it to your startup scripts or create one. I'll be lazy and not go over that right now. If people are interested, add a comment, and I'll put something up.
Sysfence can be downloaded here - http://sysfence.sourceforge.net/ (or via apt-get if on a Debian based OS)
Man page for sysfence below (note examples require adding "rulename" after if... { or rule ... {):
NAME
sysfence - system resources guard for Linux
SYNOPSIS
sysfence
<configuration file> [<configuration file> ...]
DESCRIPTION
Sysfence is a resource monitoring tool designed for Linux machines.
While running as daemon it checks resource levels and makes desired
action if some values exceed safety limits.
Sysfence can be used for notifying system administrators when something
goes wrong, stopping services when system performance is dropping too
low and starting them when it's going up again, periodically restarting
memory-leaking processes, dumping system statistics in critical situations.
Sysfence can monitor following resource levels: load average, used and
free memory amount, used and free swap space.
USAGE
Sysfence reads it's configuration from file(s) specified in argument
list. Config files may contain one or more rules describing conditions
and actions to be performed.
Rule has syntax like this:
if {
resource1 > limit1
or
{ resource2 < limit2 and resource3 < limit3 }
}
run once 'command-to-be-run'
The block enclosed within {} brackets describes condition. When it's
result is TRUE, following command is invoked.
The once keyword is optional. If present, the command is executed only
once after condition becomes TRUE. Next execution will take place only
if condition becomes FALSE and then TRUE again. Without once keyword,
command is invoked periodically, after every resource check that gives
TRUE, no matter what was the condition result before.
Command specified right after run keyword is passed to /bin/sh, so it
may contain more than one instruction or even whole script. But be
careful - rule checking is suspended unless command execution has been
completed! (Other rules are unaffected.)
As resources, following ones can be given:
- la1
- - load average during last minute.
- la5
- - load average during last 5 minutes.
- la15
- - load average during last 15 minutes.
- memfree
- - lower limit for free memory amount.
- memused
- - upper limit for memory used by processes.
- swapfree
- - lower limit for free swap space.
- swapused
- - upper limit for swap space in use.
EXAMPLES
Do you have problems with MySQL server choking and freezing whole
system? I do. To find queries that cause problems, you may use:
if {
la1 >= 8.00
} run once 'echo "SHOW FULL PROCESSLIST" | mysql | mail my@email.com'
Of course, that wouldn't prevent your system from being blocked, but
following rule could. MySQL will be restarted if LA for last minute
is over 10.0 or LA for last five minutes is over 6.0.
if { la1 >= 10.00 or la5 >= 6.0 }
run '/etc/rc.d/init.d/mysql stop; sleep 120; /etc/rc.d/init.d/mysql
start'
We may also restart some services that probably have memory leaks and
use lots of swap space if not restarted periodically. Let's assume
that 256MB of used swap is enough to give our Zope server a break.
if {
swapused >= 256M
} run '/etc/rc.d/init.d/zope restart'
We may also alert admins... Notice that you don't have to be r00t:
if {
la15 > 4.0
and
{
swapfree < 64M
or
memfree < 128M
}
} run 'echo "i wish you were here..." | sendsms +48ADMINCELLPHONE'
Using sysfence version 0.7 or later you may give rule a name that will
be used in logs:
rule "high load" { la1 > 3.0 and la15 > 2.0 } log
rule keyword has the same meaning as if. There are also synonymes for
other keywords. Detailed list is included within sysfence package.
You can find an example config file in /usr/share/doc/sysfence/example.conf.
AUTHOR
Sysfence was written by Michal Saban (emes at pld-linux org) and
Mirek Kopertowski (m.kopertowski at post pl)
This manual page was created by Lukasz Jachowicz <honey@debian.org>,
for the Debian project (but may be used by others). It is based on
the http://sysfence.sf.net/ page.
6
IP Cam Hacking – pt#6
I’ve uploaded a zip of my built test image here. I’ve only included telnetd, and ftpd, as the sshd binary is very large, and won’t fit into our rom image space!
If someone is willing to test, feel free.
Test Rom with FTPD and TELNETD binaries added
This rom is 700k+- vs the normal 550kb. So this may / may not overwrite the web ui.
As China’s firewall is being particularly obnoxious this week as to what I can view on the web, I can’t actually get to the info I need to see where they typically write the UI to in rom.
In theory, we should be able to write to the same base address via the boot loader.
The original rom is written here –
Image: 6 name:romfs.img base:0×7F0E0000 size:0×0008D000 exec:0×7F0E0000 -a
And I’m pretty sure that the UI gets written somewhere after this, and not as a separate image. I’d have to run Windows and a sniffer to test this though (using their firmware update software).
Our boot logs show that linux blkmem driver is set to view the whole area from 0×7F0E0000 through to 0x7F16D3FF, so we should easily have 200kb to waste^Hplay with.
From my boot logs:
Blkmem 1 disk images:
0: 7F0E0000-7F16D3FF [VIRTUAL 7F0E0000-7F16D3FF] (RO)
Obstensibly, this should be a matter of going to the bootloader over serial, then uploading our img file.
Suggest rename from testrom.img to romfs.img to be consistent.
It should be something like this:
bootloader > del 6
(delete the current romfs.img)
bootloader > fx 6 romfs.img 0x7f0e0000 0x7f0e0000 -a
Waiting for download
Press Ctrl-x to cancel … (while it waits, you have to select Transfer > Send File in Hyperterminal menu, choose the Xmodem protocol and select my rom image)
CCCCCCCCCCCCCCCCCCCCCCCCCCCCCCCC
Flash programming …
bootloader> boot
Then see what happens in the logs.
It should boot, then attempt to run telnetd and ftpd.
That probably WON’T work just yet, as they’ll complain about missing /etc/ config files.
You might also be missing the UI (as I think this gets written somewhere after our romfs.img in flash)
Send me the serial logs in the comments, and I can fix that up, and repackage.
I also know why the alleged clones (NB they’re not f..king clones sigh, they’re all made by 1 manufacturer here for different people, including FOSCAM) don’t work. The linux.bin for older firmware is set to boot from 0x7f0D0000 as opposed to 0x7f0e0000, so image 6 and 7 both need to be reflashed.
Also of note is that the newer units have gone cheaper, and use 2M flash, previous units had 4M.
uCLinux reports 8M, but its not talking about Flash, just RAM
Be prepared to brick (not completely, as we have a bootloader, and can reflash the original firmware) if it doesn’t work.
If my rom above doesn’t work initially for you, try flashing this linux.zip before reverting, and see if that helps it boot.
eg
bootloader> del 7
bootloader> fx 7 linux.zip 0x7f020000 0x8000 -acxz
Waiting for download
Press Ctrl-x to cancel ... (while it waits, you have to select Transfer > Send File in Hyperterminal menu, choose the Xmodem protocol and select my linux.zip)
CCCCCCCCCCCCCCCCCCCCCCCCCCCCCCCC
Flash programming ...
bootloader> fx 6 romfs.img 0x7f0e0000 0x7f0e0000 -a
Waiting for download
Press Ctrl-x to cancel ... (while it waits, you have to select Transfer > Send File in Hyperterminal menu, choose the Xmodem protocol and select my rom image)
CCCCCCCCCCCCCCCCCCCCCCCCCCCCCCCC
Flash programming ...
Why aren’t I doing this?
Mostly as I don’t currently have a good serial connection, I’m waiting on headers. Currently I have to hold the serial ports onto the board with fingers, and thats less than reliable!
I should get around to fixing that soonish though, I’m interested in testing this myself…
I’d also appreciate the French contingent adding some info. I’m particularly interested in paillassou’s board photos, and any other firmware people have found for these so I can compare.
I can’t get to Picasa, GadgetVictims, IrishJesus now in China. Grrr.
Yes, I know, use a VPN or proxy… Unfortunately what we do precludes doing so, as I’d probably get told off by our beloved government here, and thats not worth the risk…
Comments please.
30
IP Cam Hacking – pt#5
So far in this series, we’ve learnt a few things.
First, is that this hardware is quite nice for hacking purposes, as they’ve left the uBoot in a nice state, and have easily accessible debug ports.
Second is that doing this kind of thing isn’t really that complicated, and can be quite fun.
We’re pretty much ready to start doing our own coding, as we know how the images are packed, and we can use the uBoot to either flash onl the romfs on or own, or alternately roll a complete linux + romfs binary image.
For that, we’ll need to be ready to roll up our sleeves, and actually do some development (finally!).
Getting a development environment setup is our next step, as we’re ready to test out adding binaries.
I’m using Debian, but most Linux environments should be similar. OSX is BSD based, and more of a pain due to Apple not putting everything needed in the normal places, so I’m doing this in a VM on my Macbook under Debian.
Go grab a copy of “NUC700 Series MCU uCLinux BSP.zip” from here http://www.metavert.com/public/NO-SUPPORT/
Setup a VM for Debian (not going to cover that) or install Debian or similar.
Copy the zip file to /home in the OS you use.
cd /home

mkdir N745

cd N745

unzip ../NUC700\ Series\ MCU\ uCLinux\ BSP.zip
You should now see something like this:
:/home/N745/NUC700 Series MCU uCLinux BSP# ls -al

total 68

drwxr-xr-x 6 root root  4096 2009-05-15 20:02 .

drwxr-xr-x 3 root root  4096 2010-04-30 02:23 ..

drwxr-xr-x 3 root root  4096 2009-05-15 20:06 bootloader

drwxr-xr-x 2 root root  4096 2009-05-15 20:03 bsp

drwxr-xr-x 2 root root  4096 2009-05-15 20:02 doc

drwxr-xr-x 4 root root  4096 2009-05-15 20:02 mkrom

-r--r--r-- 1 root root 44632 2009-03-27 11:49 NUC700 uClinux BSP Release Note.pdf

debian:/home/N745/NUC700 Series MCU uCLinux BSP#
Unfortunately the build *really* doesn’t like long filenames, so lets move all this to the N745 folder, and get rid of the annoyingly named folder.
/home/N745/NUC700 Series MCU uCLinux BSP# mv * ..

/home/N745/# cd ..

/home/N745/# rm -r NUC700\ Series\ MCU\ uCLinux\ BSP/
We still need to unzip the BSP, as its compressed, so go into bsp
/home/N745/# cd bsp

/home/N745/bsp# tar -xzvf NUC700BSP.tar.gz

NUC700BSP/

NUC700BSP/arm_tools.tar.gz

NUC700BSP/install.sh

NUC700BSP/arm_tools_3.3.tar.gz

NUC700BSP/build.tar.gz

NUC700BSP/applications.tar.gz

NUC700BSP/uClinux-dist.tar.gz
Yay, yet another bloody subdirectory. Sigh.
/home/N745/bsp# cd NUC700BSP

debian:/home/N745/bsp/NUC700BSP# ls -al

total 183300

drwxr-xr-x 2 shanghaiguide shanghaiguide     4096 2009-03-26 22:38 .

drwxr-xr-x 3 root          root              4096 2010-04-30 02:29 ..

-rw-r--r-- 1 shanghaiguide shanghaiguide 29521418 2009-03-26 21:55 applications.tar.gz

-rw-r--r-- 1 shanghaiguide shanghaiguide 43742203 2009-03-26 21:22 arm_tools_3.3.tar.gz

-rw-r--r-- 1 shanghaiguide shanghaiguide 36108739 2009-03-26 21:11 arm_tools.tar.gz

-rw-r--r-- 1 shanghaiguide shanghaiguide  5643452 2009-03-26 21:24 build.tar.gz

-rwxr--r-- 1 shanghaiguide shanghaiguide     4370 2009-03-26 22:31 install.sh

-rw-r--r-- 1 shanghaiguide shanghaiguide 72439431 2009-03-26 20:53 uClinux-dist.tar.gz

debian:/home/N745/bsp/NUC700BSP#
Run the install – I’ve decided to install the whole shebang to /home/N745
Note – The observant amongst you will notice I’m running this as root.
This is NOT recommended. I’m running under a VM solely created to play with this, so I don’t really care if I break it (as I can roll back to the initial install image fairly easy in vmware). Don’t do this yourselves (unless you want to break things).
debian:/home/N745/bsp/NUC700BSP# ./install.sh

firstly install arm_tools.tar.gz -->/usr/local/

wait for a while

successfully finished installing arm_tools.tar.gz

now begin to install build.tar.gz,applications.tar.gz and uClinux-dist.tar.gz

Please enter your absolute path for installing build.tar.gz, applications.tar.gz and uClinux-dist.tar.gz:

/home/N745

/home/N745 has existed

please wait for a while, it will take some time

whole installation finished successfully!

debian:/home/N745/bsp/NUC700BSP#
We finally have our build environment unzipped, and its sitting in nuc700-uClinux.
debian:/home/N745# cd nuc700-uClinux/

debian:/home/N745/nuc700-uClinux# ls -al

total 24

drwxr-xr-x  6 root root 4096 2010-04-30 02:31 .

drwxr-xr-x  7 root root 4096 2010-04-30 02:31 ..

drwxr-xr-x  7 root root 4096 2009-03-25 00:44 applications

drwxr-xr-x  2 root root 4096 2009-03-26 21:23 image

drwxr-xr-x 12 root root 4096 2009-03-26 04:54 romdisk

drwxr-xr-x 10 root root 4096 2009-03-26 06:50 uClinux-dist

debian:/home/N745/nuc700-uClinux#
uClinux-dist has the default binaries we want, plus we need to configure the kernel, so lets visit there first (the more adventurous can look at the other folders)
debian:/home/N745/nuc700-uClinux# cd uClinux-dist/

debian:/home/N745/nuc700-uClinux/uClinux-dist# ls -al

total 84

drwxr-xr-x  10 root root  4096 2009-03-26 06:50 .

drwxr-xr-x   6 root root  4096 2010-04-30 02:31 ..

drwxr-xr-x   2 root root  4096 2009-01-22 23:27 bin

drwxr-xr-x   3 root root  4096 2009-03-26 06:50 config

-rw-r--r--   1 root root 18007 2009-01-22 23:29 COPYING

drwxr-xr-x   3 root root  4096 2009-01-22 23:27 Documentation

drwxr-xr-x  11 root root  4096 2009-01-22 23:29 freeswan

drwxr-xr-x   5 root root  4096 2009-01-22 23:29 lib

drwxr-xr-x  15 root root  4096 2009-03-26 06:50 linux-2.4.x

-rw-r--r--   1 root root  3228 2009-01-22 23:28 MAINTAINERS

-rw-r--r--   1 root root  7977 2009-01-22 23:27 Makefile

-rw-r--r--   1 root root  4935 2009-01-22 23:29 README

-rw-r--r--   1 root root  1654 2009-01-22 23:29 SOURCE

drwxr-xr-x 158 root root  4096 2009-01-22 23:28 user

drwxr-xr-x   4 root root  4096 2009-03-12 03:54 vendors

debian:/home/N745/nuc700-uClinux/uClinux-dist#
Looks like it should be fairly easy, right?
Wrong.
The default build doesn’t work. Why would it be that easy.
You’ll end up with issues like:
entry-armv.S:782: Error: Internal_relocation (type 210) not fixed up
(OFFSET_IMM)
entry-armv.S:784: Error: Internal_relocation (type 208) not fixed up
(IMMEDIATE)
So, we need to make sure we start off fresh.
Also, note that we’re building for an N745 cpu, so we’ll need to configure that at the make config stage.
Lastly, and EXTREMELY important, is that we’ll need to put our required tools in the path.
DO NOT FORGET TO DO THIS
sample PATH below:
PATH=/usr/local/sbin:/usr/local/bin:/usr/sbin:/usr/bin:/sbin:/bin:/usr/local/arm_tools/bin
debian:/home/N745/nuc700-uClinux/uClinux-dist# PATH=/usr/local/sbin:/usr/local/bin:/usr/sbin:/usr/bin:/sbin:/bin:/usr/local/arm_tools/bin
debian:/home/N745/nuc700-uClinux/uClinux-dist#make clean
Now we have a choice - Recommend use make xconfig if possible.
You need to have a GUI, and have tk installed. (apt-get install tk)
Otherwise run make config, and run through the tediously large amount of questions
OPTION#preferred
debian:/home/N745/nuc700-uClinux/uClinux-dist#make xconfig
OPTION#not recommended
debian:/home/N745/nuc700-uClinux/uClinux-dist# make config
config/mkconfig > config.in
#
# No defaults found
#
*
* Target Platform Selection
*
*
* Choose a Vendor/Product combination.
*
Vendor/Product (nuvoton/nuc710, nuvoton/nuc740, nuvoton/nuc745) [nuvoton/nuc710] (NEW) nuvoton/nuc745
[For the rest, I used the defaults (except for the Network Tools questions, which I said Y to all)]
Continue here from whatever menu (x)config you used.
debian:/home/N745/nuc700-uClinux/uClinux-dist#make oldconfig
[Needed, or compile doesn't work]
debian:/home/N745/nuc700-uClinux/uClinux-dist#make dep
[A gazillion pages of info later, we have a build environment!]
We’re finally ready to use our weapon of mass destruction.
debian:/home/N745/nuc700-uClinux/uClinux-dist#make

...
It should compile without issue.
Next step is to mount our created rom image, and copy the binaries off, or just go to the compiled folders, and get the binaries.
I’ve done this step already, and have a zip file of a few useful files ready.
-rwxr-xr-x 1 root root 110888 2010-04-30 03:50 ftpd
-rwxr-xr-x 1 root root 55164 2010-04-30 03:52 ping
-rwxr-xr-x 1 root root 1201904 2010-04-30 03:51 ssh
-rwxr-xr-x 1 root root 1219864 2010-04-30 03:51 sshd
-rwxr-xr-x 1 root root 118004 2010-04-30 03:45 telnet
-rwxr-xr-x 1 root root 45460 2010-04-30 03:45 telnetd
file *
ftpd: BFLT executable – version 4 ram
ping: BFLT executable – version 4 ram
ssh: BFLT executable – version 4 ram
sshd: BFLT executable – version 4 ram
telnet: BFLT executable – version 4 ram
telnetd: BFLT executable – version 4 ram
Download that here – arm7-nettools
All we need to do now is mount our romfs image, unzip the arm7-nettools.zip, copy the arm7 bFLT binaries over to bin, add telnetd, sshd, and ftpd to our /bin/init, and rebuild by running genromfs on our filesystem.
We can then finally flash our new romfs, and test it out.
Don’t forget that romfs is a read only file system, so we can’t modify it by mounting it. We need to mount, copying everything to elsewhere, do our required bits and pieces, then rebuild.
eg
mount -o loop -t romfs still_unsure.img /mnt/test -r
mkdir /mnt/new
cd /mnt
rsync -arv /mnt/test/ new
cd new/bin
wget http://www.computersolutions.cn/blog/wp-content/uploads/2010/04/arm7-nettools.zip
unzip arm7-nettools.zip
rm arm7-nettools.zip[We need to also edit init]
pico initAdd
sshd&
telnetd&
ftpd&eg –
cat init
mount -t proc none /proc
mount -t ramfs none /usr
mount -t ramfs none /swap
mount -t ramfs none /var/run
mount -t ramfs none /etc
mount -t ramfs none /flash
mount -t ramfs none /home
camera&
sshd&
telnetd&
ftpd&
shChange to the next directory up, and lets run genromfs
genromfs -d new -f testrom.img
debian:/mnt# ls testrom.img
testrom.img
debian:/mnt# ls -al testrom.img
-rw-r–r– 1 root root 3329024 2010-04-30 04:18 testrom.imgIn theory, this should be usable (famous last words!).
Unfortunately, I can’t try testing on that at home, as all the equipment is at the office, but that should be fairly easy.
Probably also some small config issues to sort out, as ftpd, telnetd and sshd will probably choke without their related /etc/whatever config files needed, but we can sort that out via serial on the debug ports.
Archives
- November 2024
- November 2019
- October 2019
- August 2019
- April 2019
- February 2017
- September 2016
- June 2016
- May 2016
- September 2015
- August 2015
- June 2015
- April 2015
- December 2014
- October 2014
- September 2014
- July 2014
- June 2014
- April 2014
- October 2013
- July 2013
- May 2013
- April 2013
- March 2013
- January 2013
- December 2012
- October 2012
- August 2012
- July 2012
- June 2012
- May 2012
- April 2012
- March 2012
- December 2011
- November 2011
- October 2011
- September 2011
- July 2011
- May 2011
- April 2011
- March 2011
- February 2011
- January 2011
- December 2010
- November 2010
- October 2010
- September 2010
- August 2010
- July 2010
- June 2010
- May 2010
- April 2010
- March 2010
- February 2010
- January 2010
- December 2009
- November 2009
- October 2009
- May 2009
- April 2009
- March 2009
- February 2009
- January 2009
- December 2008
- November 2008
- October 2008
- September 2008
Categories
- Apple
- Arcade Machines
- Badges
- BMW
- China Related
- Cool Hunting
- Exploits
- Firmware
- Food
- General Talk
- government
- IP Cam
- iPhone
- Lasers
- legislation
- MODx
- MySQL
- notice
- qmail
- requirements
- Reviews
- Service Issues
- Tao Bao
- Technical Mumbo Jumbo
- Things that will get me censored
- Travel
- Uncategorized
- Useful Info