13
Apple Tips and Tricks
As I haven’t posted in a while, I thought I would publish a few tips and tricks for Apple computers.
All of the tips below are done inside Terminal.
I find most of them useful, don’t blindly copy and paste unless you understand what you’re doing.
Some of them can be accomplished in the OSX Gui, some cannot.
—-
Getting access to the Beta’s for OS X
Accessing public beta’s via Software update (on Yosemite)
sudo defaults write /Library/Preferences/com.apple.SoftwareUpdate CatalogURL https://swscan.apple.com/content/catalogs/others/index-10.10beta-10.10-10.9-mountainlion-lion-snowleopard-leopard.merged-1.sucatalog.gz
softwareupdate -l
Accessing all available beta’s via Software update (on Yosemite)
sudo defaults write /Library/Preferences/com.apple.SoftwareUpdate CatalogURL https://swscan.apple.com/content/catalogs/others/index-10.10seed-10.10-10.9-mountainlion-lion-snowleopard-leopard.merged-1.sucatalog.gz
softwareupdate -l
Resetting Software Update catalog to the defaults (eg if you used one of the above 2 catalogs)
sudo softwareupdate –clear-catalog
Making TextEdit default to plain text mode for new documents
defaults write com.apple.TextEdit RichText -int 0
Change the default Finder location to your home folder (~/)
defaults write com.apple.finder NewWindowTarget -string "PfLo" && \

defaults write com.apple.finder NewWindowTargetPath -string "file://${HOME}"
Make the save panel expanded by default
defaults write NSGlobalDomain NSNavPanelExpandedStateForSaveMode -bool true
Turning off the warning when changing file extensions
defaults write com.apple.finder FXEnableExtensionChangeWarning -bool false
Check for software updates daily
defaults write com.apple.SoftwareUpdate ScheduleFrequency -int 1
Show the icons for drives, network drives, and usb disks on the desktop
defaults write com.apple.finder ShowExternalHardDrivesOnDesktop -bool true && \

defaults write com.apple.finder ShowHardDrivesOnDesktop -bool true && \

defaults write com.apple.finder ShowMountedServersOnDesktop -bool true && \

defaults write com.apple.finder ShowRemovableMediaOnDesktop -bool true
Disable creation of .DS_Store files on network shares
defaults write com.apple.desktopservices DSDontWriteNetworkStores -bool true
Unhide the user Library folder
chflags nohidden ~/Library
Enable AirDrop over Ethernet and on unsupported Macs
defaults write com.apple.NetworkBrowser BrowseAllInterfaces -bool true
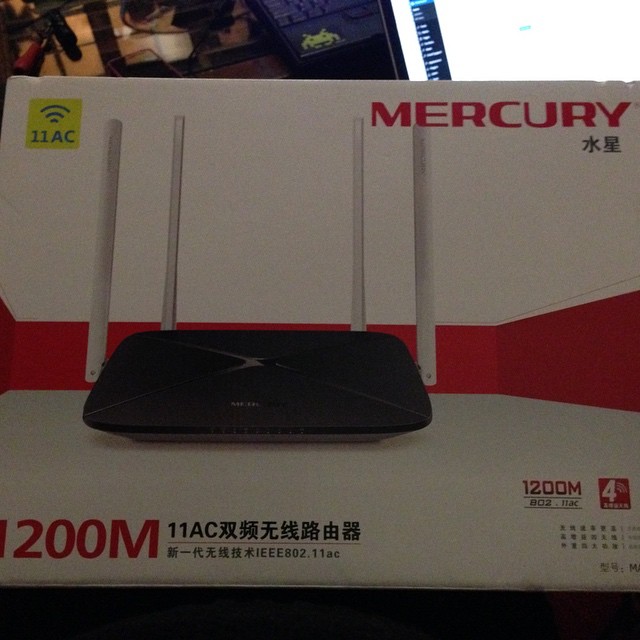
The Mercury MAC1200R (TPLINK WR6300) is one of the cheapest AC based routers on the planet, as I have a few AC devices I thought I’d buy one to try out. They’re available for under RMB120 or so online.
Mercury hardware is TPLink hardware, albeit using a different name. Same stuff, same factory, different casing.
The router has 64M ram, and 8M flash. CPU / Wifi AR9344 / QCA9882
OpenWRT says it has support, so I had a quick go at taking a look at flashing one.
First steps:
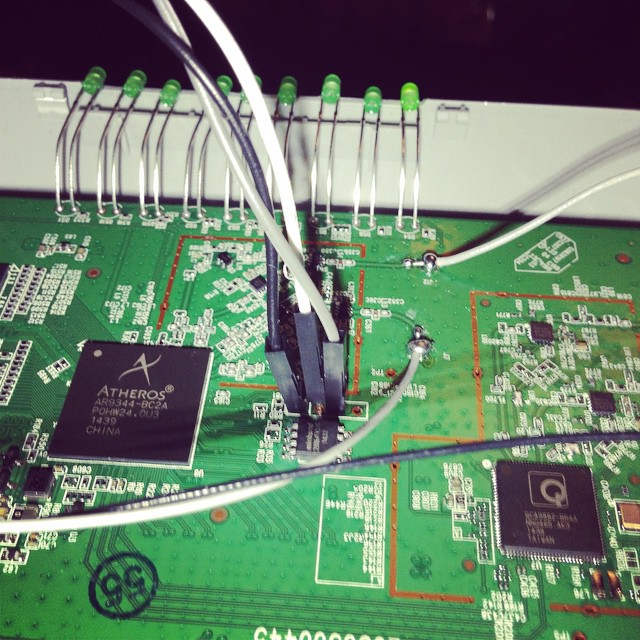
Open up the unit (remove the 2 screws underneath, then use a spare credit card or similar to jam open the plastic case).
The serial headers are to the right of the SoC.
You’ll need a rs232 to ttl or usb to ttl adaptor.
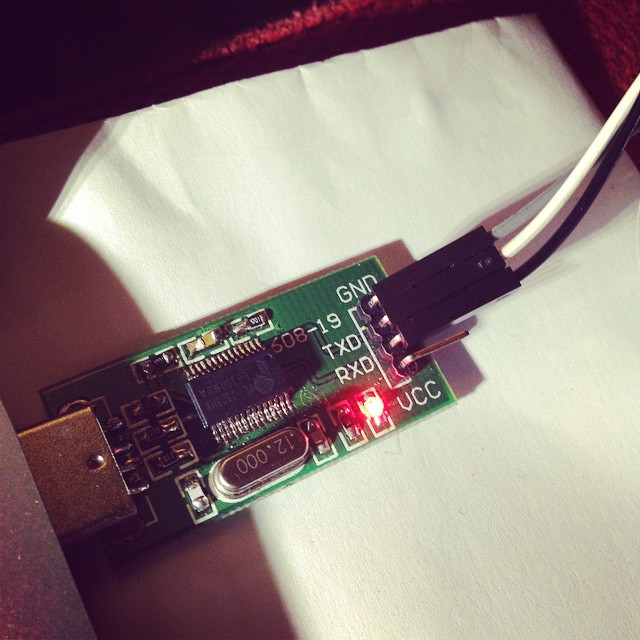
Pin 1 is GND
Pin 2 is TX (connect to rx)
Pin 3 is RX (connect to tx)
Pin 4 is VCC (don’t connect).
Port speeds are 115200,8,n,1
Connect up, and you should see a flurry of activity on boot.
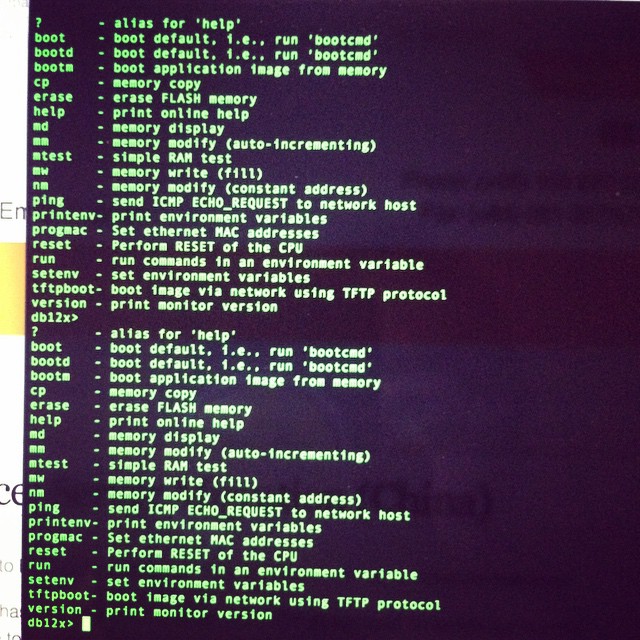
To get into the bootloader (uBoot), you’ll need to type tpl
May take a few tries, so prepare to pull power and retry again, and again till you get in.
You’ll need a TFTPD server running on 192.168.1.100 to push files over. My Mac no haz ethernet (and Thunderbolt to Ethernet is crud), so I use my venerable X40 and tftpd software.
Firmware is up here. (Or you can compile your own) -> http://pan.baidu.com/s/1hqkVOfa
Firmware locations in flash (see below)
printenv

bootargs=console=ttyS0,115200 root=31:02 rootfstype=jffs2 init=/sbin/init mtdparts=ath-nor0:256k(u-boot),64k(u-boot-env),6336k(rootfs),1408k(uImage),64k(mib0),64k(ART)

bootcmd=bootm 0x9f020000

bootdelay=1

baudrate=115200

ethaddr=0xba:0xbe:0xfa:0xce:0x08:0x41

ipaddr=192.168.1.111

serverip=192.168.1.100

dir=

lu=tftp 0x80060000 ${dir}u-boot.bin&&erase 0x9f000000 +$filesize&&cp.b $fileaddr 0x9f000000 $filesize

lf=tftp 0x80060000 ${dir}db12x${bc}-jffs2&&erase 0x9f050000 +0x630000&&cp.b $fileaddr 0x9f050000 $filesize

lk=tftp 0x80060000 ${dir}vmlinux${bc}.lzma.uImage&&erase 0x9f680000 +$filesize&&cp.b $fileaddr 0x9f680000 $filesize

stdin=serial

stdout=serial

stderr=serial

ethact=eth0
Environment size: 686/65532 bytes
Upload to the uBoot
U-Boot 1.1.4--LSDK-10.1.389 (Apr 9 2014 - 15:23:02)
U-Boot DB120
Wasp 1.2
DRAM: 64 MB
Flash Manuf Id 0xef, DeviceId0 0x40, DeviceId1 0x17
flash size 8MB, sector count = 128
Flash: 8 MB
Using default environment
In: serial
Out: serial
Err: serial
Net: ag934x_enet_initialize...
No valid address in Flash. Using fixed address
No valid address in Flash. Using fixed address
wasp reset mask:c02200
WASP ----> S27 PHY
s27 reg init
: cfg1 0x80000000 cfg2 0x7114
eth0: ba:be:fa:ce:08:41
athrs27_phy_setup ATHR_PHY_CONTROL 4 :1000
athrs27_phy_setup ATHR_PHY_SPEC_STAUS 4 :10
eth0 up
WASP ----> S27 PHY
s27 reg init lan
ATHRS27: resetting s27
ATHRS27: s27 reset done
: cfg1 0x800c0000 cfg2 0x7214
eth1: ba:be:fa:ce:08:41
athrs27_phy_setup ATHR_PHY_CONTROL 0 :1000
athrs27_phy_setup ATHR_PHY_SPEC_STAUS 0 :10
athrs27_phy_setup ATHR_PHY_CONTROL 1 :1000
athrs27_phy_setup ATHR_PHY_SPEC_STAUS 1 :10
athrs27_phy_setup ATHR_PHY_CONTROL 2 :1000
athrs27_phy_setup ATHR_PHY_SPEC_STAUS 2 :10
athrs27_phy_setup ATHR_PHY_CONTROL 3 :1000
athrs27_phy_setup ATHR_PHY_SPEC_STAUS 3 :10
eth1 up
eth0, eth1
Setting 0xb8116290 to 0x30602d0f
Autobooting in 1 seconds
db12x>
db12x> tftpboot 0x81000000 image.bin
eth1 link down
enet0 port4 up
dup 1 speed 100
Using eth0 device
TFTP from server 192.168.1.100; our IP address is 192.168.1.111
Filename 'image.bin'.
Load address: 0x81000000
Loading: #################################################################
#################################################################
#################################################################
#################################################################
#################################################################
#################################################################
#################################################################
#################################################################
#################################################################
##############################
done
Bytes transferred = 3145732 (300004 hex)
db12x> erase 0x9f020000 +0x3c0000
Erasing flash... ............................................................
Erased 60 sectors
db12x> cp.b 0x81000000 0x9f020000 0x3c0000
Copy to Flash... ............................................................done
db12x> bootm 9f020000
It should boot into OpenWRT, you can flash from there.
...[long kernel bootlogs redacted]
- init complete -
BusyBox v1.22.1 (2014-12-15 18:46:26 CST) built-in shell (ash)
Enter 'help' for a list of built-in commands.
_______ ________ __
| |.-----.-----.-----.| | | |.----.| |_
| - || _ | -__| || | | || _|| _|
|_______|| __|_____|__|__||________||__| |____|
|__| W I R E L E S S F R E E D O M
-----------------------------------------------------
BARRIER BREAKER (14.07, r42625)
-----------------------------------------------------
* 1/2 oz Galliano Pour all ingredients into
* 4 oz cold Coffee an irish coffee mug filled
* 1 1/2 oz Dark Rum with crushed ice. Stir.
* 2 tsp. Creme de Cacao
-----------------------------------------------------
cat /proc/mtd
dev: size erasesize name
mtd0: 00020000 00010000 "u-boot"
mtd1: 0010206c 00010000 "kernel"
mtd2: 006cdf94 00010000 "rootfs"
mtd3: 004d0000 00010000 "rootfs_data"
mtd4: 00010000 00010000 "art"
mtd5: 007d0000 00010000 "firmware"
I highly recommend replacing the bootloader with an unlocked one.
i.e. this one – https://github.com/pepe2k/u-boot_mod
Bootloader sits at 0x9f000000 and is 64kb in size.
Suggest load in ram at 0x80060000 like they do, and flash from there.
eg from the bootloader –
tfpboot 0x80060000 uboot.bin

erase 0x9f000000 +0x20000

cp.b 0x80060000 0x9f000000 0x20000
Pray that it didn’t mess up (or you need an spi flasher…), and reboot!
Other bits n bobs –
You’ll need to adjust the opkg.conf file
ssh into the router @ 192.168.1.1 / root / root
mv /etc/opkg.conf /etc/opkg.conf.orig
echo 'dest root /
dest ram /tmp
lists_dir ext /var/opkg-lists
option overlay_root /overlay
src/gz barrier_breaker_base http://downloads.openwrt.org/barrier_breaker/14.07/ar71xx/generic/packages/base
src/gz barrier_breaker_management http://downloads.openwrt.org/barrier_breaker/14.07/ar71xx/generic/packages/management
src/gz barrier_breaker_oldpackages http://downloads.openwrt.org/barrier_breaker/14.07/ar71xx/generic/packages/oldpackages
src/gz barrier_breaker_packages http://downloads.openwrt.org/barrier_breaker/14.07/ar71xx/generic/packages/packages
src/gz barrier_breaker_routing http://downloads.openwrt.org/barrier_breaker/14.07/ar71xx/generic/packages/routing
src/gz barrier_breaker_telephony http://downloads.openwrt.org/barrier_breaker/14.07/ar71xx/generic/packages/telephony
src/gz barrier_breaker_luci http://downloads.openwrt.org/barrier_breaker/14.07/ar71xx/generic/packages/luci
#src/gz barrier_breaker_base http://downloads.openwrt.org/snapshots/trunk/ar71xx/packages/base
#src/gz barrier_breaker_management http://downloads.openwrt.org/snapshots/trunk/ar71xx/packages/management
#src/gz barrier_breaker_oldpackages http://downloads.openwrt.org/snapshots/trunk/ar71xx/packages/oldpackages
#src/gz barrier_breaker_packages http://downloads.openwrt.org/snapshots/trunk/ar71xx/packages/packages
#src/gz barrier_breaker_routing http://downloads.openwrt.org/snapshots/trunk/ar71xx/packages/routing
#src/gz barrier_breaker_telephony http://downloads.openwrt.org/snapshots/trunk/ar71xx/packages/telephony' >> /etc/opkg.conf
…and install Luci (the openwrt webui)
opkg update

opkg install luci
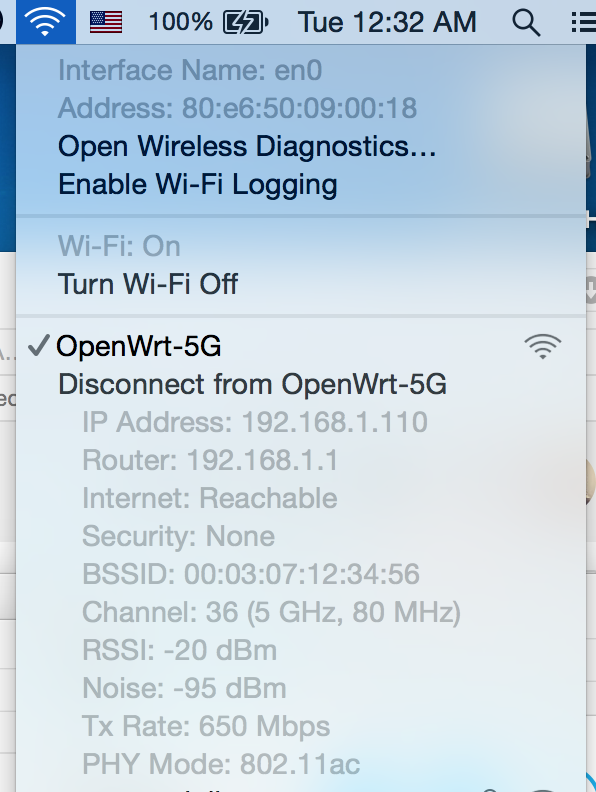
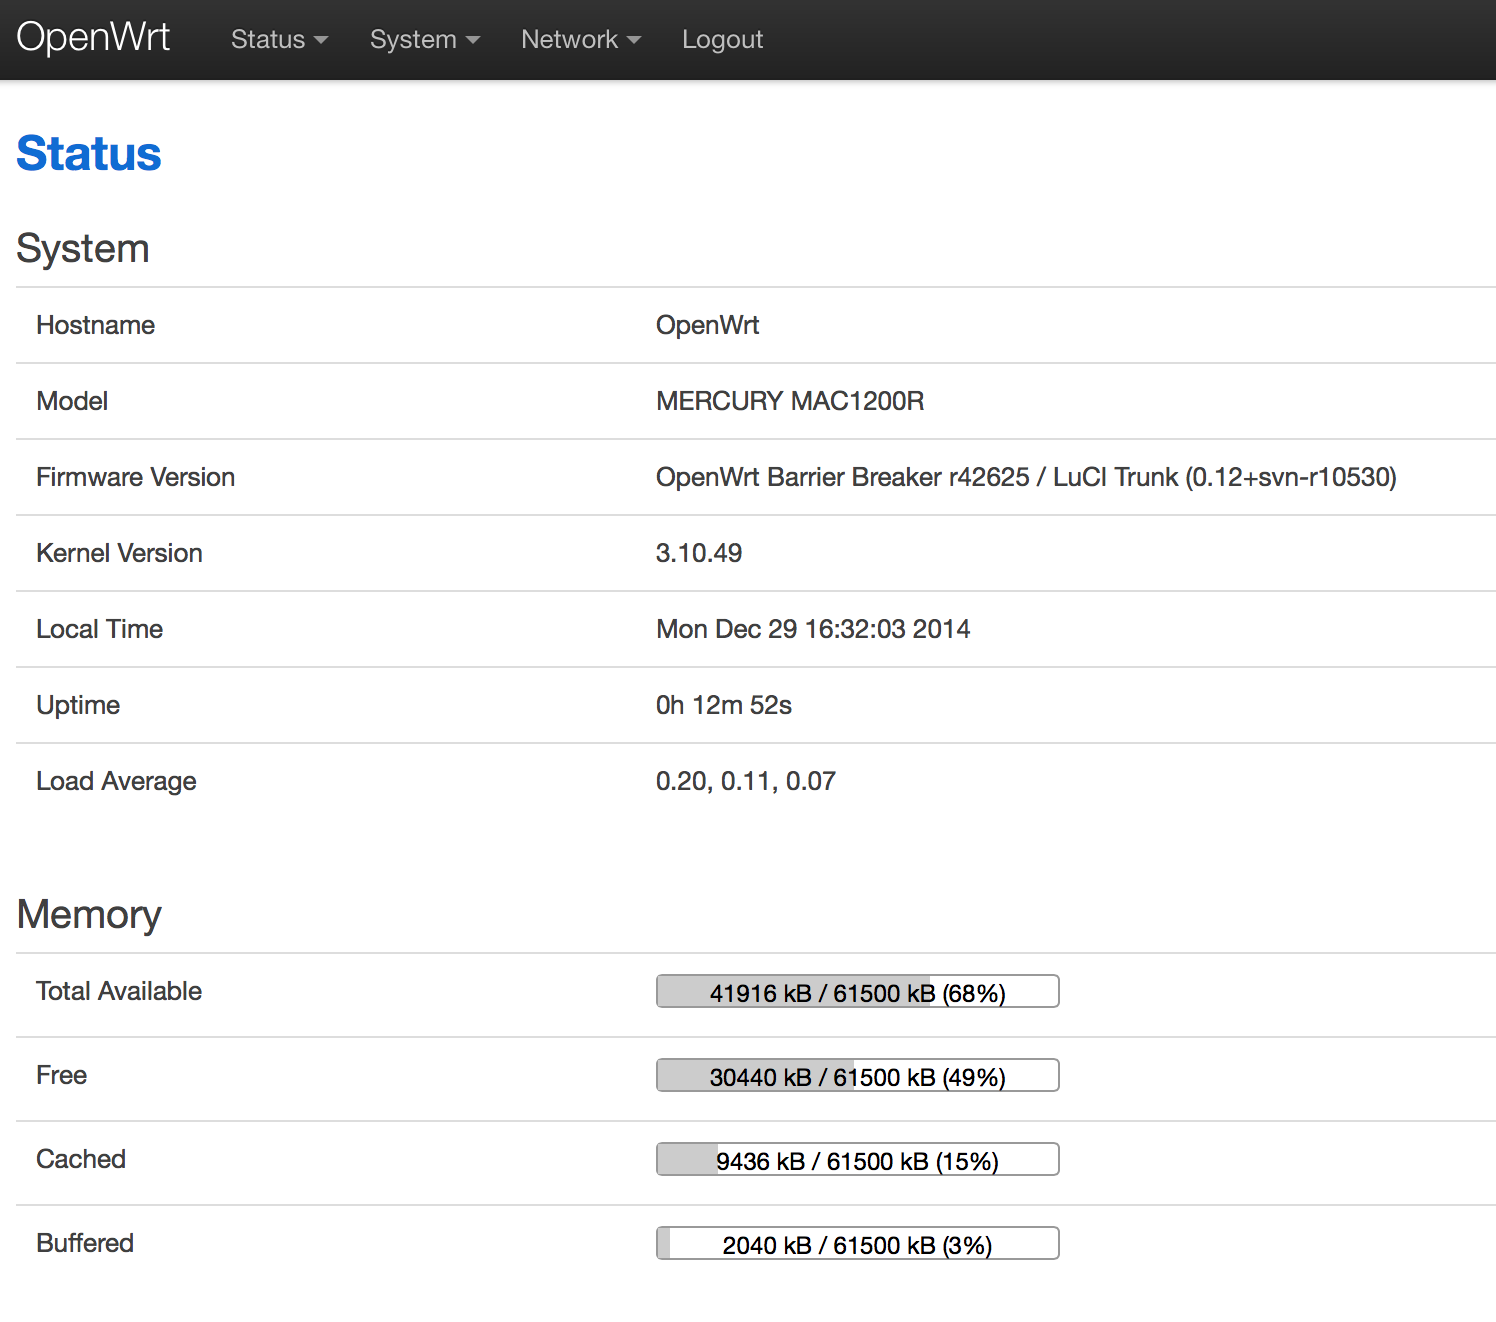
You should be able to visit http://192.168.1.1 and start changing settings.
In January, I upgraded to 100M fibre, and paid upfront for the year (RMB2800).
While I was on vacation, my FTTB at home stopped working, so we called Shanghai Telecom.
What had actually happened was that there was a screwup with the account setup, and they’d put me on a monthly bill *and* 100M.
After 6 months, they decided that I hadn’t paid my bill, and cancelled my 100M fibre account!
Staff eventually sorted it out, and Telecom gave us a 6 month credit.
Even so, I ended up coming back to a crappy E8 wifi + modem setup and my router set to use DHCP.
The Shanghai Telecom unit was setup for a maximum of 16 wifi devices, and uPNP was disabled, sigh.
I prefer to use my own equipment, as I generally don’t gimp it, so I called Telecom to ask for my “new” account details so I could replace it.
Unfortunately the technician had changed the password, and the 10000 hotline didn’t have the new pass, or the LOID.
I called the install technician who’d installed it in my absence, but he wasn’t very helpful, and told me I couldn’t have it. Surprise…
What to do.
I took a look at their modem, and thought it should be fairly easy to try get the details from it.
Did a bit of googling, and found that it had an accessible serial port, so opened up the unit, and connected it up.
After a bit of cable fiddling, got a connection @ 115200 / 8n1
Cable pinout should be –
GND | MISSING PIN | TX | RX | VCC
I’ll add some photos later.
With some more fiddling around, I got terminal access (accidentally!) with some prudent Ctrl C/ Ctrl Z’ing during the boot process as something crashed and I got a terminal prompt.
Its vxware, although the boot process does look quite linuxy.
Lots of interesting commands..
 > ls -al
telnetd:error:341.568:processInput:440:unrecognized command ls -al
 > help
?
help
logout
exit
quit
reboot
brctl
cat
loglevel
logdest
virtualserver
ddns
df
dumpcfg
dumpmulticfg
dumpmdm
dumpnvram
meminfo
psp
kill
dumpsysinfo
dnsproxy
syslog
echo
ifconfig
ping
ps
pwd
sntp
sysinfo
tftp
voice
wlctl
showOmciStats
omci
omcipm
dumpOmciVoice
dumpOmciEnet
dumpOmciGem
arp
defaultgateway
dhcpserver
dns
lan
lanhosts
passwd
ppp
restoredefault
psiInvalidateCheck
route
save
swversion
uptime
cfgupdate
swupdate
exitOnIdle
wan
btt
oam
laser
overhead
mcpctl
sendInform
wlanpower
zyims_watchdog
atbp
ctrate
testled
ipversionmode
dumptr69soap
lan2lanmcast
telecomaccount
wanlimit
namechange
userinfo
localservice
tcptimewait
atsh
option125Mode
eponlinkper
setponlinkuptime
loidtimewait
phonetest
First up, dump the nvram
> dumpnvram
============NVRAM data============
nvramData.ulVersion=6l
nvramData.szBootline=e=192.168.1.1:ffffff00 h=192.168.1.100 g= r=f f=vmlinux i=bcm963xx_fs_kernel d=1 p=0 c= a=
nvramData.szBoardId=      XPT2542NUR
nvramData.ulMainTpNum=0l
nvramData.ulPsiSize=64l
nvramData.ulNumMacAddrs=10l
nvramData.ucaBaseMacAddr=??Umo
nvramData.pad=
nvramData.ulCheckSumV4=0l
nvramData.gponSerialNumber=
nvramData.gponPassword=
nvramData.cardMode=-1
nvramData.cardNo=  000000000000000000
nvramData.userPasswd=telecomadmin31407623
nvramData.uSerialNumber=32300C4C755116D6F
nvramData.useradminPassword=62pfq
nvramData.wirelessPassword=3yyv3kum
nvramData.wirelessSSID=ChinaNet-WmqQ
nvramData.conntrack_multiple_rate=0
============NVRAM data============
Nice, got the router admin pass already.
– nvramData.userPasswd=telecomadmin31407623
(user is telecomadmin).
I actually needed the login details, this turned out to be via
> dumpmdm
This dumped a rather large xml style file with some interesting bits
[excerpted are some of the good bits – the whole file is huge]
Hmm, telnet, and a password!
Telnet is not enabled by default, nor is FTP.
It also had the pppoe user/pass which was what I was looking for, and the LOID, which I needed to stick into my modem.
Score.
While that was pretty much all I needed, I decided to enable Telnet and FTP to play around.
Ok, so how do we enable telnet?
 > localservice
usage:
   localservice show: show the current telnet/ftp service status.
   localservice telnet enable/disable: set the telnet service enable or disable.
   localservice telnetAccess enable/disable: allow access telnet in wan side or not.
   localservice ftp enable/disable: set the ftp service enable or disable.
   localservice ftpAccess enable/disable: allow access ftp in wan side or not.

 > localservice telnet enable

> localservice show
Current local services status:
Ftp Service: Disable
Ftp Allow Wan Access: No
Telnet Service: Enable
Telnet Allow Wan Access: No

> localservice ftp enable

> localservice show
Current local services status:
Ftp Service: Enable
Ftp Allow Wan Access: No
Telnet Service: Enable
Telnet Allow Wan Access: No
 > save
config saved.
reboot the modem, and see if we can login via ethernet
telnet 192.168.1.1
Trying 192.168.1.1...
Connected to broadcom.home.
Escape character is '^]'.
BCM96838 Broadband Router
Login: telecomadmin
Password:
Login incorrect. Try again.
Login: e8telnet
Password:
 >
Cool, so we now have full access to the device.
There also seems to be a remote monitoring system config’d via devacs.edatahome.com, which maps to a Shanghai Telecom ip.
   http://devacs.edatahome.com:9090/ACS-server/ACS
      http://devacs.edatahome.com:9090/ACS-server/ACS
      hgw
      hgwXXXX1563
and something else called itms.
itms
 itmsXXXX5503
I’ve XXX’d out some of the numbers from my own dump, as I suspect its device / login specific.
I got what I needed though, which was admin access to the modem, despite Shanghai Telecom not telling me.
Would really be nice if they just gave you the PPPoE user/pass and LOID, but that would be too easy…
On my modem, the following were the default passwords:
Console Access (via serial port)
User: admin
Pass: v2mprt
Once in console, you can enable Telnet and FTP.
Telnet (not enabled by default)
User: e8telnet
Pass: e8telnet
FTP (not enabled by default)
User: e8ftp
Pass: e8ftp
To show the http password from console (either local, or via telnet).
dumpnvram
url: http://192.168.1.1
http user: telecomadmin
http pass: (as per nvram, mine was telecomadmin31407623 )
Once in you can see all the important bits. Probably easier to grep the xml file from
dumpmdm
Took me about an hour or so to get to that point, I’m running on my own equipment again, and its not gimped. Worth my time!
Looks like Ubuntu 13 has changed the dev id’s for disks!
If you use ZFS, like us, then you may be caught by this subtle naughty change.
Previously, disk-id’s were something like this:
scsi-SATA_ST4000DM000-1CD_Z3000WGF
In Ubuntu 13 this changed:
ata-ST4000DM000-1CD168_Z3000WGF
According to the FAQ in ZFS on Linux, this *isn’t* supposed to change.
http://zfsonlinux.org/faq.html#WhatDevNamesShouldIUseWhenCreatingMyPool
/dev/disk/by-id/: Best for small pools (less than 10 disks)

Summary: This directory contains disk identifiers with more human readable names. The disk identifier usually consists of the interface type, vendor name, model number, device serial number, and partition number. This approach is more user friendly because it simplifies identifying a specific disk.

Benefits: Nice for small systems with a single disk controller. Because the names are persistent and guaranteed not to change, it doesn't matter how the disks are attached to the system. You can take them all out, randomly mixed them up on the desk, put them back anywhere in the system and your pool will still be automatically imported correctly.
So… on a reboot after upgrading a clients NAS, all the data was missing, with the nefarious pool error.
See below:
root@hpnas:# zpool status

pool: nas

state: UNAVAIL

status: One or more devices could not be used because the label is missing

or invalid. There are insufficient replicas for the pool to continue

functioning.

action: Destroy and re-create the pool from

a backup source.

see: http://zfsonlinux.org/msg/ZFS-8000-5E

scan: none requested

config:
NAME STATE READ WRITE CKSUM
nas UNAVAIL 0 0 0 insufficient replicas
raidz1-0 UNAVAIL 0 0 0 insufficient replicas
scsi-SATA_ST4000DM000-1CD_Z3000WGF UNAVAIL 0 0 0
scsi-SATA_ST4000DX000-1CL_Z1Z036ST UNAVAIL 0 0 0
scsi-SATA_ST4000DX000-1CL_Z1Z04QDM UNAVAIL 0 0 0
scsi-SATA_ST4000DX000-1CL_Z1Z05B9Y UNAVAIL 0 0 0
Don’t worry, the data’s still there. Ubuntu has just changed the disk names, so ZFS assumes the disks are broken.
Simple way to fix it is to export the pool, then reimport with the new names.
Our pool is named “nas” in the example below:
root@hpnas:# zpool export nas

root@hpnas:# zpool import -d /dev/disk/by-id nas -f
As you can see, our pool is now a happy chappy, and our data should be back
root@hpnas:# zfs list

NAME USED AVAIL REFER MOUNTPOINT

nas 5.25T 5.12T 209K /nas

nas/storage 5.25T 5.12T 5.25T /nas/storage

root@hpnas:/dev/disk/by-id# zfs list

NAME USED AVAIL REFER MOUNTPOINT

nas 5.25T 5.12T 209K /nas

nas/storage 5.25T 5.12T 5.25T /nas/storage

root@hpnas:/dev/disk/by-id# zpool status

pool: nas

state: ONLINE

scan: none requested

config:
NAME STATE READ WRITE CKSUM
nas ONLINE 0 0 0
raidz1-0 ONLINE 0 0 0
ata-ST4000DM000-1CD168_Z3000WGF ONLINE 0 0 0
ata-ST4000DX000-1CL160_Z1Z036ST ONLINE 0 0 0
ata-ST4000DX000-1CL160_Z1Z04QDM ONLINE 0 0 0
ata-ST4000DX000-1CL160_Z1Z05B9Y ONLINE 0 0 0
errors: No known data errors
Bit naughty of Ubuntu to do that imho…
Our underlying hardware uses Dell equipment for the most part inside China.
We use Debian as an OS, and Dell has some software available on their linux repo’s specifically tailored for their (often rebranded from other peoples) hardware.
Eg RAC (Remote Access) bits and pieces, RAID hardware, and BIOS updates.
So, enough about why, how do we use their repo?
First add it as a source
echo 'deb http://linux.dell.com/repo/community/deb/latest /' > /etc/apt/sources.list.d/linux.dell.com.sources.list
…then add gpg keys –
gpg --keyserver pool.sks-keyservers.net --recv-key 1285491434D8786F

gpg -a --export 1285491434D8786F | apt-key add -
apt-get update, to make sure that you have the latest repo bits added, then you can install their goodies.
apt-cache search dell will show you whats in their repo. Pick wisely!
18
ZFS bits and bobs
Behind the scenes we use ZFS as storage for our offsite backups.
We have backups in 2 separate physical locations + original data on the server(s), as data is mui importante!
ZFS is a rather nice storage file system that improves radically on older RAID based solutions, offering a lot more funky options, like snapshot’s (where the OS can store have multiple versions of files, similar to Time Machine backups), and more importantly compression.
At some point we’ll be deploying a SAN (storage area network) on a blade server in the data center for data using ZFS, using lots of three and four letter acronyms –
ESXi for base OS, then a VM running providing ZFS storage and iSCSI targets with hardware passthru for other VM’s, then other blades in the server doing clustering.
Right now we’re waiting on an LSI SAS card (see more anacronyms!), so we can deploy…, but I digress.
Back to ZFS.
The ZFS version we use now allows flags, yay!, and that means we can choose alternate compression methods.
There is a reasonably newish compression algorithm called LZ4 that is now supported, and it improves both read and write speeds over normal uncompressed ZFS, and some benefits over compressed ZFS using the standard compression algorithm(s).
To quote: “LZ4 is a new high-speed BSD-licensed compression algorithm written by Yann Collet that delivers very high compression and decompression performance compared to lzjb (>50% faster on compression, >80% faster on decompression and around 3x faster on compression of incompressible data)”
First up check if your zfs version supports it:
zpool upgrade -v

This system supports ZFS pool feature flags.
The following features are supported:
FEAT DESCRIPTION
-------------------------------------------------------------
async_destroy (read-only compatible)
Destroy filesystems asynchronously.
empty_bpobj (read-only compatible)
Snapshots use less space.
lz4_compress
LZ4 compression algorithm support.
Mine does (well duh!)
So…, I can turn on support.
As a note, lz4 is not backward compatible, so you will need to use a ZFS version that supports flags *and* lz4.
At the time of writing nas4free doesn’t support it, zfsonlinux does though, as does omnios, illumos and other solaris based OS’s.
If you aren’t sure, check first with the command above and see if there is support.
Next step is to turn on that feature.
My storage pools are typically called nas or tank
To enable lz4 compression, its a 2 step process.
zpool set feature@lz4_compress=enabled

zpool set compression=lz4
I have nas and nas/storage so I did -
zpool set feature@lz4_compress=enabled nas
zpool set compression=lz4 nas
zpool set compression=lz4 nas/storage
Once the flag is set though, you can set compression on the pools or volume. If you set at the storage volume level, then new pools inherit the compression setting.
Here are my volumes / pools
zfs list

NAME          USED  AVAIL  REFER  MOUNTPOINT

nas          6.09T  4.28T   209K  /nas

nas/storage  6.09T  4.28T  6.09T  /nas/storage
I’ve already set compression on (although it doesn’t take effect till I copy new data onto the pools / volumes).
We can check compression status by doing a zfs get all command, and filtering by compress
zfs get all | grep compress

nas          compressratio         1.00x                    -

nas          compression           lz4                      local

nas          refcompressratio      1.00x                    -

nas/storage  compressratio         1.00x                    -

nas/storage  compression           lz4                      local

nas/storage  refcompressratio      1.00x                    -
If I create a new pool you’ll see it gets created with the same compression inherited from its parent storage volume.
zfs create nas/test

root@nas:/nas# zfs get all | grep compress

nas          compressratio         1.00x                    -

nas          compression           lz4                      local

nas          refcompressratio      1.00x                    -

nas/storage  compressratio         1.00x                    -

nas/storage  compression           lz4                      local

nas/storage  refcompressratio      1.00x                    -

nas/test     compressratio         1.00x                    -

nas/test     compression           lz4                      inherited from nas

nas/test     refcompressratio      1.00x                    -
I’ll copy some dummy data onto there, then recheck.
nas/test     compressratio         1.71x                    -

nas/test     compression           lz4                      inherited from nas

nas/test     refcompressratio      1.71x                    -
Nice!
Obviously, compression ratio’s will depend highly on the data, but for our purposes, most things are web data, mail and other things, so we’re heavy on text content, and benefit highly from compression.
Once we get our SAN up and running, I’ll be looking at whether I should be using rsync still or I should look at zfs snapshots -> zfs storage on other servers.
That though, is a topic for another day.
Rather hacky fix to sort out utf8 latin-1 post issues after export from a rather badly encoded mysql db in wordpress.
UPDATE wp_posts SET post_content = REPLACE(post_content, '“', '“');
UPDATE wp_posts SET post_content = REPLACE(post_content, 'â€', '”');
UPDATE wp_posts SET post_content = REPLACE(post_content, '’', '’');
UPDATE wp_posts SET post_content = REPLACE(post_content, '‘', '‘');
UPDATE wp_posts SET post_content = REPLACE(post_content, '—', '–');
UPDATE wp_posts SET post_content = REPLACE(post_content, '–', '—');
UPDATE wp_posts SET post_content = REPLACE(post_content, '•', '-');
UPDATE wp_posts SET post_content = REPLACE(post_content, '…', '…');
Not recommended, but I had a use for it.
13
Going Solar
I’ve been interested in going completely solar for a while now back home in South Africa, as pricing for electricity has rapidly increased past the pricing for solar; return on investment is in the 3 year range currently.
It will get close to 1 1/2 year return on investment when Eskom new pricing increases happen, so its a no brainer to install.
I’ve already replaced our geyser (hot water system) with a solar based system, plus all the lighting in the house is already LED based (yay China!), so our base load of electricity is low for the size of the house. I can still improve though by installing solar, to make the electrical costs approach zero, and at some indeterminate point in the future when Eskom allows for legalized grid tie, a profit center!
As I’ll nominally be a 10KW producer (I can add 2 panels to get there), I should be able to at some point pump back into the grid sooner rather than later – as the trial projects for Cape Town all sit at the 10KW range and up…
From what I read –
Eskom will pay out R 1.20 per kilowatt hour
generated by your solar system for the first three years, 70% immediately after installation
and the balance at 10% for the next three years.
More here – http://www.capetown.gov.za/en/EnergyForum/Documents/Eskom%20IDM%20small-scale%20renew%20energy%20-%20Lodine%20Redelinghuys_31Aug2012.pdf
(Yes, currently this is only available for commercial use, but I do expect that to change at some point. My system should be in use for at least 25 years, so I should get some benefit at some point in the future.)
—-
Before I get to pricing though, I need to explain how it all works.
For any system, you’ll need some kind of input.
As I’m looking at Solar, thats my input. I can also look at thermal or wind based. Wind based is a distinct possibility in Cape Town, but I have been advised that its probably too windy to use! (turbines can’t run during extremely windy weather or you break the turbines).
So, I’m going with Solar.
There are 2 types of solar panel out there. Monocrystalline and Polycrystalline.
Monocrystalline is more expensive per watt, as its a more difficult process to make panels from.
Mono panels are also slightly smaller per watt of output. On average mono panels are about 14% smaller. They also work better in hot climates.
Aside from those differences, they’re fairly similar.
Panels are typically rated in watt terms.
A 300w panel will give you 300W of power at peak output (eg mid-day).
This 300w of power is at DC voltage though, and for house use, we need A/C
The 300w panels I’ve been looking at give 36V @ 8.3A.
I’ll probably go with polycrystalline, as the pricing isn’t really worth the extra 30% for mono crystalline for my needs.
Panel info below – (click me for pdf)
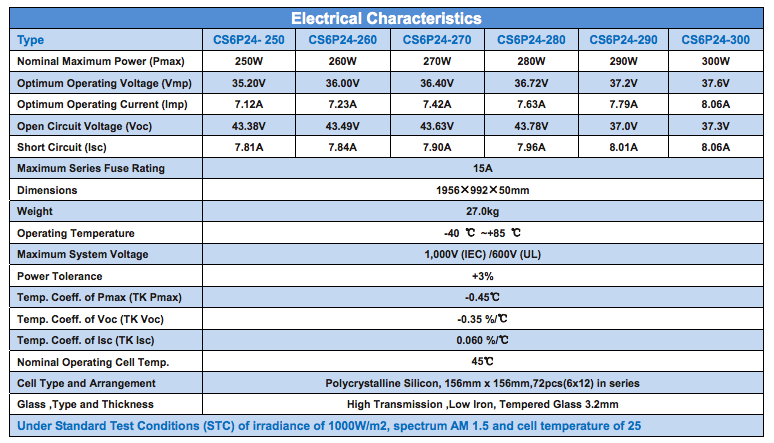
Basic calculation for power output is P = V * A
This works out to 300W a panel (303W = 37.6V * 8.06A)
I’ll be getting 30 panels, as thats about the max I can fit on my roof in theory.

(My brother hasn’t gotten me the exact sizing yet).
To use this, we need an inverter though, as something has to convert the DC power into AC.
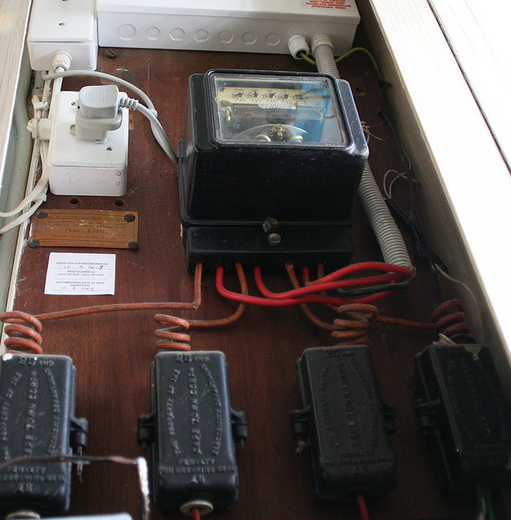
In my house, I have 3 phase power, and an antique metering system.

3 Phase is good, as i have sufficient power for my needs, but its bad as I need a more advanced inverter to give me 3 phase.
I could use 3 x single phase inverters, but for simplicity, I’ll be going with a single 3 phase inverter.
If you see the cabling here – you’ll see we have 3 phases + 1 neutral = 4 cables.
To work out what sort of inverter I can use, I need to do some basic math.
I’ll have 30 Panels total.
Each panel gives out 36V @ 8A., and that will give me approximately 9KW output. As the smallest *decent* 3 phase inverters I could find are 10KW ones, thats a good size.
I have a choice of running the panels in series or in parallel.
If I run them in series, then the Voltage increases.
Eg 1 panel = 37v, 2 panels = 74v @ 8A…
If I run them in parallel, then the Ampage increases.
Eg 1 panel = 8A, 2 panels = 16A @ 37v
If you’ve ever seen welding cables or car battery cables, you’ll see what sort of cabling is required for high Amps. So, everyone wires using DC voltage.
My inverter of choice is probably going to be this: Growatt10000UE
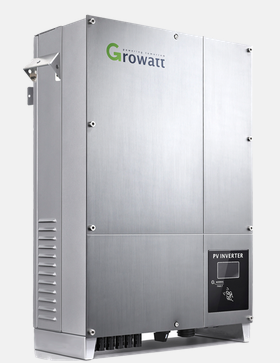
That 3 phase inverter has the following characteristics.
It will power up from 300V (min voltage to run), and accepts voltage up to 1000V.
It also has 4 inputs for panels.
Generally each input is called a “string”.
As I’ll have 30 panels, I’ll probably be balancing them out in 2 x 15 piece strings -> the inverter.
Each string will work like this
37V * 15 = 564V DC * 8A (4.54KW of power)
37V * 15 = 564V DC * 8A (4.54KW of power)
This will give me a rough total of 9W peak power.
As conversions are never perfect, and panels can output more during peak than they are rated for, I’m getting a 10KW inverter. This will allow for some small headroom in future if I need to expand slightly.
It also is fine for something I haven’t talked about yet – open circuit. The panels I’m looking at run at 36v open circuit (i.e. before they kick in), the inverter also needs to be able to work without issue at open circuit voltages. As the inverter supports 1000v, open circuit of 564v isn’t an issue.
So far, costs are:
30 Panels = 720RMB / poly panel = 21,600 (mono panels are about 900-1000 per piece). Poly panels are physically 1.9M x 1M @ 300w / 28KG , Mono 1.9M x 1M @ 300W / 25kg
10KW 3 Phase inverter = 9,000RMB
Weight = 1000KG with packing.
Shipping + clearance – roughly 15,000 + duties @ 20%
Total landed in Cape Town = 45,000RMB / R60,000
That gives me a rough pricing of R6.6 a watt *installed*.
It also gives me a system that I can hook into the grid (illegally currently!), but won’t provide for power in case of failure.
I actually don’t need something that size, but sadly, due to the cost of clearance being a complete rip off, it doesn’t make sense to ship less 🙁
Currently our power bill sits at about 700-1000 rand a month, over a year this is around R12,000 using worst case scenario maths 😉
My intended system will cost me about R60,000 + install labour. At current electricity pricing, I should see a complete payback for the system in about 5 years. Given that electricity prices are going to be *doubling* over the next 5 years in Cape Town, this will actually be achieved in about 3 years or so.
Not too shabby!
Our current monthly electricity usage looks like this for those who may be interested.

You’ll note that electricity use spikes on certain days (mainly weekends) – this generally ties into when the maid is there, as then the washing machine, dish washer etc get run, or on the rare occasion that my brother actually cooks 😉
Initially I’ll be feeding excess power back into the grid, and using that as a “battery”.
How will that work?
Well, as I have an older meter, it can run backwards. So, daytime when I have _substantial_ excess, i’ll be running backwards, and nighttime, when the solar panels are not generating, I’ll be running forwards.
Essentially, using the grid as my battery..
Eskom will be benefiting from all this, as I’ll be a net producer far over what I consume – so they’ll get all the free electricity I’ll be generating.
Its also safe – as the inverter will not feed back into the grid if its offline – eg when we have one of our rather too regular power outages (3 in the last month from my logs).
Longer term I’ll be installing a battery system to allow for complete off grid, but funds don’t currently stretch to that yet..
Do note that the above is for my needs – your needs might not be my needs!
I need a 3 phase system. Most people _don’t_. I’m also going grid tied for the moment due to funding available. Others might find it better to have a hybrid grid tie/ battery system. If I could afford it, I’d go that route!
I’m also *heavily* overspeccing the output – clearance costs are substantial for South Africa (highest in the world almost), so it doesn’t make sense for me to ship a small system, as there is only a marginal cost for what I’m speccing.
A suitably sized system for us would be 8 panels, and a 3kw inverter. I’d be crazy to ship that though, as the clearance is more than the cost of the system. So, I’m heavily overspeccing on requirements so that it makes sense. Long term its also a no-brainer for me, as I’ll have substantial excess I can sell back to the grid.
In case anyone is interested how I’ll retrofit this sort of system with a battery backup – here is a diagram of a single phase implementation – I’d be doing something similar:

That said, I do have another easier solution – I’ll probably go cheap – stick the things that may not lose power(tm) circuit on a 2KV UPS, and have an isolator switch in circuit for when the grid goes down so its isolated from Eskom. This will accomplish the same thing pretty much, and should tide us over for the average 3-4hour outages we seem to experience every few weeks. It will also sit nicely in the computer rack that will contain the media side of the house and data storage needs 🙂
Debian 7 was released, and like all good sysadmin’s we updated our servers to the newer OS version.
Unfortunately there have been a few minor issues where functionality has changed.
One of those relates to FTP.
We generally use VSFTP as its relatively secure, and has chroot functionality out of the box (i.e. users can only see their own folders).
Today a user complained that they couldn’t login, and on checking we saw this little error:
500 OOPS: vsftpd: refusing to run with writable root inside chroot ()
A quick google showed that 2.3.5 breaks backward compatibility somewhat by changing functionality, oops!
This was done for safety reasons, but is a bit of a questionable change to functionality when it breaks things.
The suggestions on the internet were to add this line:
allow_writeable_chroot=YES
Which didn’t work – VSFTP wouldn’t restart, as it didn’t recognize it. What to do?
Well, the quick solution is to use Debian unstable, as that uses a newer version of VSFTP 3.x which does recognize that line.
So:
(assuming you have the testing repo’s in apt.sources)
apt-get install -t testing vsftpd

echo allow_writeable_chroot=YES >> /etc/vsftpd.conf

/etc/init.d/vsftpd restart
As one of the main contention points people have with mail service is either the amount of spam they receive, or the amount of legitimate email we block, we’ve decided to put the solution in your hands.
We’ve added user access to the blocking implementation we use at Computer Solutions.
For a quite rerun on this our incoming mail rules are as follows:
- Sending Server has a valid Reverse DNS Entry
- Sending Server conforms to mail RFC’s
- Sending Server is not listed in any of the following Antispam Service Lists zen.spamhaus.org cblplus.anti-spam.org.cn cdl.anti-spam.org.cn bl.spamcop.net dnsbl.njabl.org
- Mail does not contain a virus, malware or similar content.
- Mail is addressed to a valid sender.
- Recipients mailbox is not full.
We’re giving you access to do what you want with regards to incoming spam blocks.
If you decide that our heinous blocking of senders who’s servers are _definitely_ listed in spam listings is not to your taste, then you can change that.
If you want to whitelist any incoming mail you can do the following:
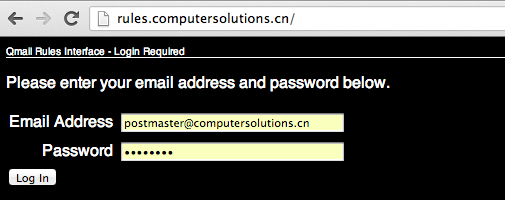
1) Login as the postmaster account for your domain at http://rules.computersolutions.cn (in the example below, I’m editing my own account, you’ll need to use YOUR postmaster@yourdomain.com / password!)
2) Select Domain Wide Focus

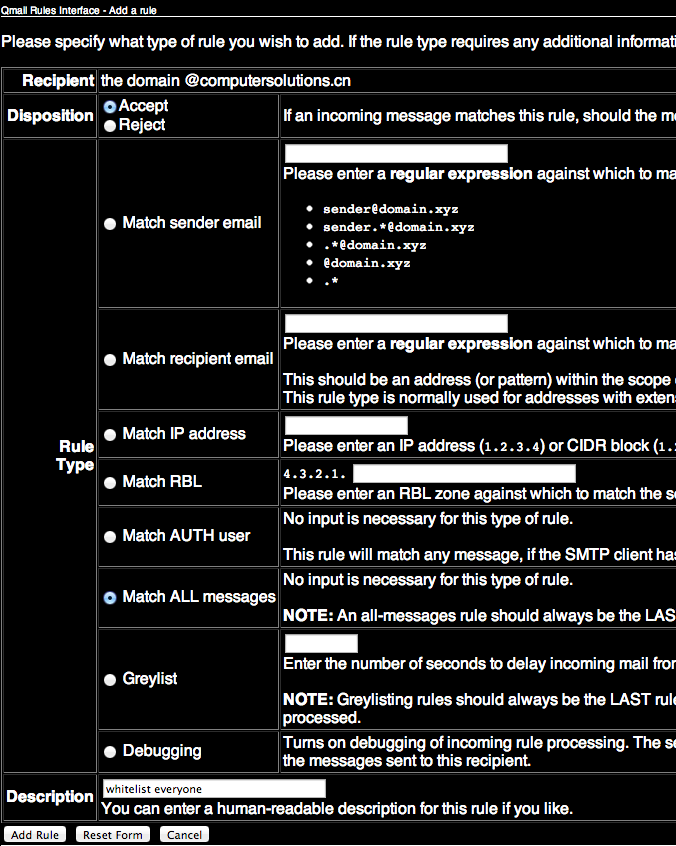
3) Click Add a domain specific rule (this will apply to all messages received for your domain – i.e. anything @yourdomainname.com)
![]()
4) Setup appropriate rules (there are a number of options – in the example below I’m whitelisting all incoming mail).
5) Note that the System rules below are now greyed out (assuming you whitelisted as per example above).
Thats because they no longer apply!

In future we will be pushing clients to use this interface for their unblocking / blocking requirements, so that the needs of the few outvote the needs of the many, and your incoming email can go where no wo/man has gone before.
Lawrence.
Archives
- November 2024
- November 2019
- October 2019
- August 2019
- April 2019
- February 2017
- September 2016
- June 2016
- May 2016
- September 2015
- August 2015
- June 2015
- April 2015
- December 2014
- October 2014
- September 2014
- July 2014
- June 2014
- April 2014
- October 2013
- July 2013
- May 2013
- April 2013
- March 2013
- January 2013
- December 2012
- October 2012
- August 2012
- July 2012
- June 2012
- May 2012
- April 2012
- March 2012
- December 2011
- November 2011
- October 2011
- September 2011
- July 2011
- May 2011
- April 2011
- March 2011
- February 2011
- January 2011
- December 2010
- November 2010
- October 2010
- September 2010
- August 2010
- July 2010
- June 2010
- May 2010
- April 2010
- March 2010
- February 2010
- January 2010
- December 2009
- November 2009
- October 2009
- May 2009
- April 2009
- March 2009
- February 2009
- January 2009
- December 2008
- November 2008
- October 2008
- September 2008
Categories
- Apple
- Arcade Machines
- Badges
- BMW
- China Related
- Cool Hunting
- Exploits
- Firmware
- Food
- General Talk
- government
- IP Cam
- iPhone
- Lasers
- legislation
- MODx
- MySQL
- notice
- qmail
- requirements
- Reviews
- Service Issues
- Tao Bao
- Technical Mumbo Jumbo
- Things that will get me censored
- Travel
- Uncategorized
- Useful Info