13
Apple Tips and Tricks
As I haven’t posted in a while, I thought I would publish a few tips and tricks for Apple computers.
All of the tips below are done inside Terminal.
I find most of them useful, don’t blindly copy and paste unless you understand what you’re doing.
Some of them can be accomplished in the OSX Gui, some cannot.
—-
Getting access to the Beta’s for OS X
Accessing public beta’s via Software update (on Yosemite)
sudo defaults write /Library/Preferences/com.apple.SoftwareUpdate CatalogURL https://swscan.apple.com/content/catalogs/others/index-10.10beta-10.10-10.9-mountainlion-lion-snowleopard-leopard.merged-1.sucatalog.gz
softwareupdate -l
Accessing all available beta’s via Software update (on Yosemite)
sudo defaults write /Library/Preferences/com.apple.SoftwareUpdate CatalogURL https://swscan.apple.com/content/catalogs/others/index-10.10seed-10.10-10.9-mountainlion-lion-snowleopard-leopard.merged-1.sucatalog.gz
softwareupdate -l
Resetting Software Update catalog to the defaults (eg if you used one of the above 2 catalogs)
sudo softwareupdate –clear-catalog
Making TextEdit default to plain text mode for new documents
defaults write com.apple.TextEdit RichText -int 0
Change the default Finder location to your home folder (~/)
defaults write com.apple.finder NewWindowTarget -string "PfLo" && \

defaults write com.apple.finder NewWindowTargetPath -string "file://${HOME}"
Make the save panel expanded by default
defaults write NSGlobalDomain NSNavPanelExpandedStateForSaveMode -bool true
Turning off the warning when changing file extensions
defaults write com.apple.finder FXEnableExtensionChangeWarning -bool false
Check for software updates daily
defaults write com.apple.SoftwareUpdate ScheduleFrequency -int 1
Show the icons for drives, network drives, and usb disks on the desktop
defaults write com.apple.finder ShowExternalHardDrivesOnDesktop -bool true && \

defaults write com.apple.finder ShowHardDrivesOnDesktop -bool true && \

defaults write com.apple.finder ShowMountedServersOnDesktop -bool true && \

defaults write com.apple.finder ShowRemovableMediaOnDesktop -bool true
Disable creation of .DS_Store files on network shares
defaults write com.apple.desktopservices DSDontWriteNetworkStores -bool true
Unhide the user Library folder
chflags nohidden ~/Library
Enable AirDrop over Ethernet and on unsupported Macs
defaults write com.apple.NetworkBrowser BrowseAllInterfaces -bool true
Had an interesting issue trying to install/upgrade to Mavericks on an Apple 4,1 Mac Pro Desktop.
It was running Snow Leopard, but if I tried to install Mountain Lion or Mavericks it would give a disk error on reboot into the installer.
I made a USB installer, booted off that, and could see that disk utility couldn’t see any drives inside the installer.
As the equipment was working fine on Snow Leopard, this wasn’t a hardware issue.
I updated the firmware on the machine to the latest version, but still the same issue.
Cleared NV ram, same.
Compared SMC revisions, AHCI firmware revisions against a good machine, everything was the same.
Checked dmesg on the machine during a Mavericks installer boot, and could see that it was having issues with wifi, then with SATA.
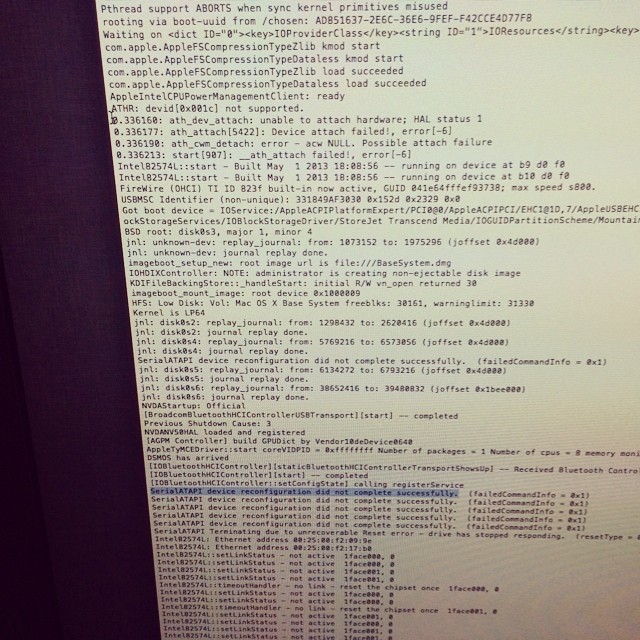
I checked the other machine, and saw that it had a different wifi card. Bingo!
I removed the wifi card from the non-working machine, and rebooted back into the installer, and it could suddenly see the drives again.
My conclusion is that the Intel ACH10 drivers, and the Atheros ARB5X86 drivers conflict with each other in 10.8 and above. I tested in the 10.10 beta too to be sure, and had the same issue.
Something apple needs to sort out, I guess..
Interesting issue, it took me a little while to troubleshoot.
8
Macbook Pro top replacement issue – or how I fixed my Macbook and sorted out the function keys.
I’ve been buying broken Macbook’s in SA when I’ve been home, for repair in China.
My latest purchase is a pre unibody Mac Book Pro that had been dropped – the top case was dented,and the screen shattered.
The LCD was fairly painless to replace – I’ve done quite a few already on various models, and I have a bazillion suppliers for raw panels.
The top case was a little more problematic – I ordered 2 consecutive replacements off of Taobao, but unfortunately the delivery company (ShenTong) destroyed both in shipping. Took about a month to sort that out and find a yet another replacement with explicit instructions please not to send via ShenTong (aka destroyer of parts).
The third case arrived in pristine condition, and I installed the keyboard from the previous case, only to find that the function keys didn’t work, and the caps lock didn’t work.
It wasn’t a hardware issue with the keyboard, as it worked fine in another laptop. I even ordered another one just to make sure.
A bit of googling revealed that the keyboard kext gets the layout from the USB hardware ID present in the top case.
As my top case didn’t quite match up hardware id wise, I was seeing that as an issue.
Fixing this is a bit tricky, but doable.
First up was to find out what the hardware id is for the USB case.
In my case this was as below (snarfed from System Information / USB)
Apple Internal Keyboard / Trackpad:

  Product ID:	0x0231
  Vendor ID:	0x05ac  (Apple Inc.)
  Version:	0,70
  Speed:	Up to 12 Mb/sec
  Manufacturer:	Apple, Inc.
  Location ID:	0x5d200000 / 3
  Current Available (mA):	500
  Current Required (mA):	40
Product ID is the useful bit – 0x0231 = 561 in decimal.
So, we need to lookup 561 in the kext (driver) for the keyboard.
In Lion / Snow Leopard, this is in the AppleUSBTopCase.kext over in System / Library / Extensions.
If you open up that kext, it has the plist for the keyboard layouts over here –
AppleUSBTopCase.kext » Contents » PlugIns » AppleUSBTCKeyEventDriver.kext » Contents » Info.plist
Open up the Info.plist, and look for the Product ID that matches your Product ID – in my case 560.
The key FnFunctionUsageMap contains the mapping for the keyboard. In my case I had to change it to this:
FnFunctionUsageMap
0x0007003a,0x00ff0005,0x0007003b,0x00ff0004,0x0007003c,0x000c00e2,0x0007003d,0x000c00ea,0x0007003e,0x000c00e9,0x0007003f,0x00070083,0x00070040,0x00ff0006,0x00070041,0x00ff0007,0x00070042,0x00ff0009,0x00070043,0x00ff0008
Each value is a pair – first the key number, then the value to set it to.
0x0007003a = F1
0x0007003b = F2
…
My above settings are for
F1 = brightness down
F2 = brightness up
F3 = mute
F4 = volume down
F5 = volume up
F6 = num lock
F7 = Expose
F8 = Keyboard Light off
F9 = Keyboard Light down
F10 = Keyboard Light Up
F11 = n/a
F12 = n/a
I got these values from here –
// usage IDs from the hid
#define FF_BRIGHTNESS_DOWN_ID_LAPTOP @”0x00ff0005″ // for laptops
#define FF_BRIGHTNESS_UP_ID_LAPTOP @”0x00ff0004″ // for laptops
#define FF_BRIGHTNESS_DOWN_ID_EXTERNAL @”0xff010021″ // for external keyboards
#define FF_BRIGHTNESS_UP_ID_EXTERNAL @”0xff010020″ // for external keyboards
#define FF_EXPOSE_ID @”0xff010010″
#define FF_DASHBOARD_ID @”0xff010002″
#define FF_ILLUMINATION_TOGGLE_ID @”0x00ff0007″
#define FF_ILLUMINATION_DOWN_ID @”0x00ff0009″
#define FF_ILLUMINATION_UP_ID @”0x00ff0008″
#define FF_VIDEO_MIRROR_ID @”0x00ff0006″
#define FF_REWIND_ID @”0x000C00B4″
#define FF_PLAYPAUSE_ID @”0x000C00CD”
#define FF_FASTFORWARD_ID @”0x000C00B3″
#define FF_MUTE_ID @”0x000C00E2″
#define FF_VOLUME_DOWN_ID @”0x000C00EA”
#define FF_VOLUME_UP_ID @”0x000C00E9″
Once I’d done that, I also needed to rebuild (or in my case build), the Kext cache so that the OS would use it on next reboot.
Heres how to do that in Lion
sudo kextcache -v 1 -a i386 -a x86_64 -m /System/Library/Caches/com.apple.kext.caches/Startup/Extensions.mkext /System/Library/Extensions
…oh, and lastly, reboot of course!
Post reboot my function keys were working normally.
The caps lock key is still non-functional, but I’m ok with that, as its means a bit more work for little effort.
I may look into setting up a special plist to override the usb_id its getting from the hardware via the method here –http://www.projectosx.com/forum/index.php?showtopic=798
..but again, time vs effort…
Still, my Macbook is working now more or less, so its good enough for me 🙂
Of course, subsequently to doing this the hard way, I found a program to do it all for me!
http://pqrs.org/macosx/keyremap4macbook/
Suggest unless you are a masochist, use that!
Although I was supposed to be on a plane today heading home, I did something silly and got the dates wrong.
So, after a nice scenic trip yesterday evening to the airport and back, I get to do it all over again tonight.
Although that was a total pain, I did get to spend another day in Shanghai, and luckily enough, it coincided with the new Apple Store opening in the IFC center over in Pudong.
Overall impression – this is good!
I spoke with a number of the staff, and talked about the usual issues here (service, service, service…), and they were all quite understanding, and Apple’s genuinely trying to improve on things – hence their own store, and support in Shanghai (finally).
Shanghai has the biggest Genius bar in the world now. Unfortunately the store is a bit lacking compared to others in Shanghai – no iPad, no iPhone (other than the official one), but they do carry software and iMac’s / Laptops in lots of configurations.
I know where my next iMac is coming from 🙂
Downsides of the store – the moat outside is going to claim lots of victims. Its so subtle that you miss is – who’s idea was that?
We already saw unhappy victims with wet feet while we were leaving. I expect that to be changed in the near future, or the store will have to provide a shoe drying facility!
I also had the only iPad in the store (and possibly China at that point) that could play flash. Ok, there were only 2 iPad’s in the store, but still.. 😉
Photo’s of the store on flickr, which I would upload, but China is being finicky again. Grrr
Should be on the sidebar though.
8
Time Capsule repair
I’ve been seeing a bunch of failed Apple Time Capsules recently.
The issue is that the PSU’s are dying, as opposed to the HDD’s.
I took one apart to take a look, and the issue is the oh too familiar someone bought cheap capacitors that use the wrong formula. Tsk tsk Apple!
Here are some photos of a faulty power supply from a Time Capsule I’ve taken apart to demonstrate –

23
Cube vs Cube
Obviously I’ve had waaaaaaaaaay too much fun with my newly purchased coffee machine today.
Photo’s (and story) below.
Its a match of the titans.
Frog design vs A+P Cahen.
No rolls barred, its Cube vs Cube.
In the left corner, we have the old, the venerable…
G4 Cube
Part frakkin Toaster, part computer, (ex) fishtank, part space heater.
VS
The newcomer with an attitude, he’s shiny, and he isn’t afraid to show it off.
Le Cube
Archives
- November 2024
- November 2019
- October 2019
- August 2019
- April 2019
- February 2017
- September 2016
- June 2016
- May 2016
- September 2015
- August 2015
- June 2015
- April 2015
- December 2014
- October 2014
- September 2014
- July 2014
- June 2014
- April 2014
- October 2013
- July 2013
- May 2013
- April 2013
- March 2013
- January 2013
- December 2012
- October 2012
- August 2012
- July 2012
- June 2012
- May 2012
- April 2012
- March 2012
- December 2011
- November 2011
- October 2011
- September 2011
- July 2011
- May 2011
- April 2011
- March 2011
- February 2011
- January 2011
- December 2010
- November 2010
- October 2010
- September 2010
- August 2010
- July 2010
- June 2010
- May 2010
- April 2010
- March 2010
- February 2010
- January 2010
- December 2009
- November 2009
- October 2009
- May 2009
- April 2009
- March 2009
- February 2009
- January 2009
- December 2008
- November 2008
- October 2008
- September 2008
Categories
- Apple
- Arcade Machines
- Badges
- BMW
- China Related
- Cool Hunting
- Exploits
- Firmware
- Food
- General Talk
- government
- IP Cam
- iPhone
- Lasers
- legislation
- MODx
- MySQL
- notice
- qmail
- requirements
- Reviews
- Service Issues
- Tao Bao
- Technical Mumbo Jumbo
- Things that will get me censored
- Travel
- Uncategorized
- Useful Info