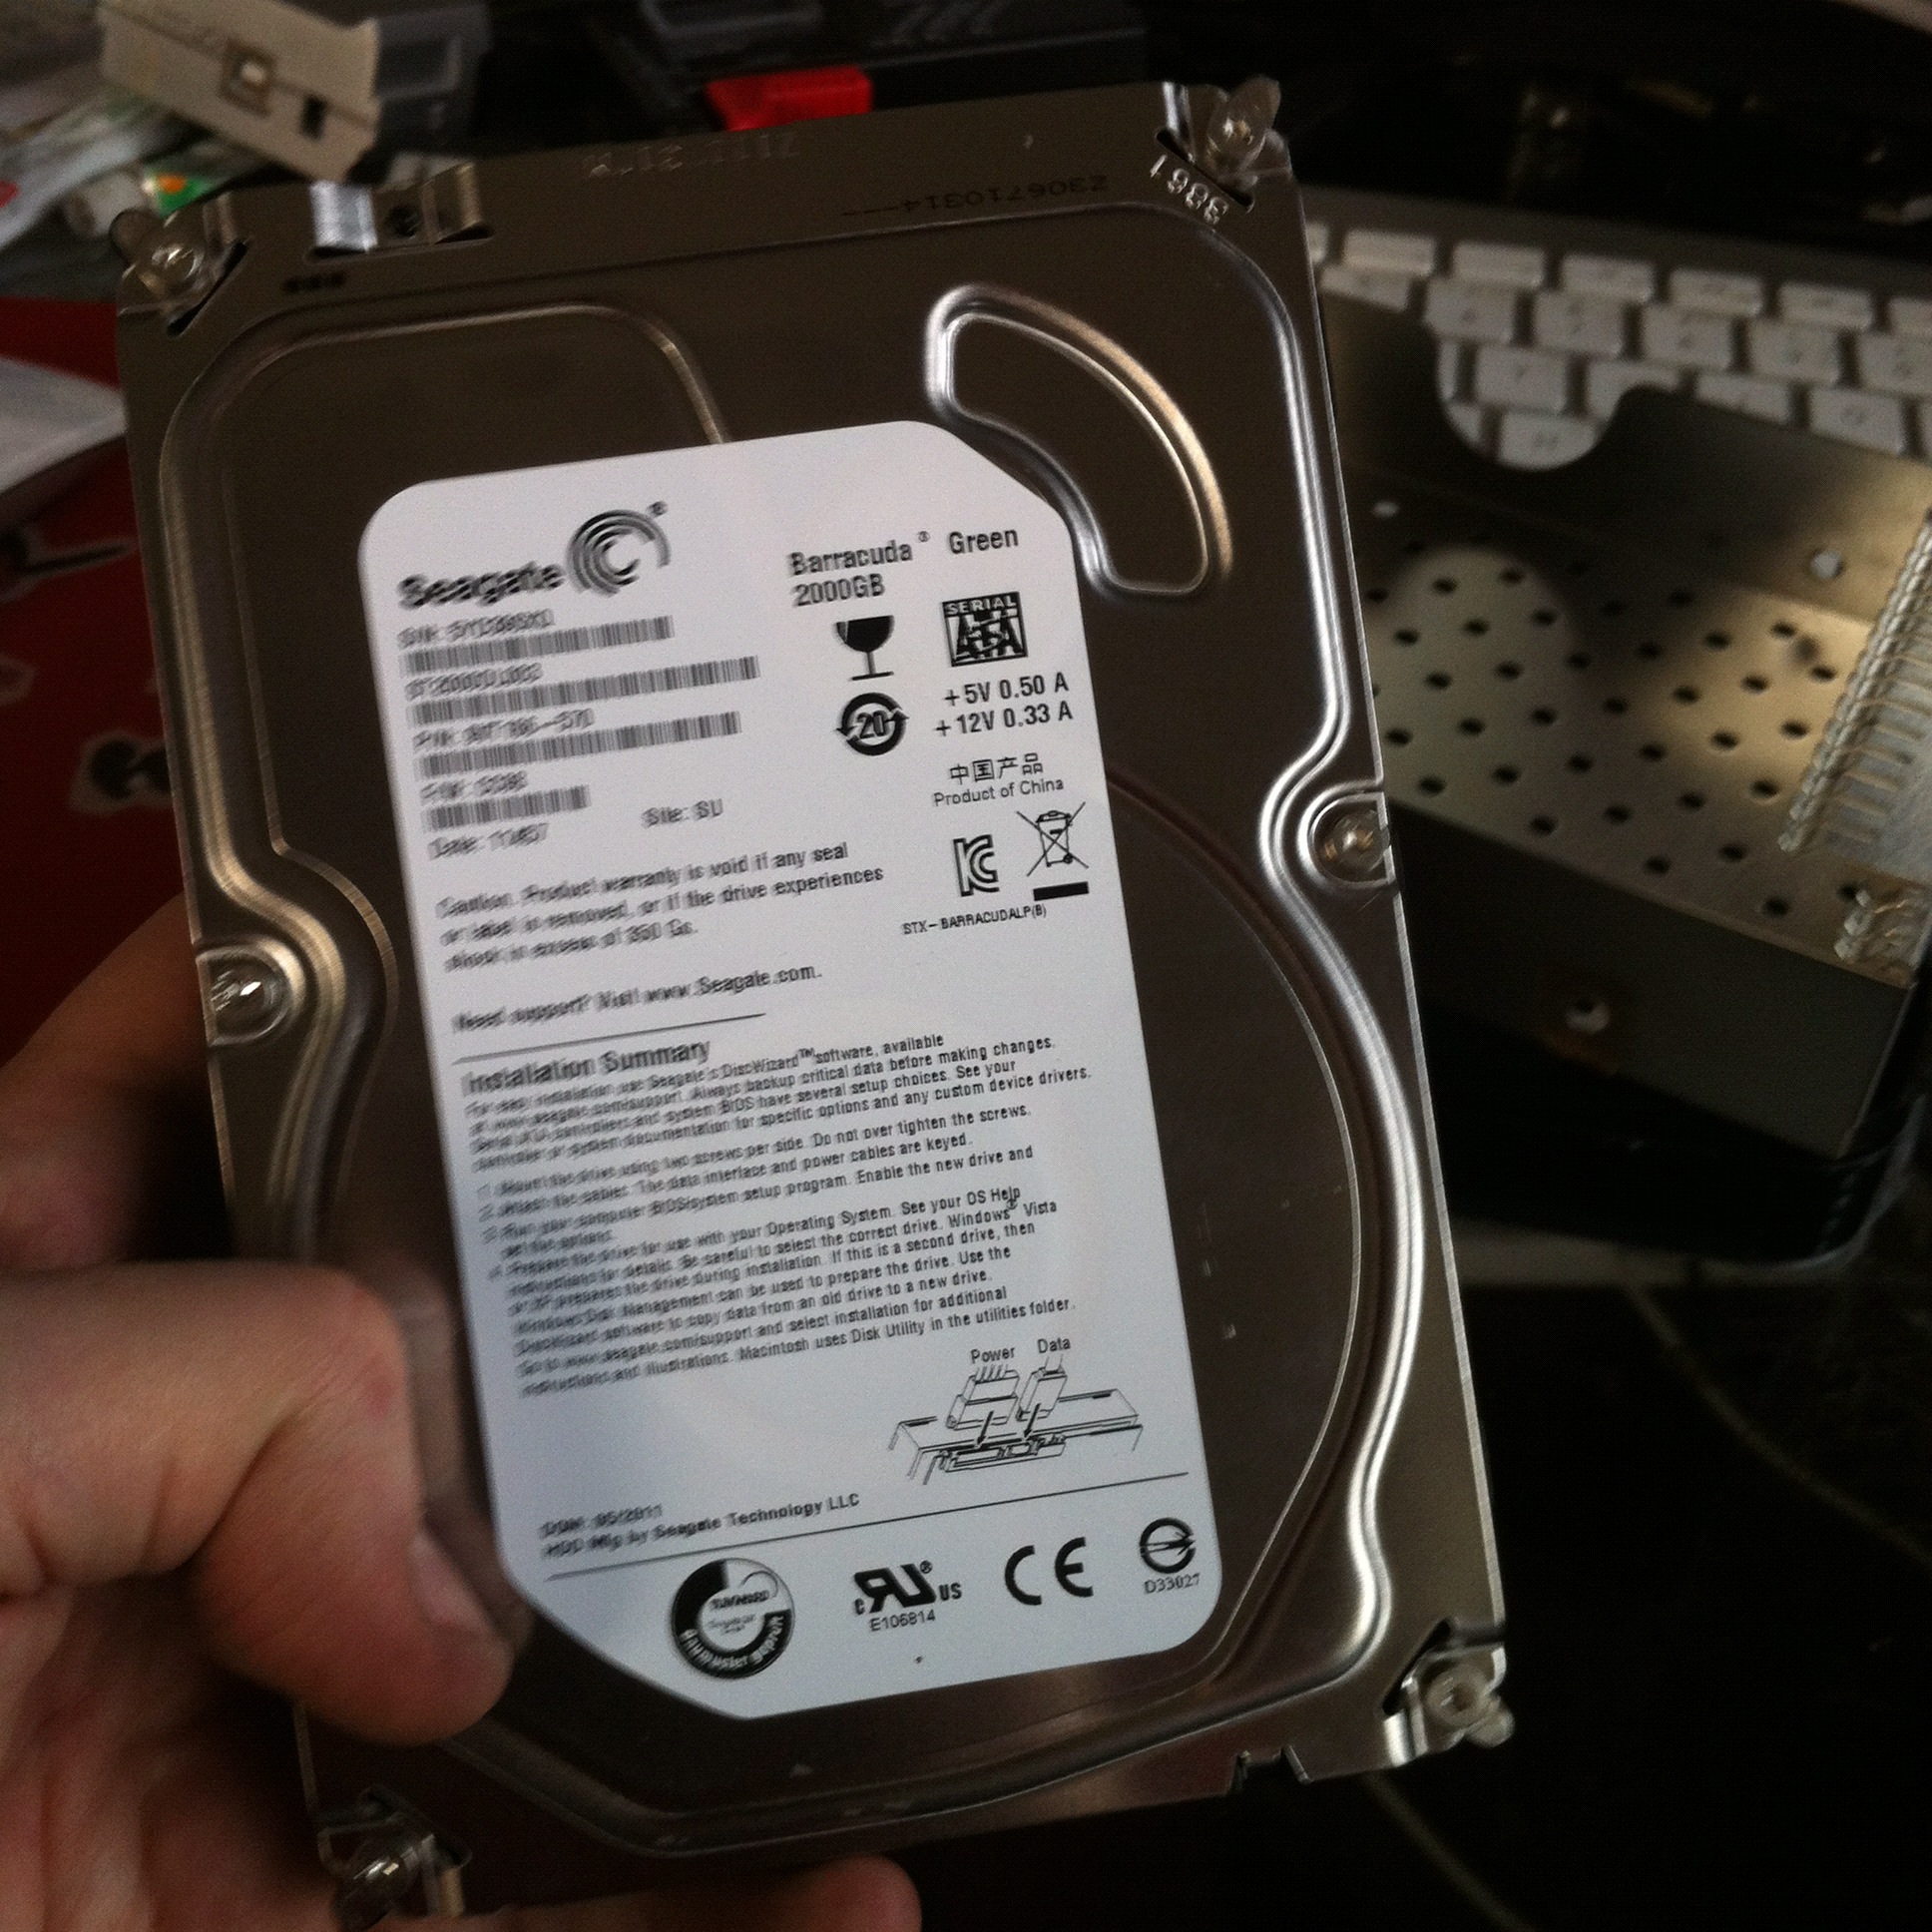
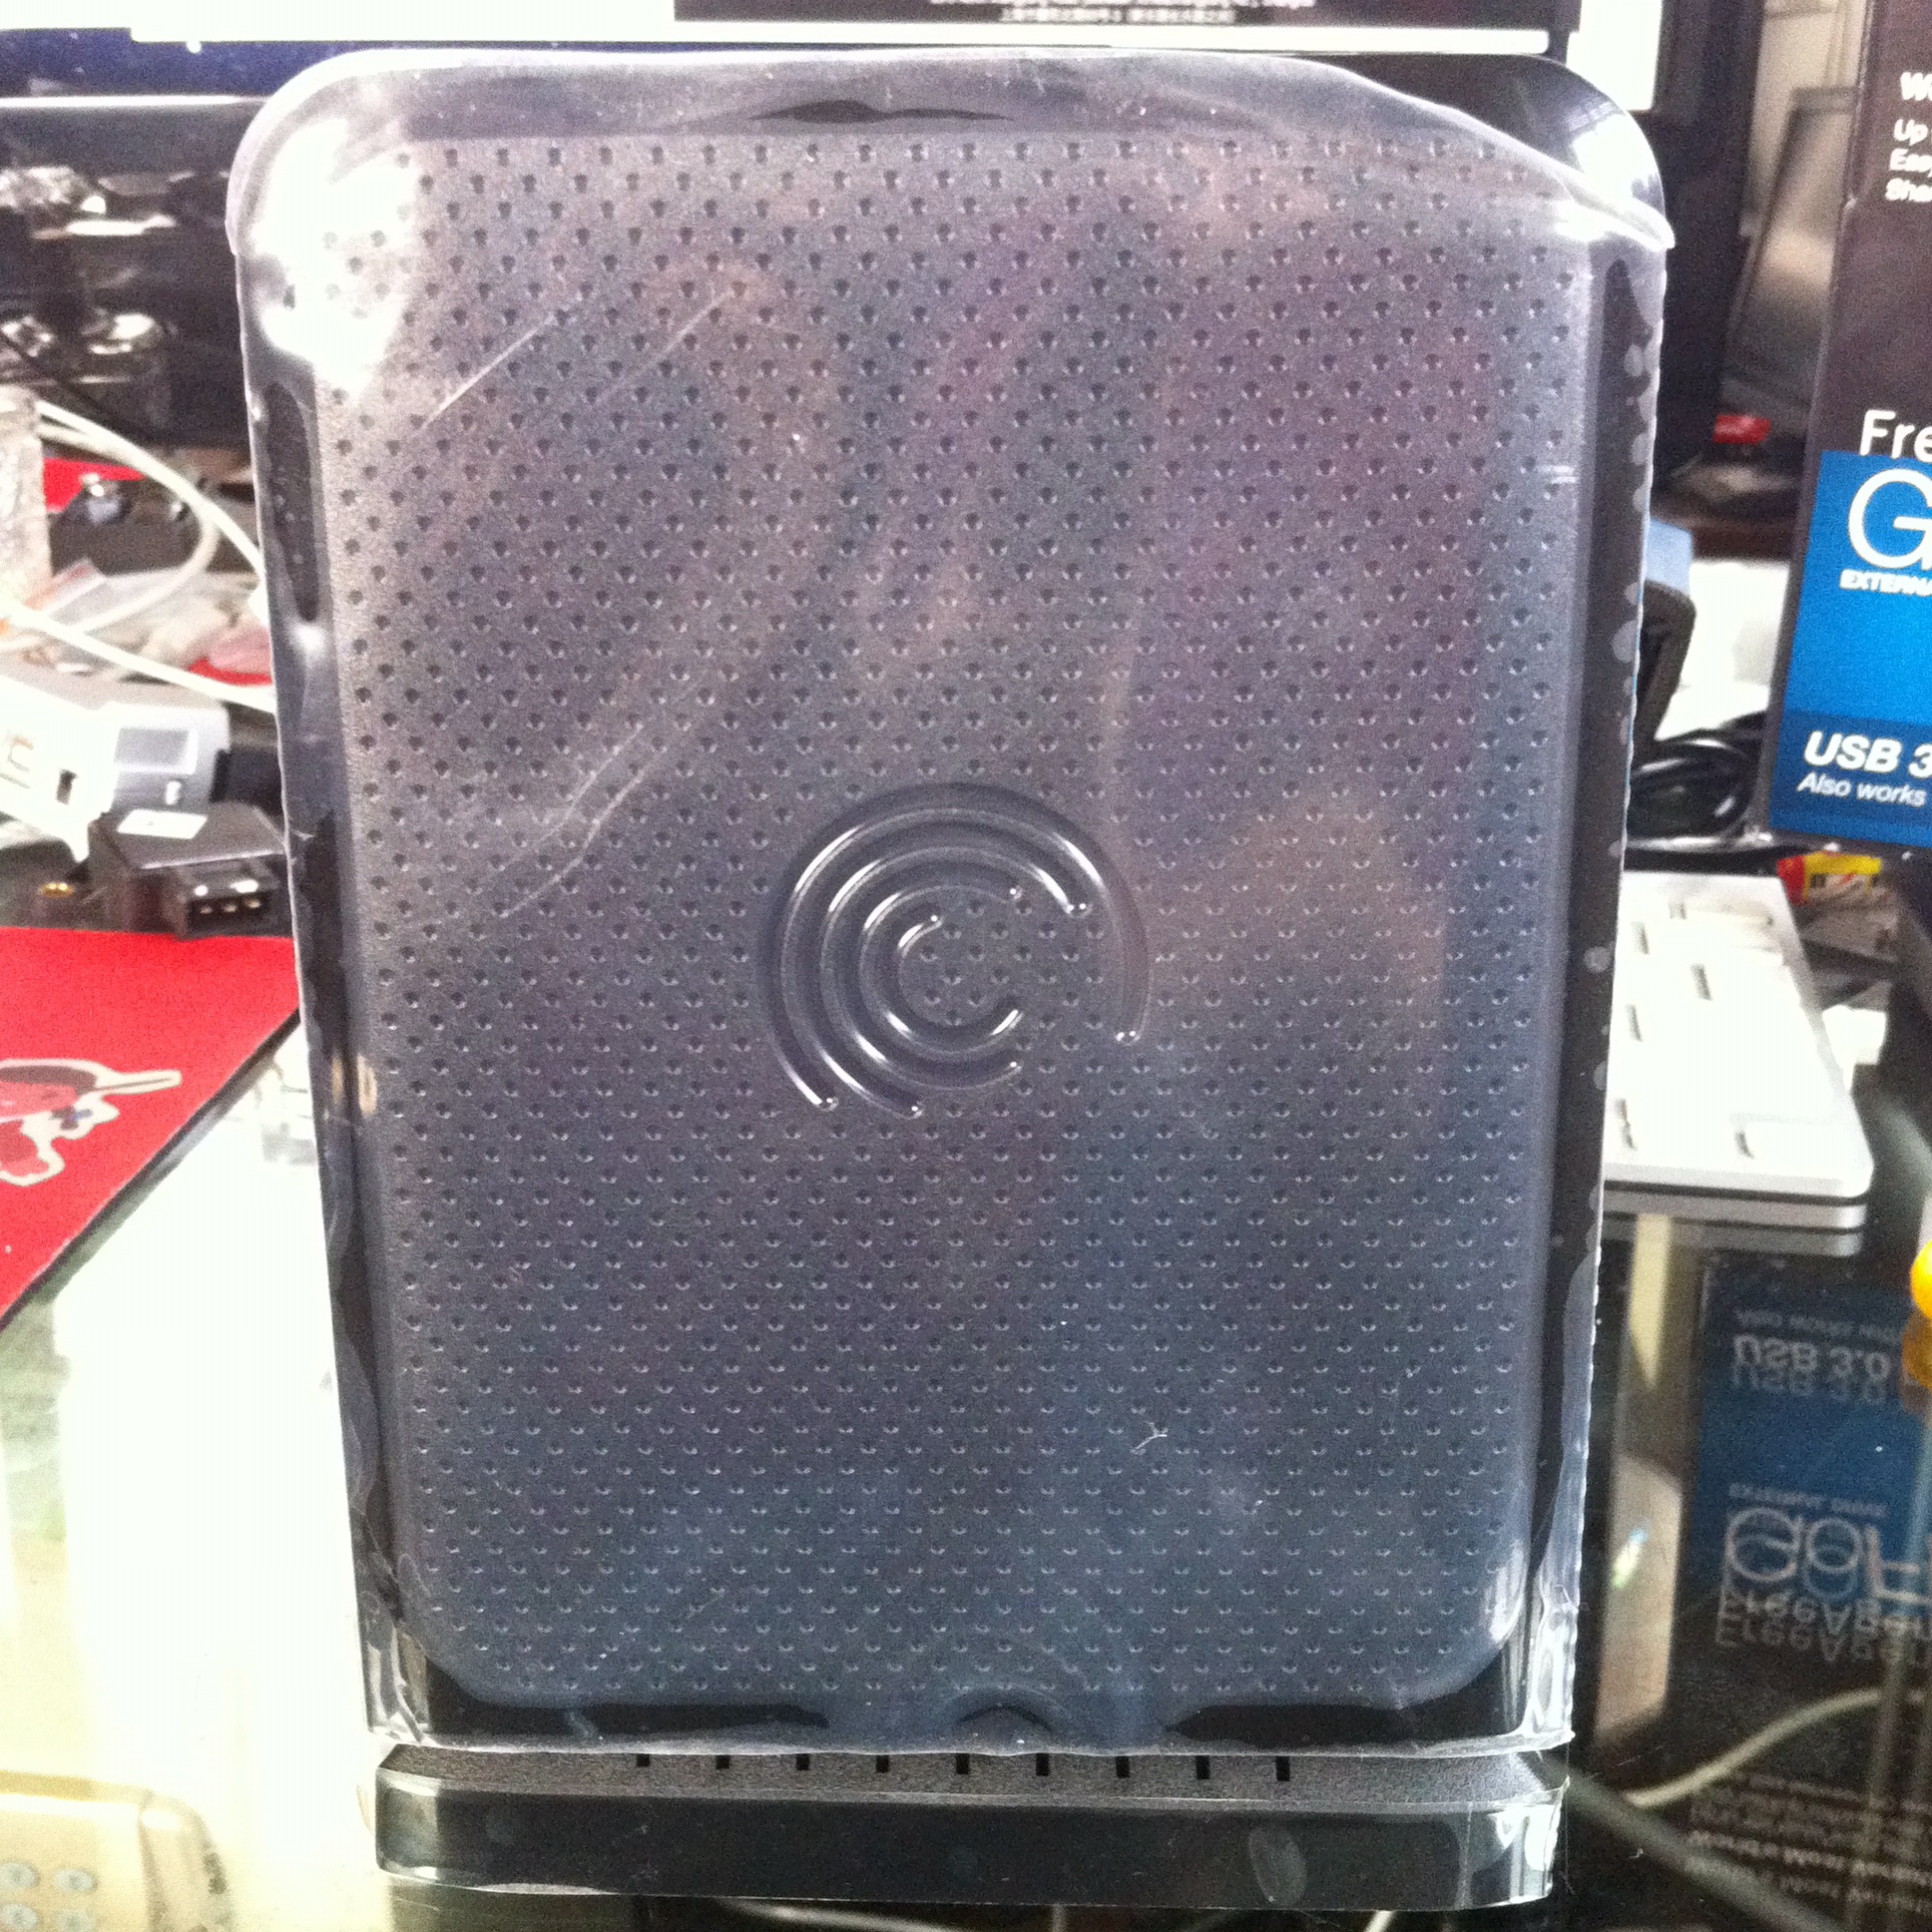
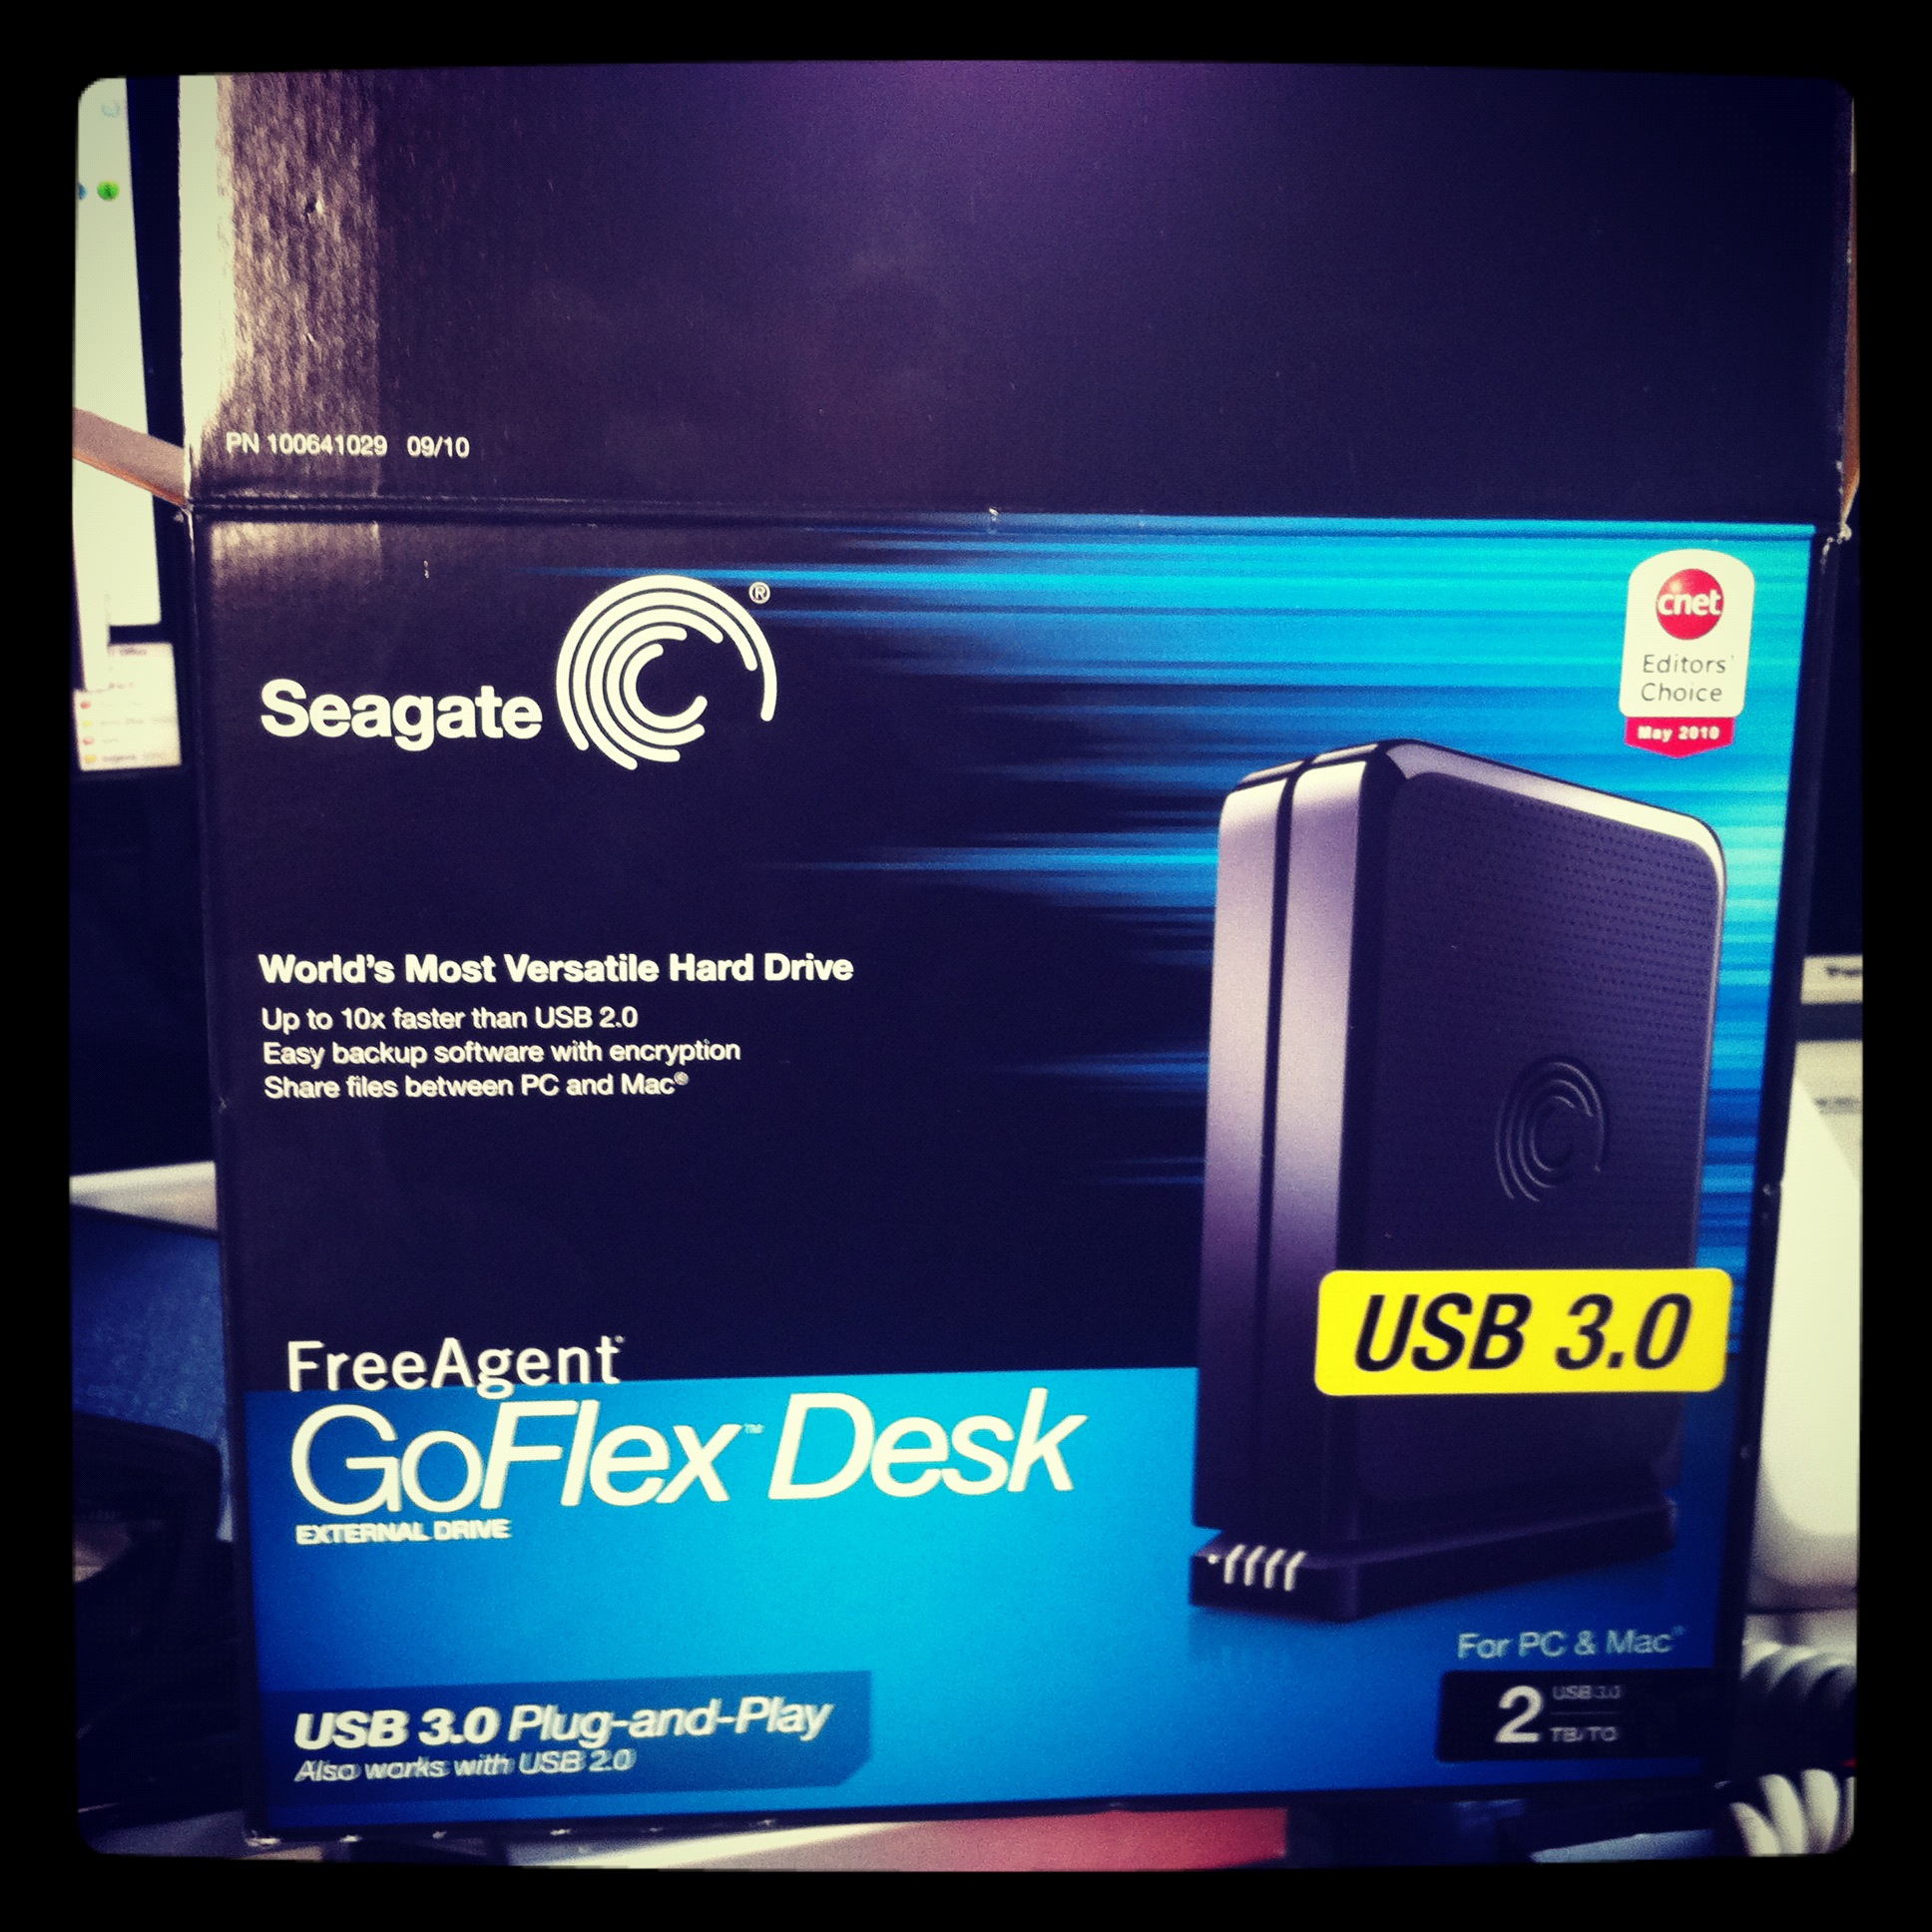
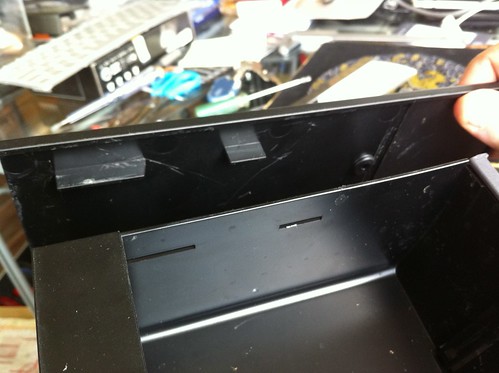
As drive prices have increased somewhat to roughly 200% in price locally over the last few weeks for raw drives, and external drive cases have not, I advised a client recently to purchase an external hard drive to save some money.
The drive case he brought over to me to have installed in his desktop was a Seagate GoFlex drive.
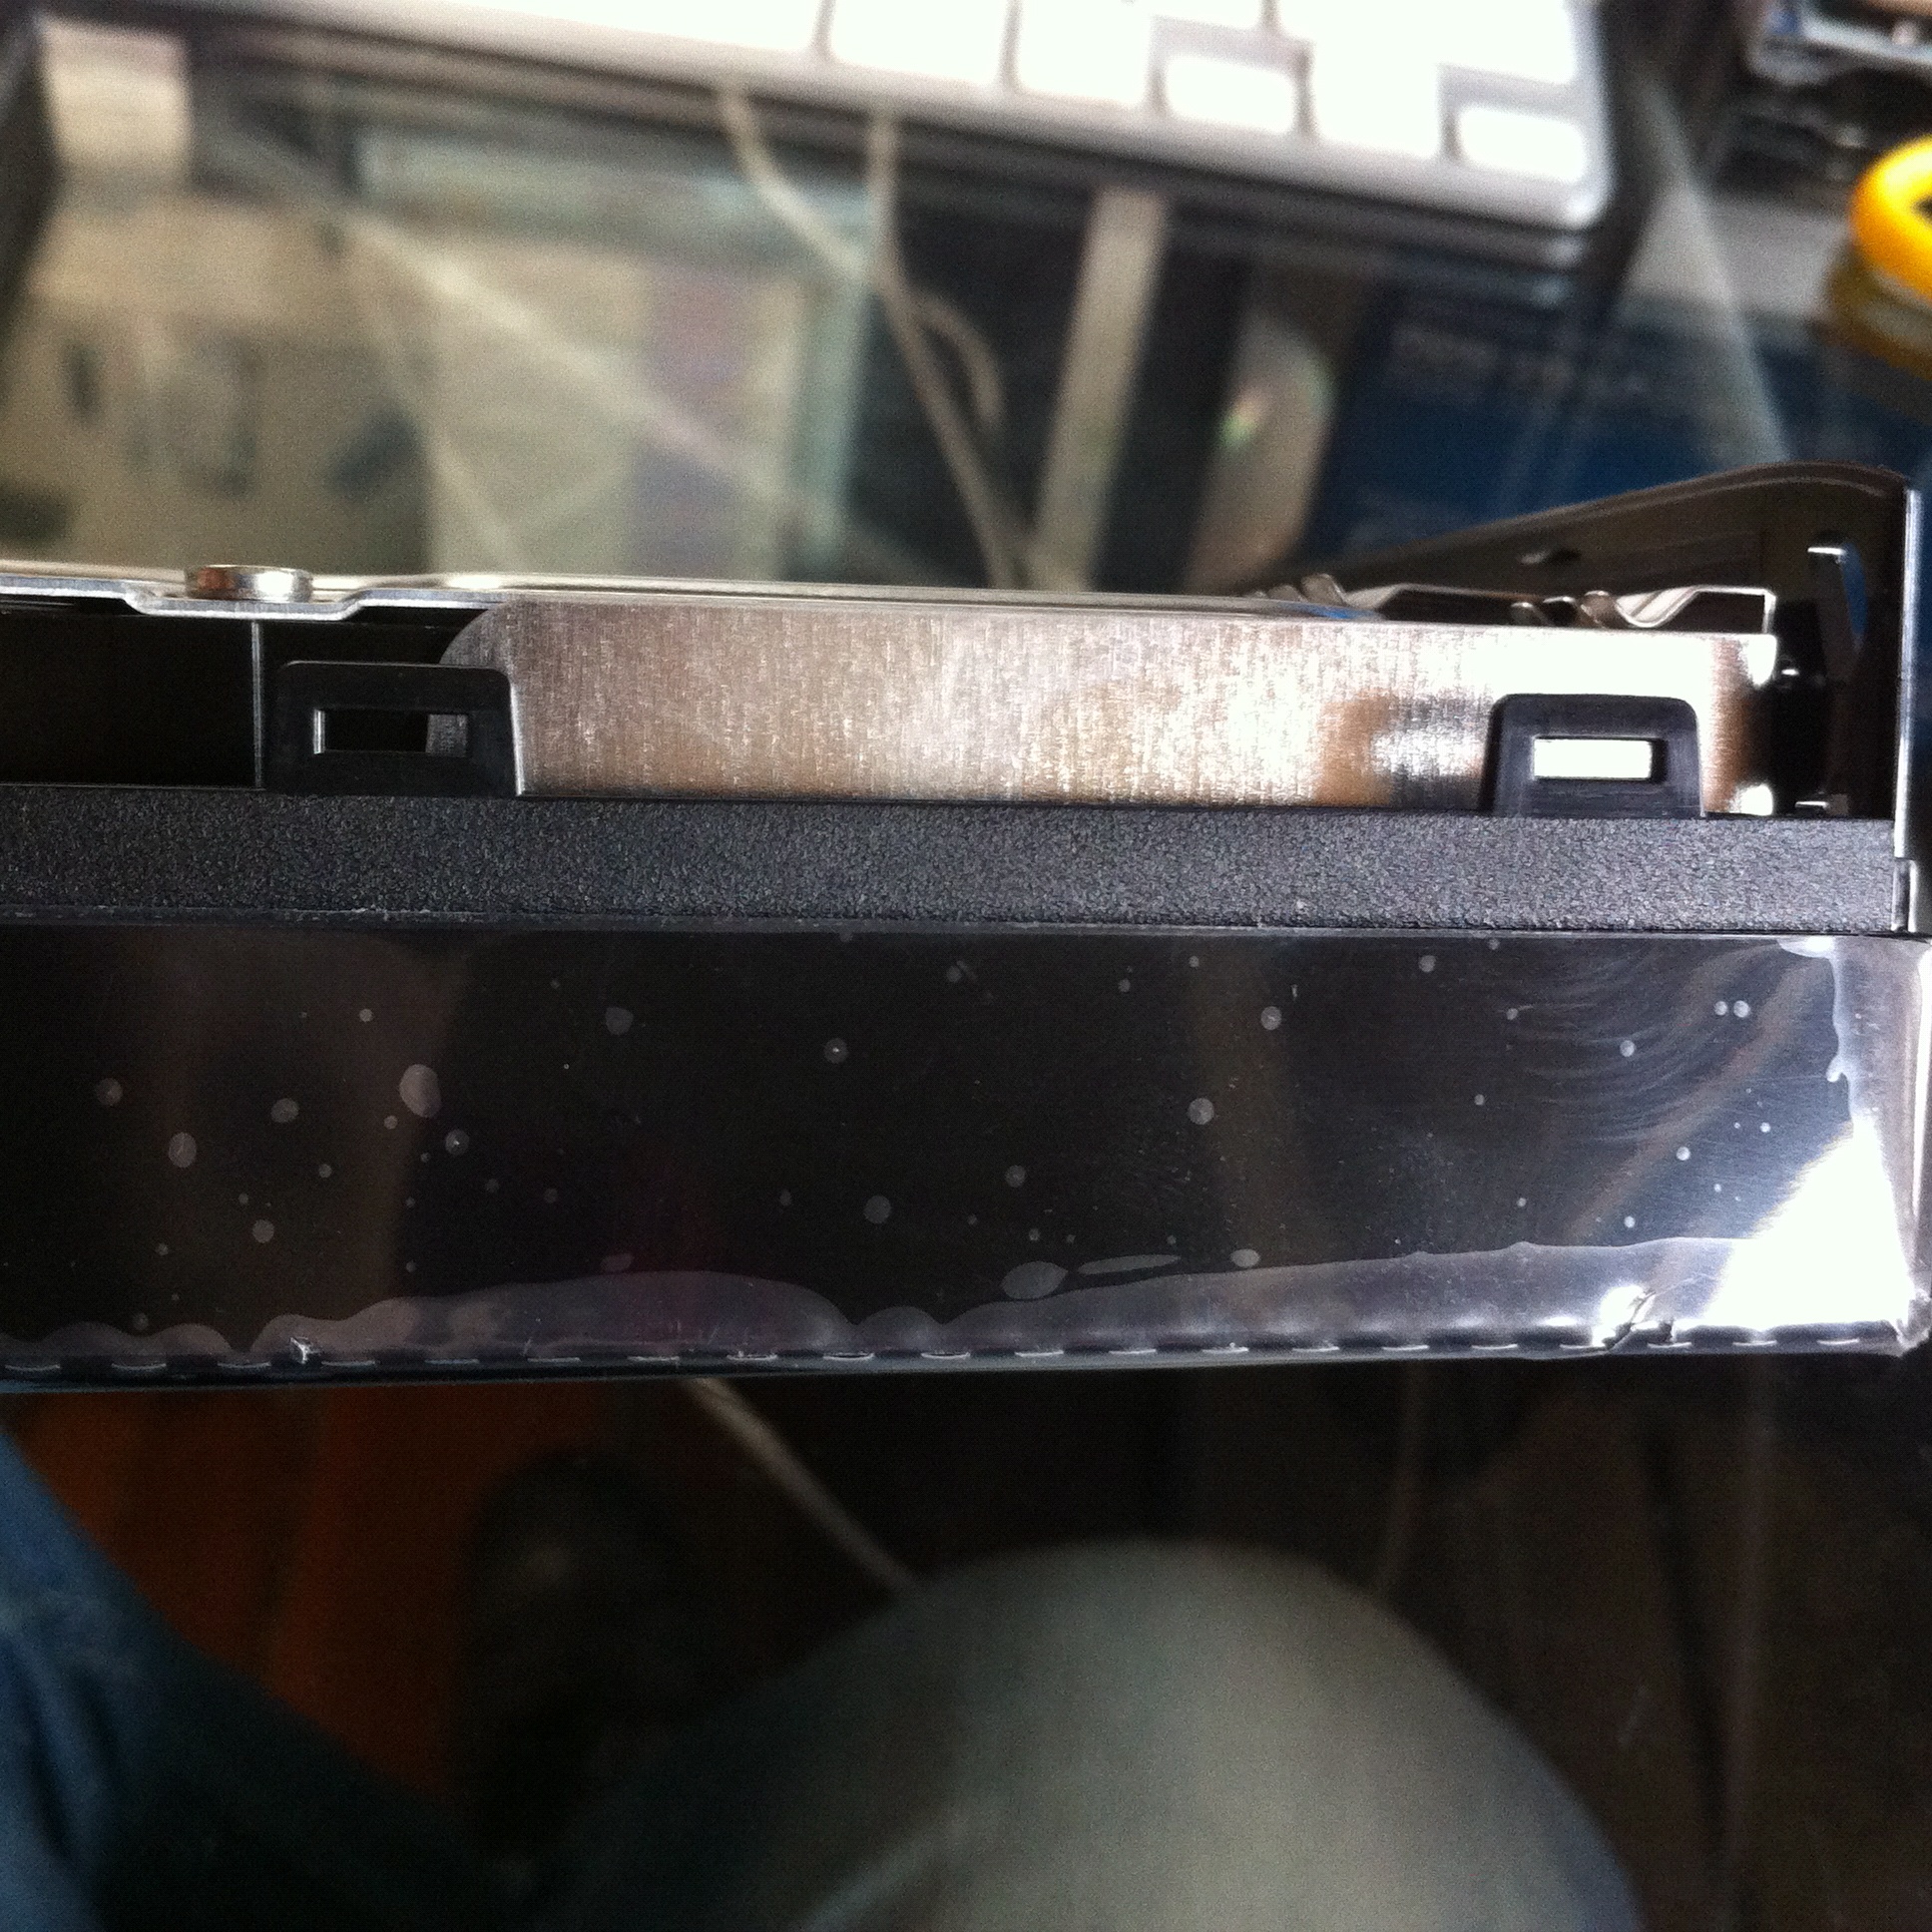
Seagate unfortunately doesn’t use screws to put the case together like other manufacturers, instead they use the dreaded plastic clips to hold the drive case together.
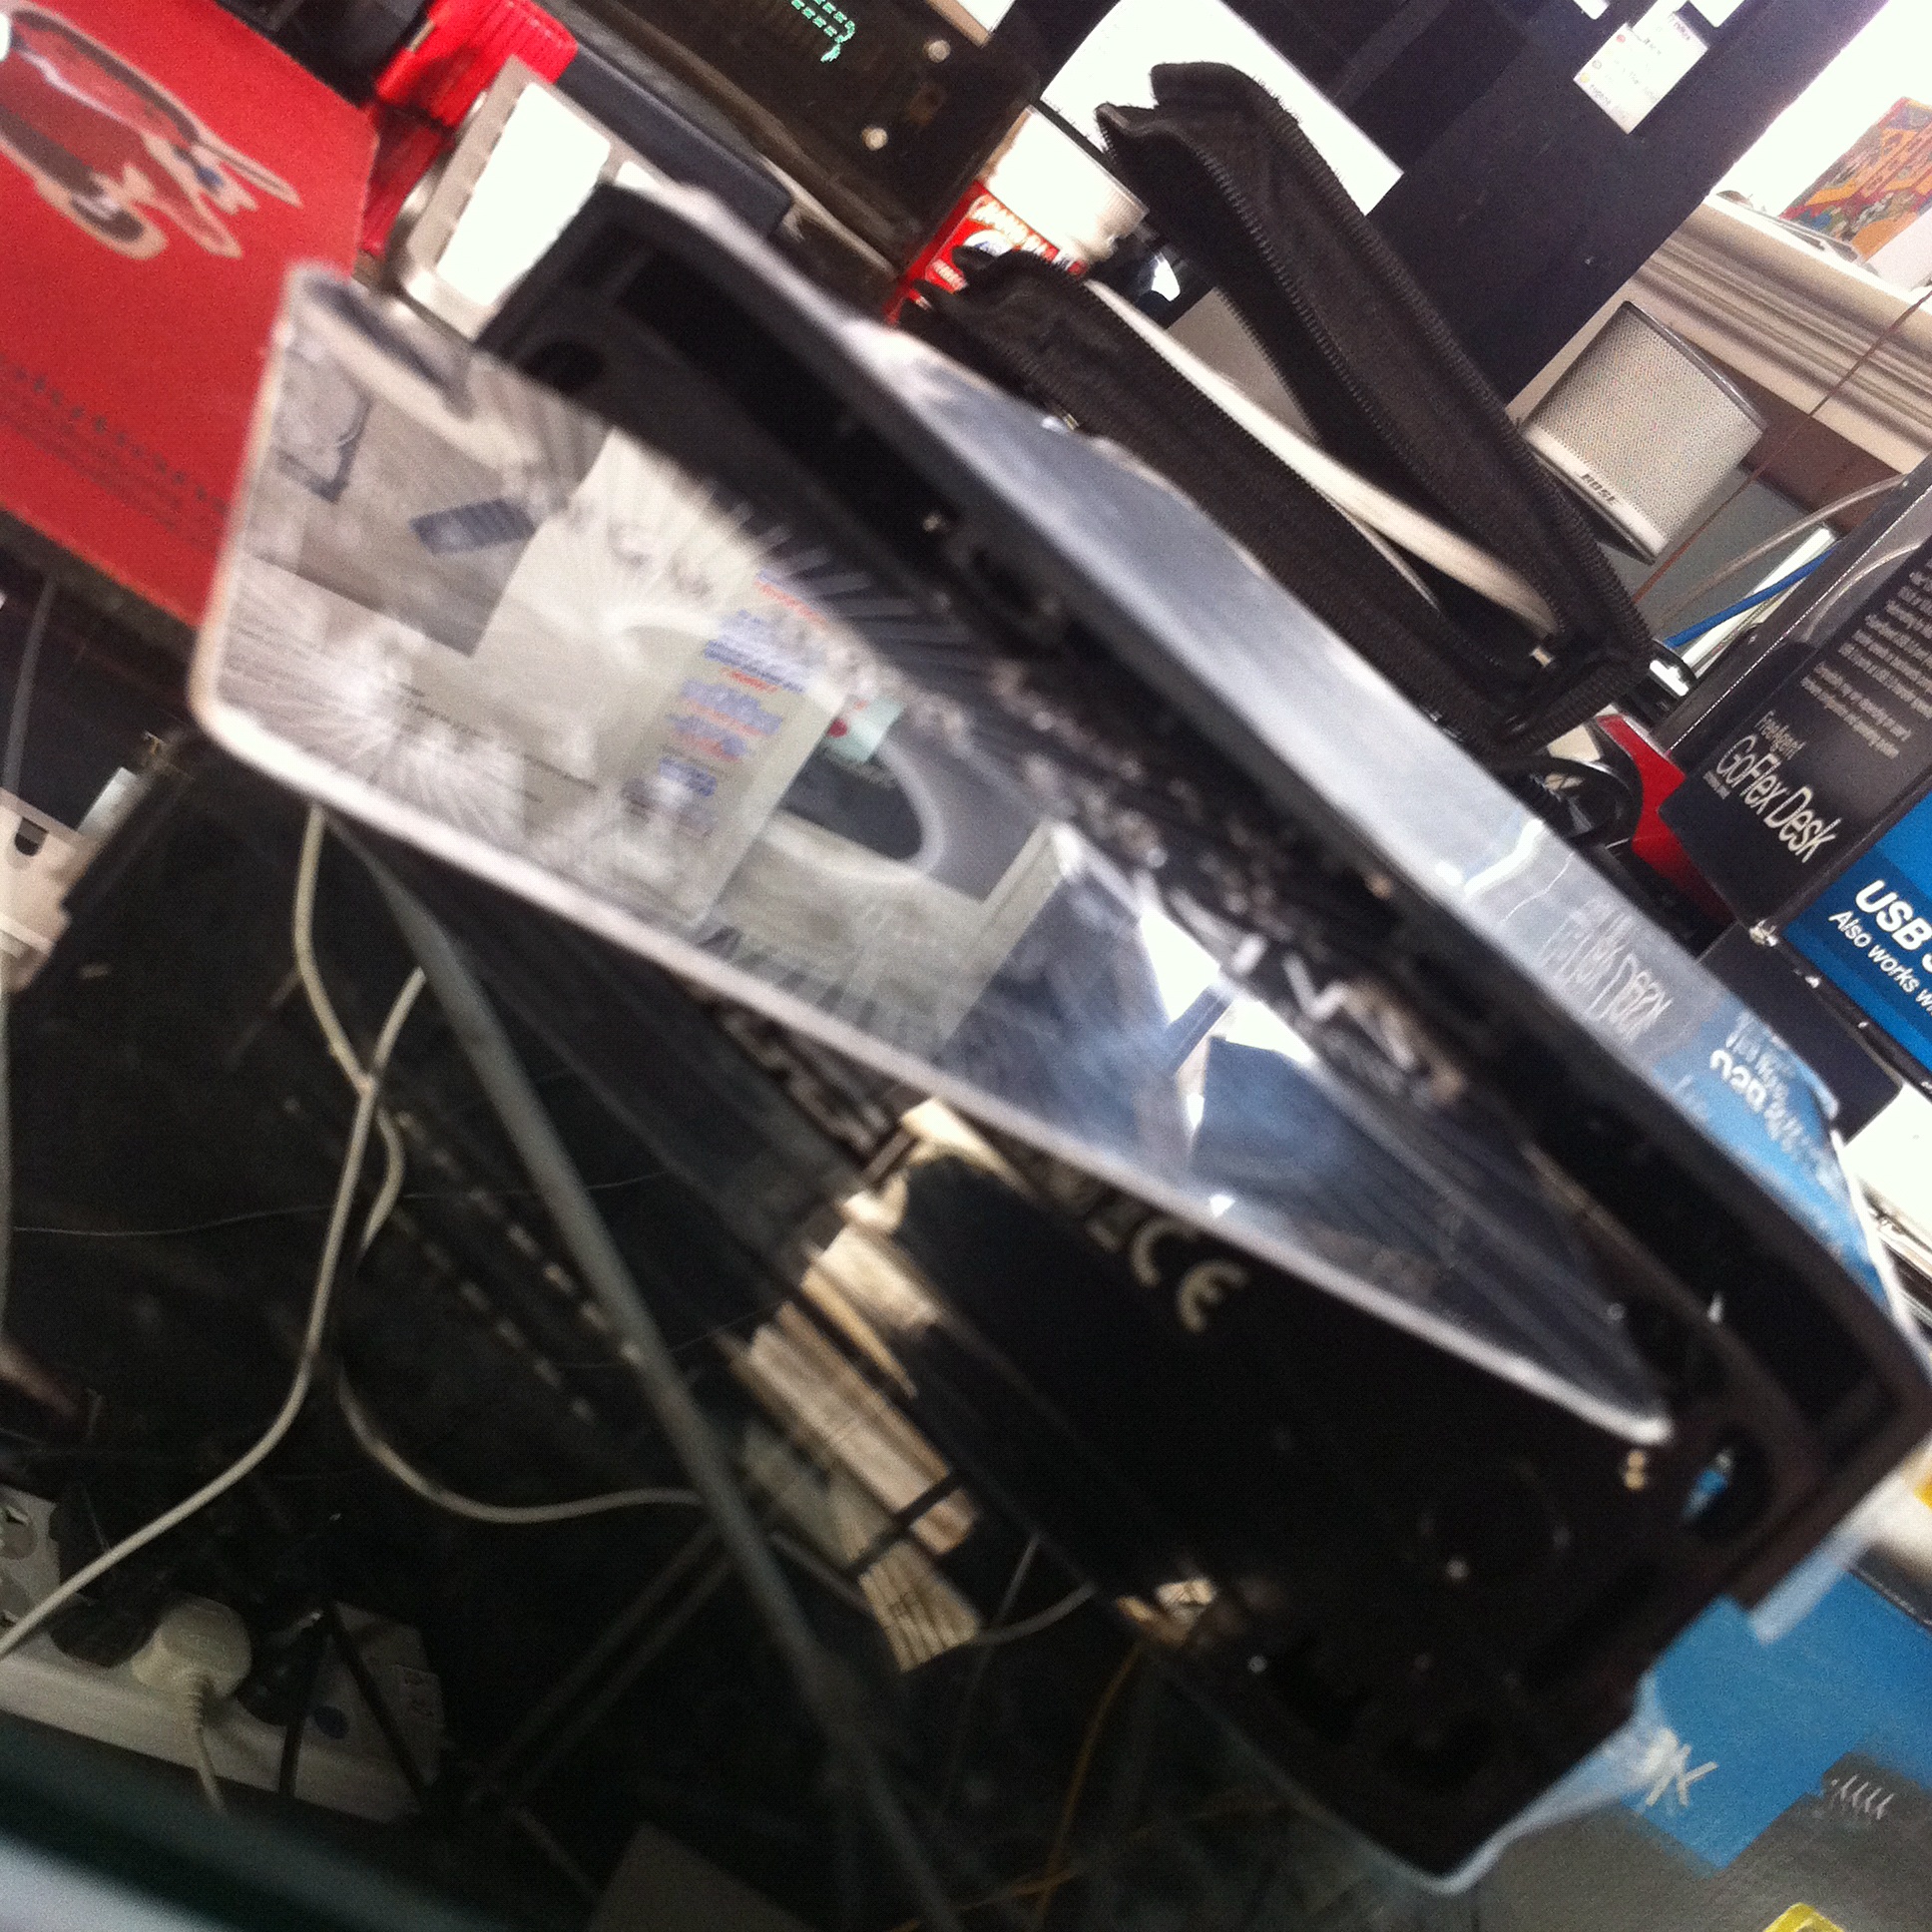
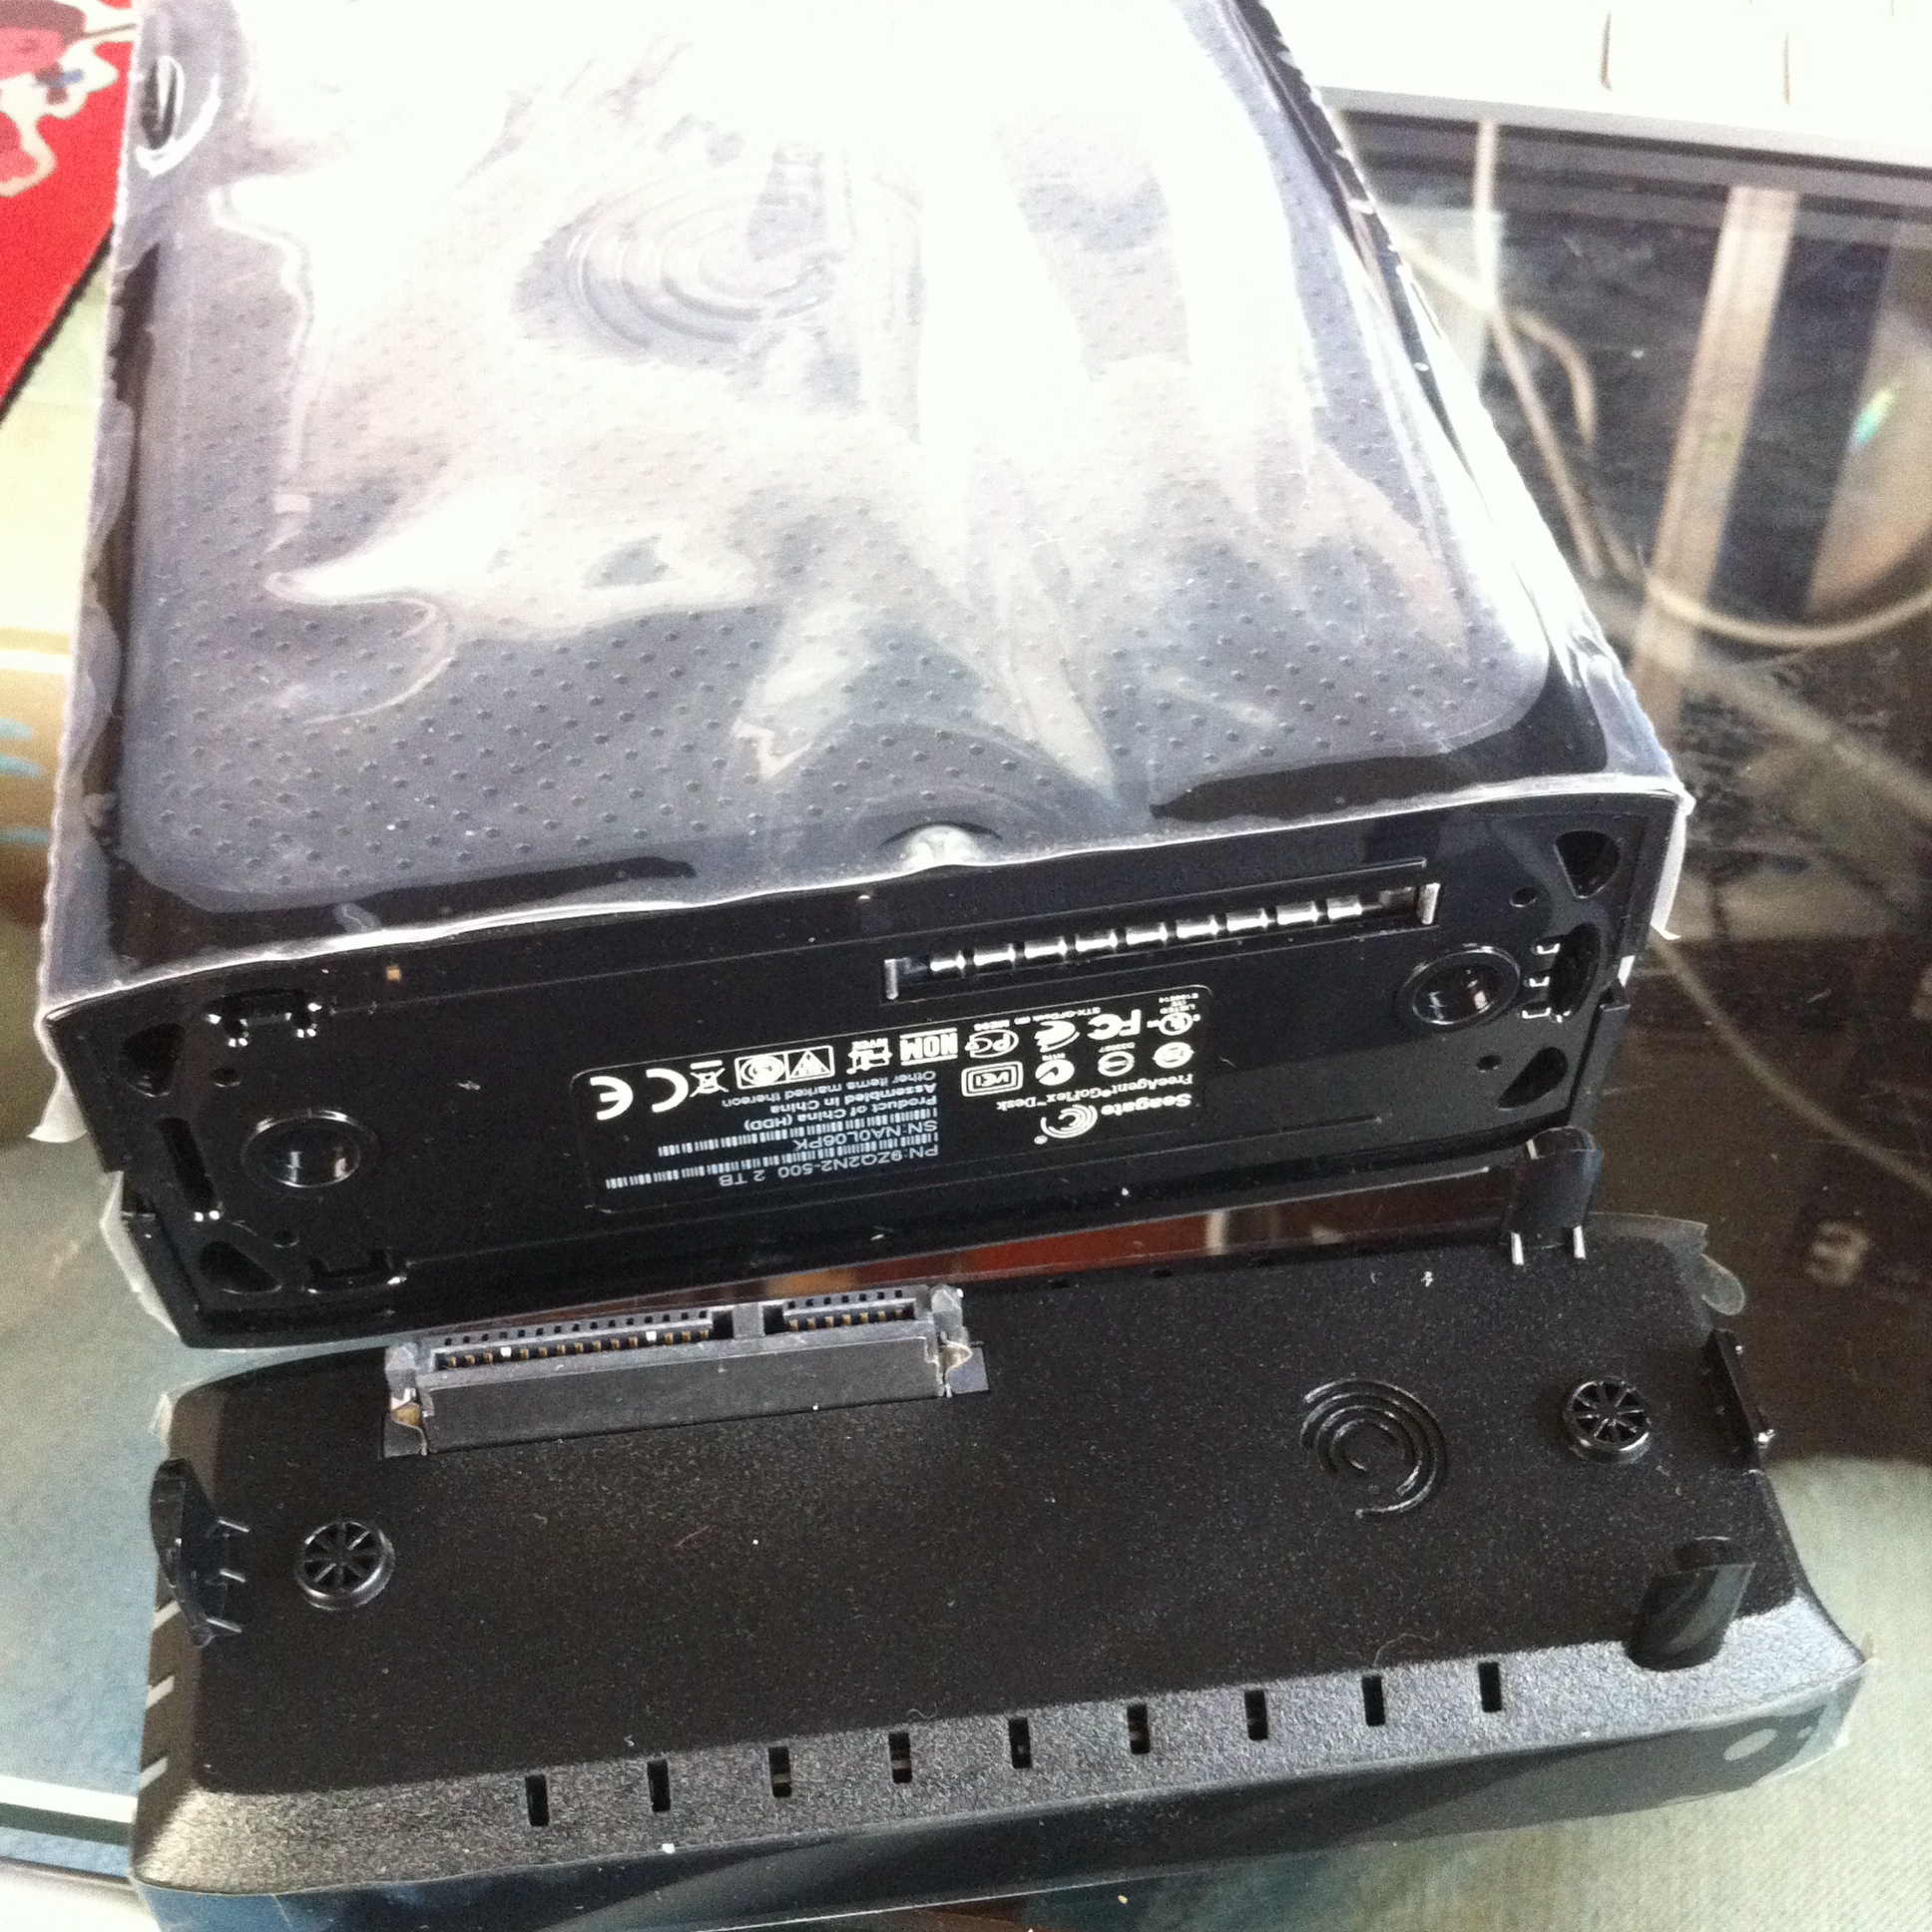
Below is a quick pictorial to safely take apart one of these cases to remove a drive (or swap a broken drive).
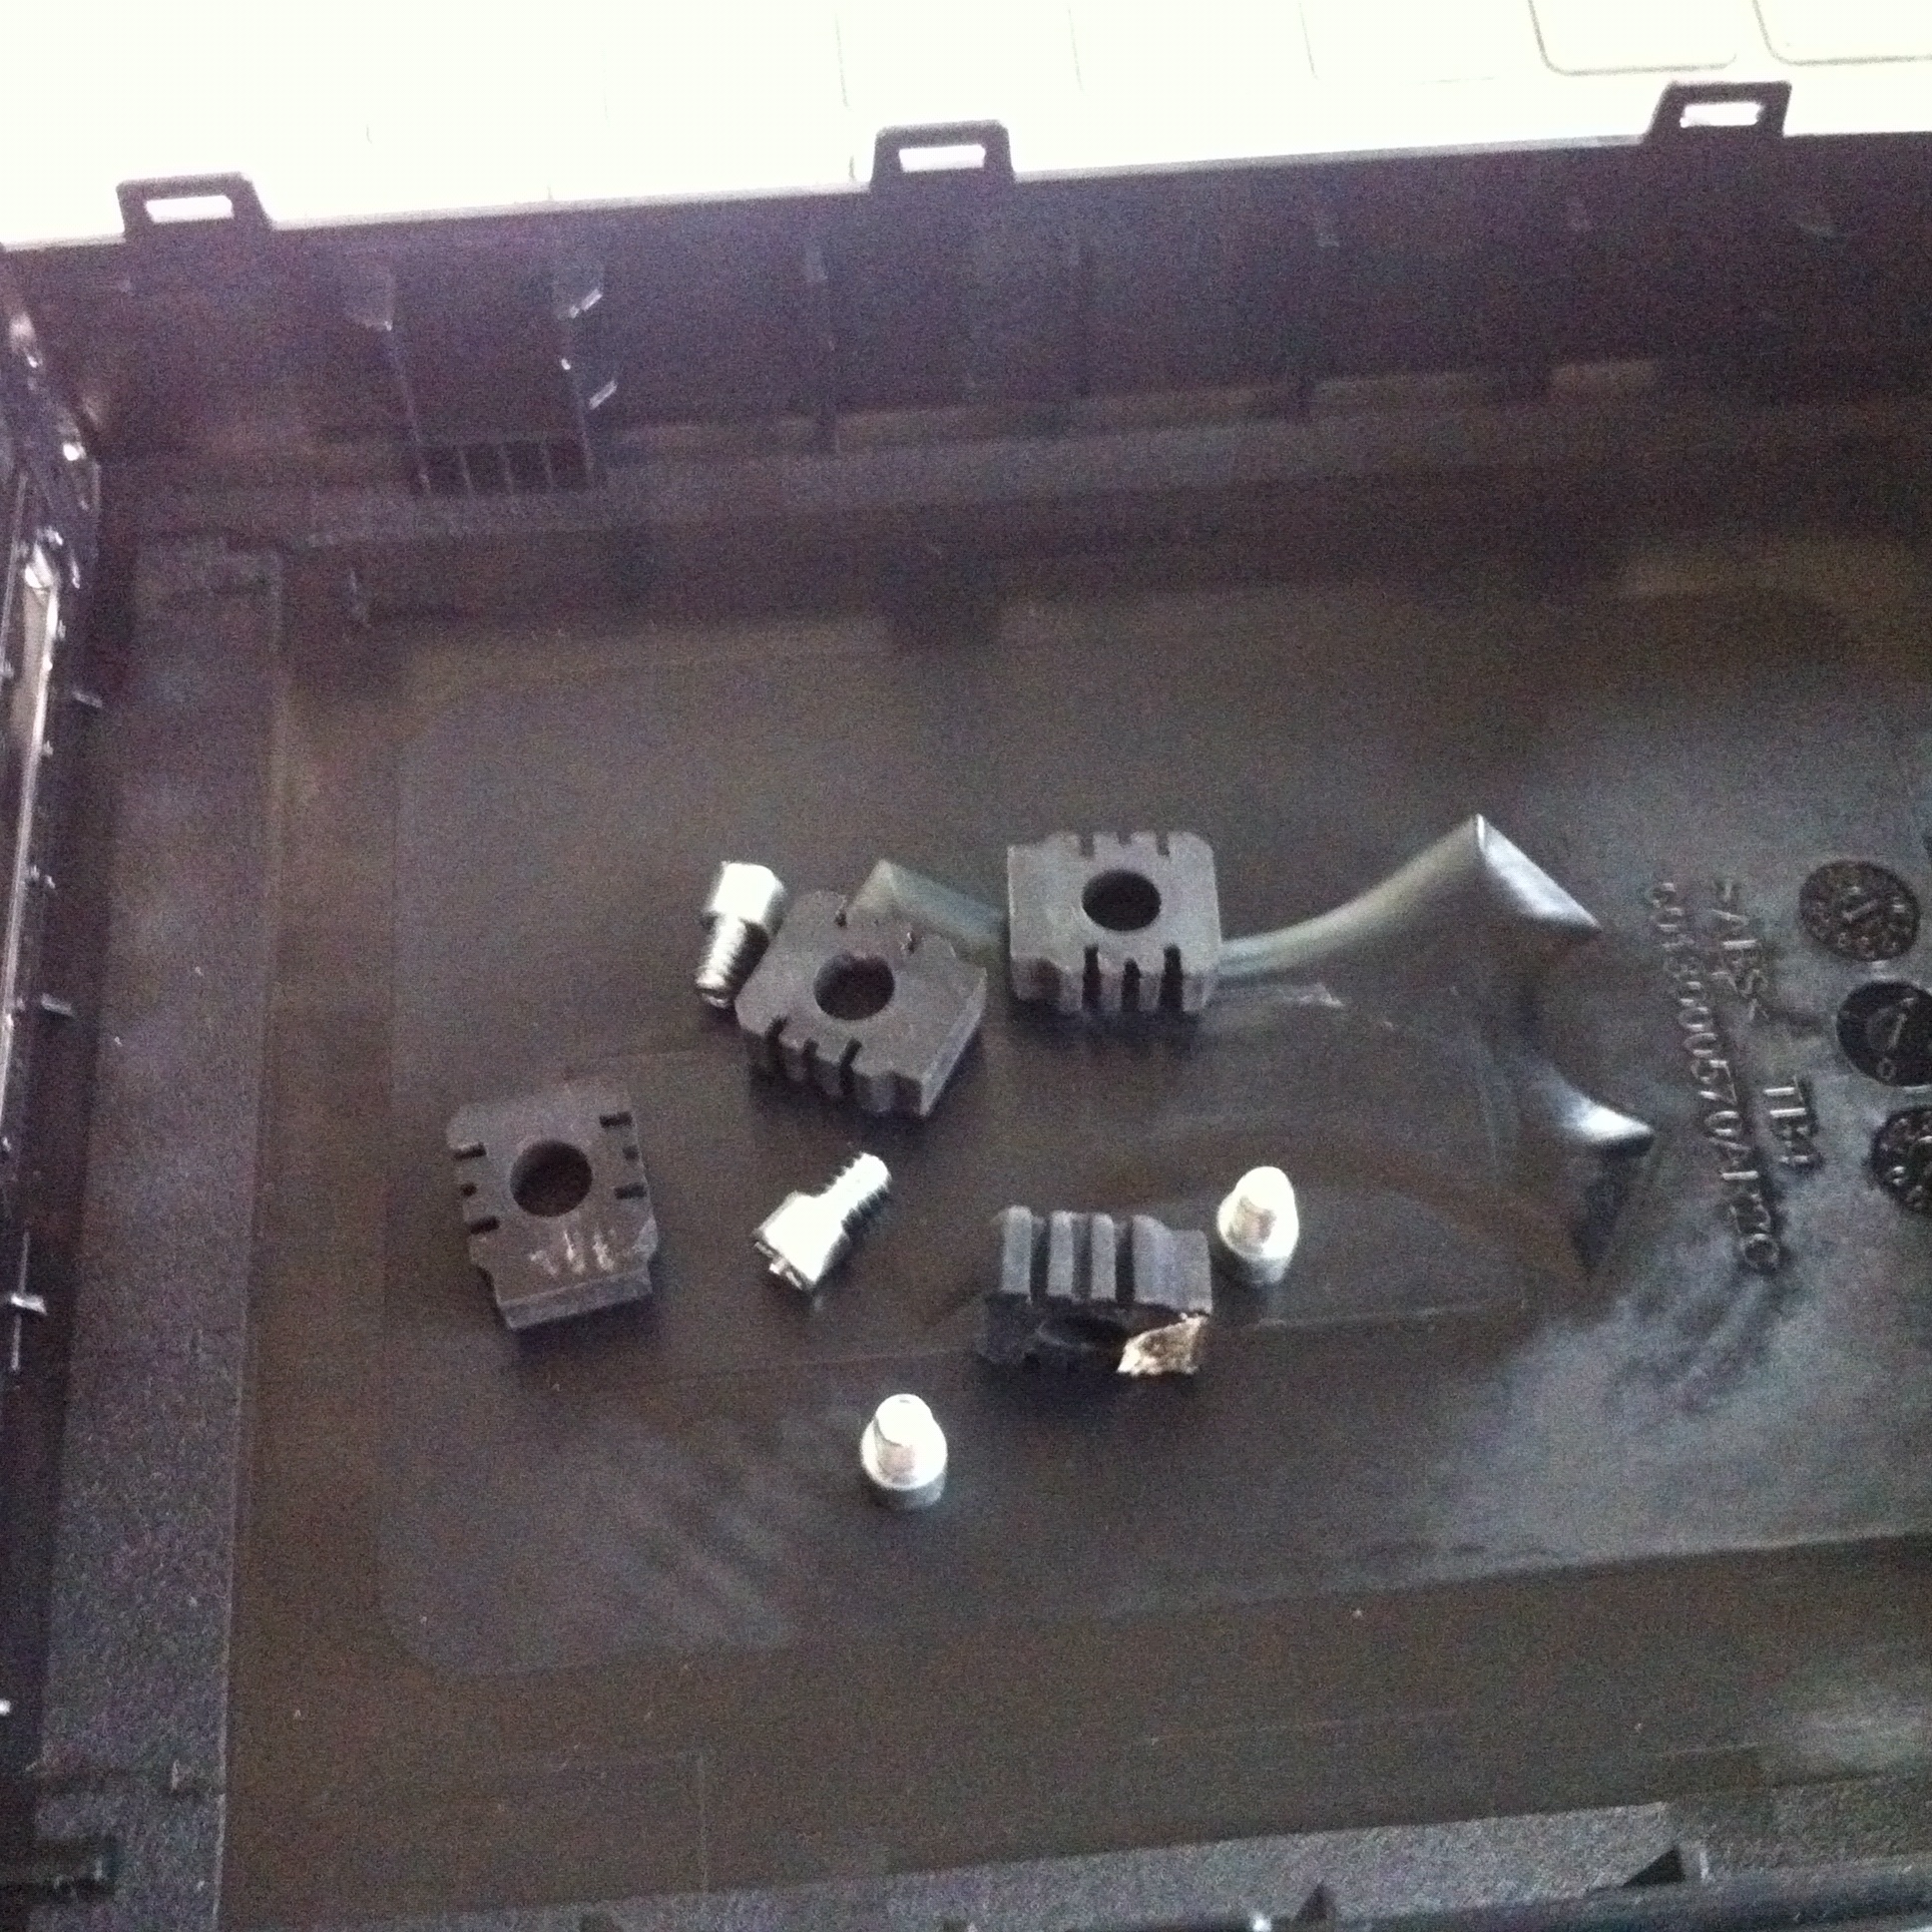
Essentially –
1. remove the base (pulls of easily).
2. stick a credit card under the top edge (I used a flat jewel screwdriver to get enough space), and unclip top
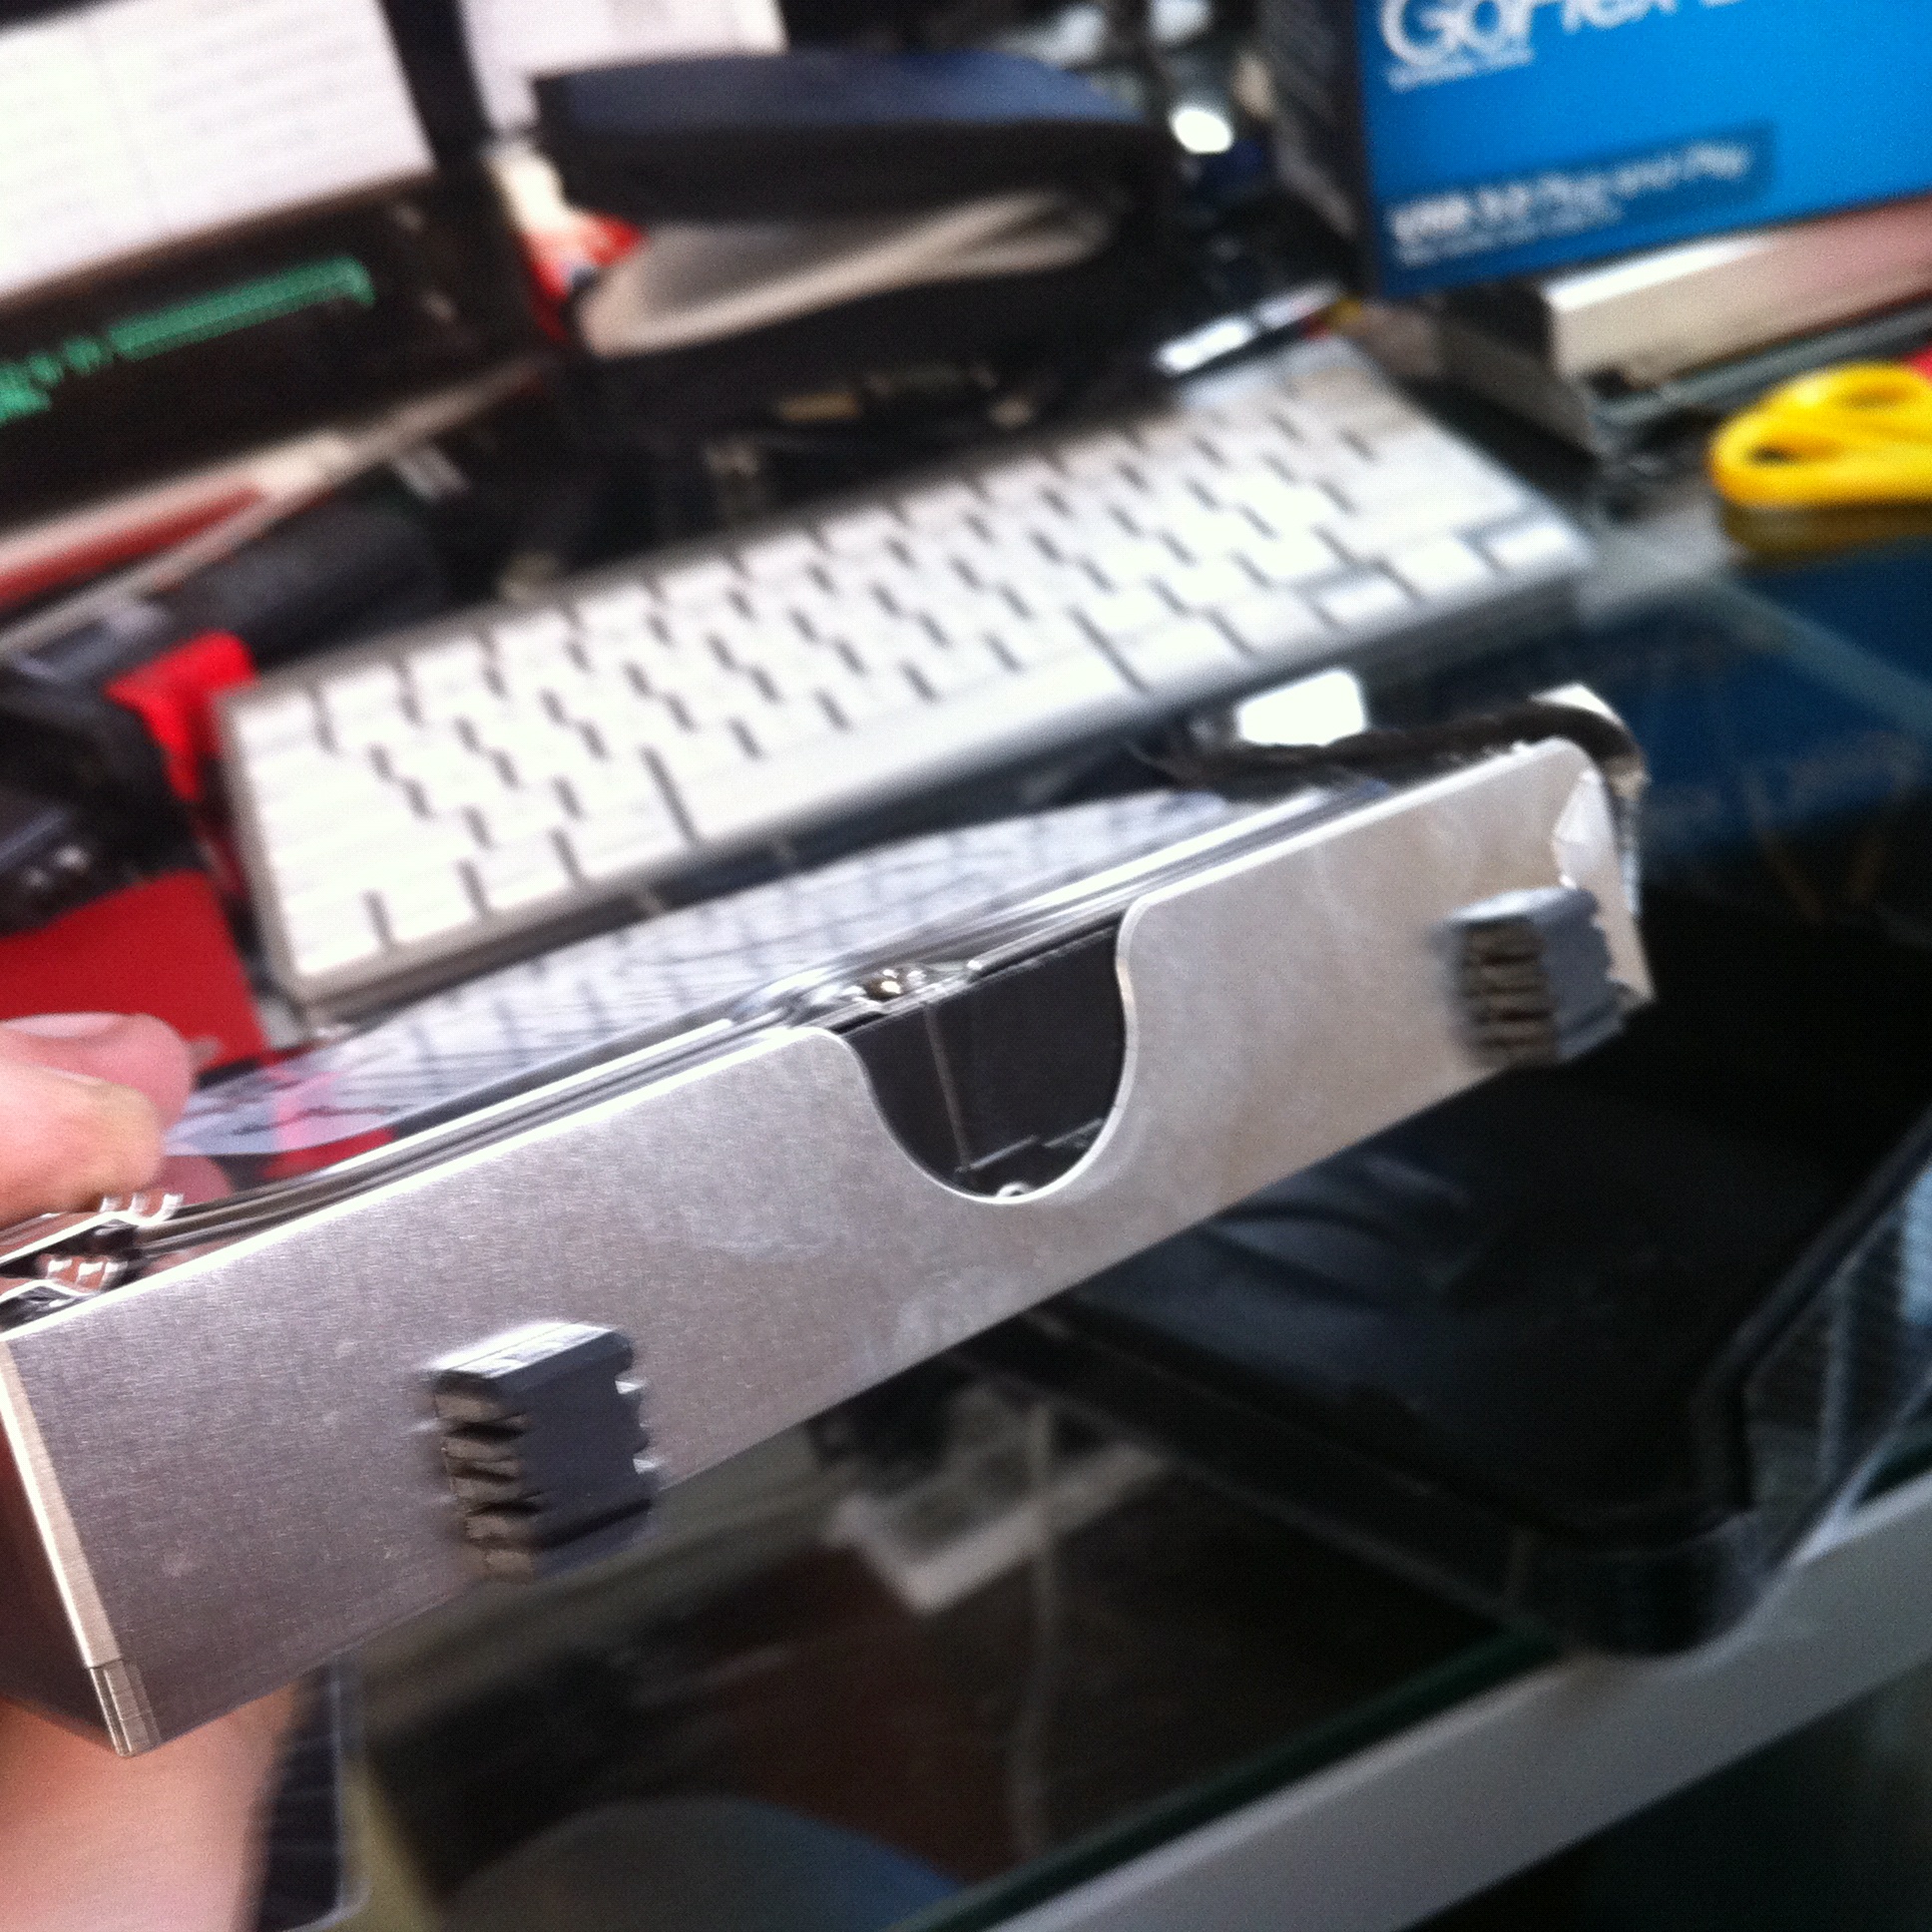
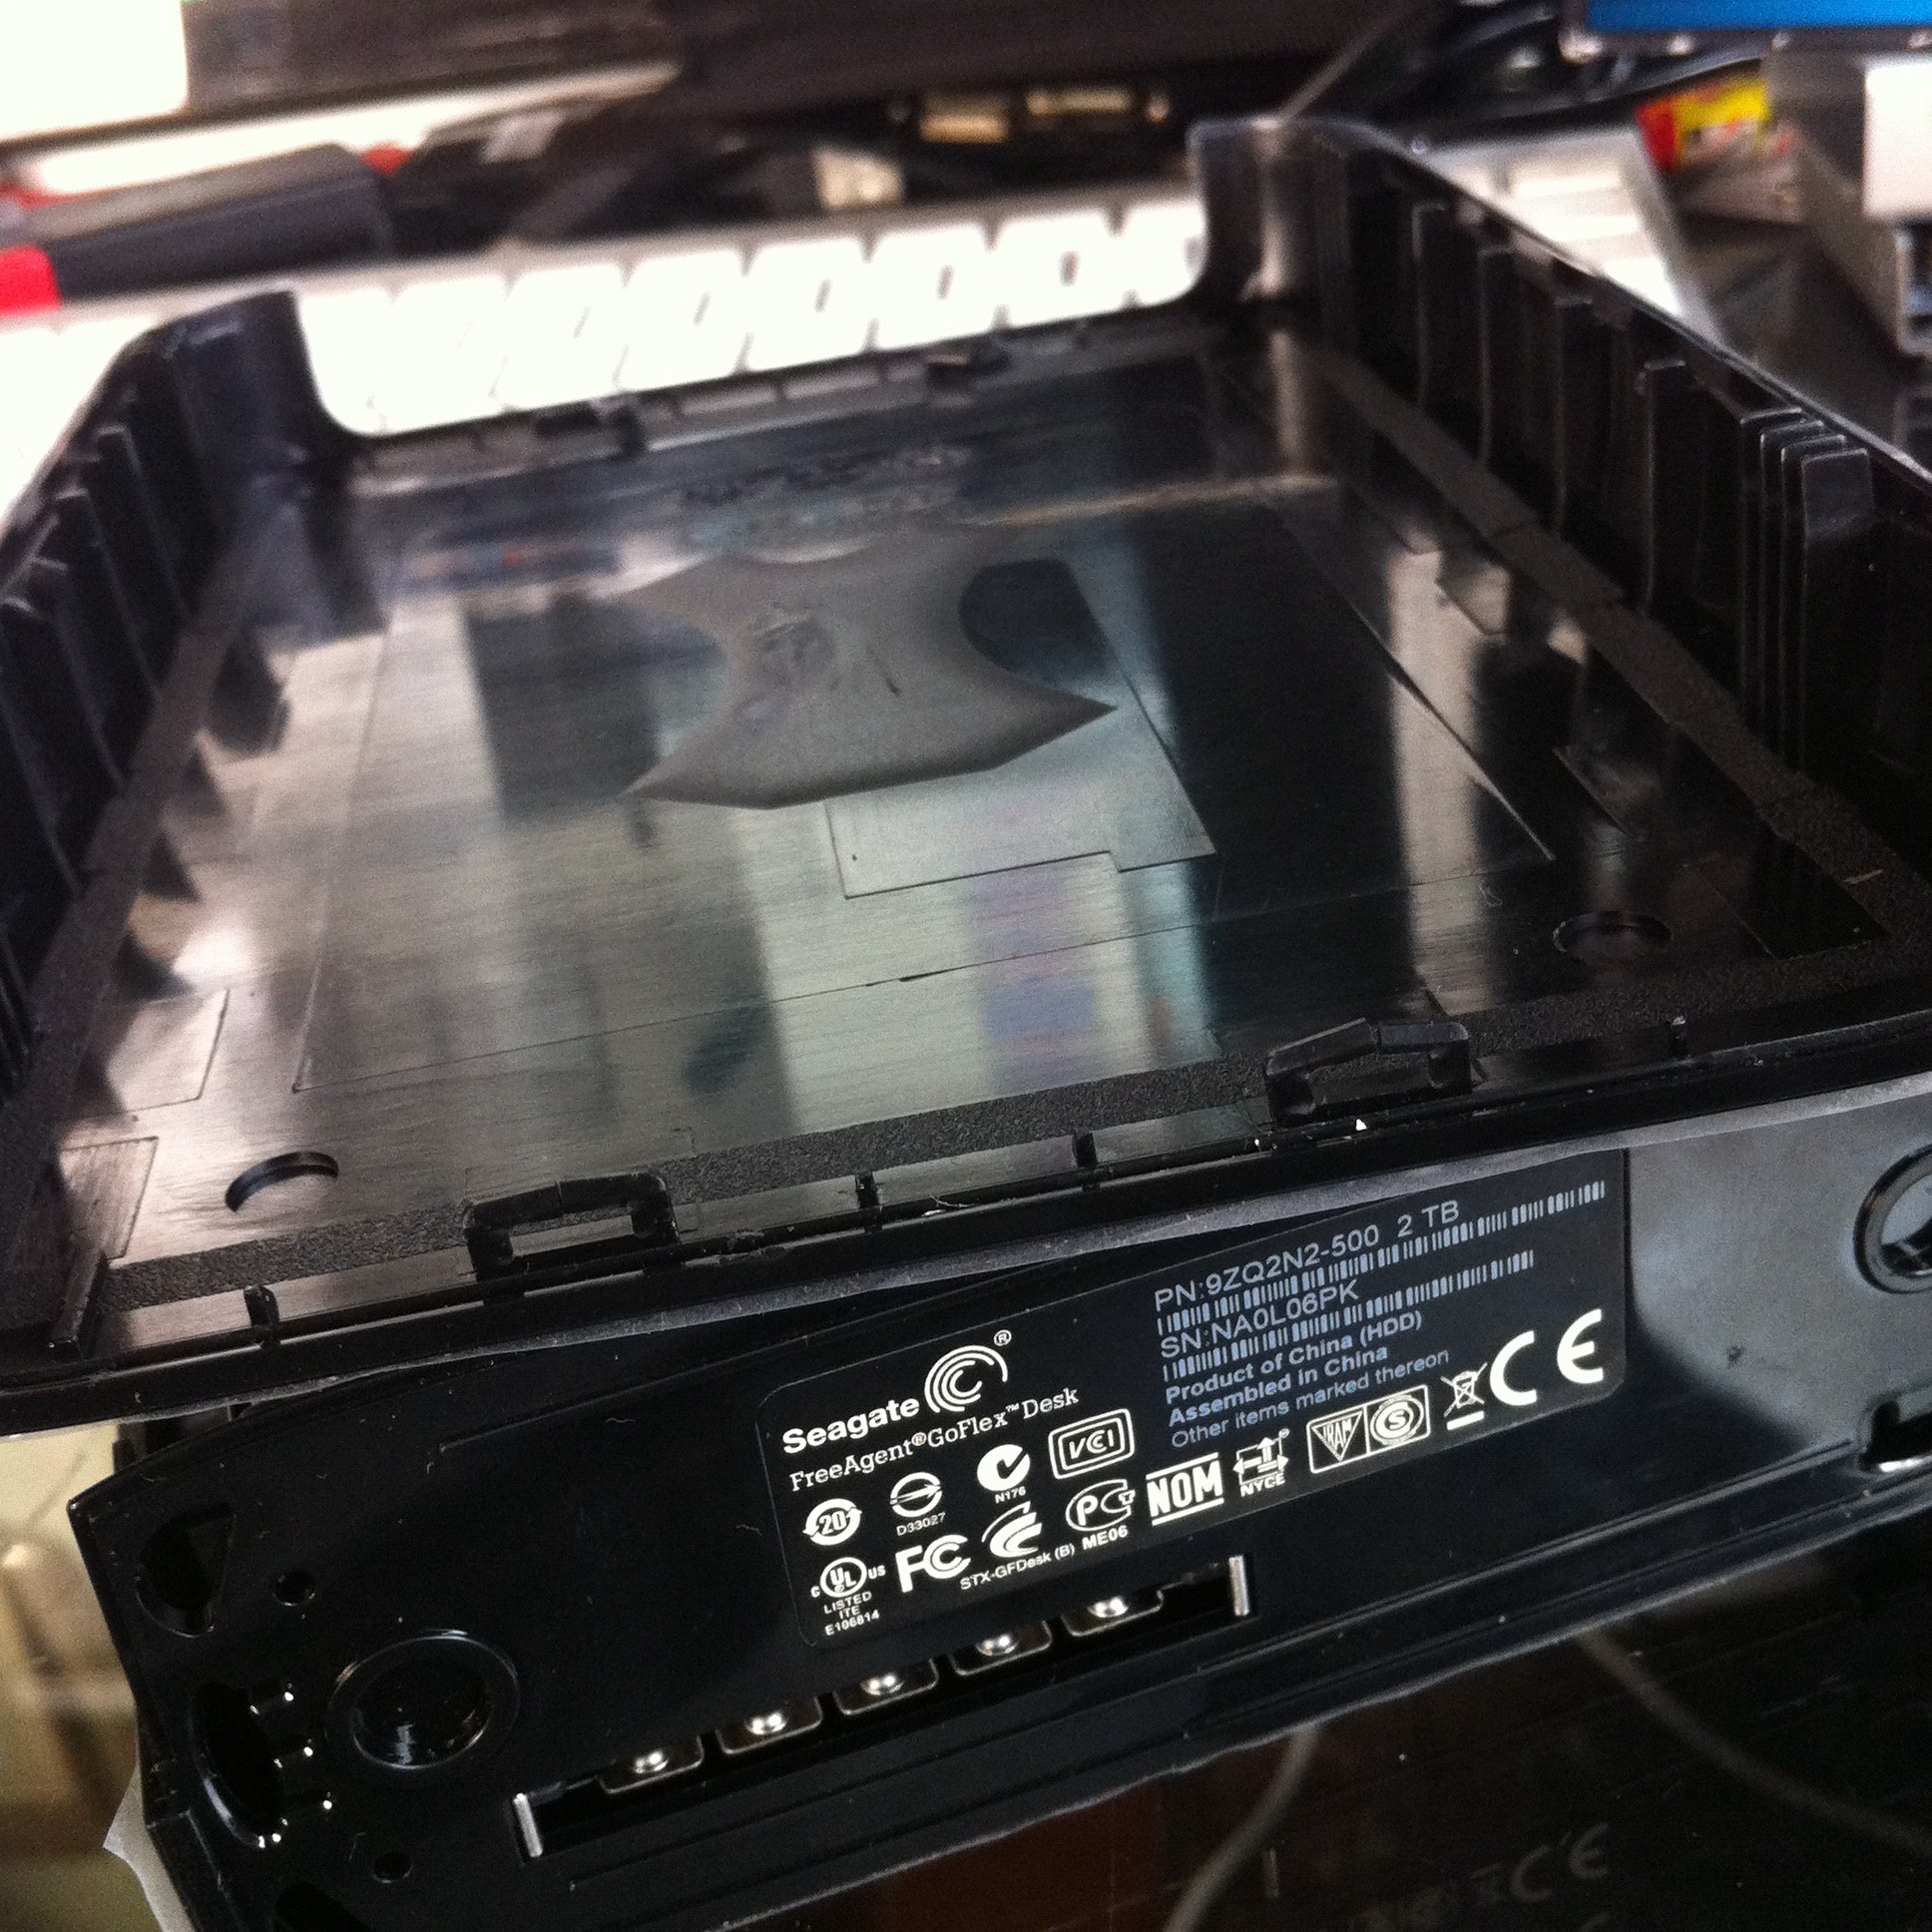
3. slide drive out
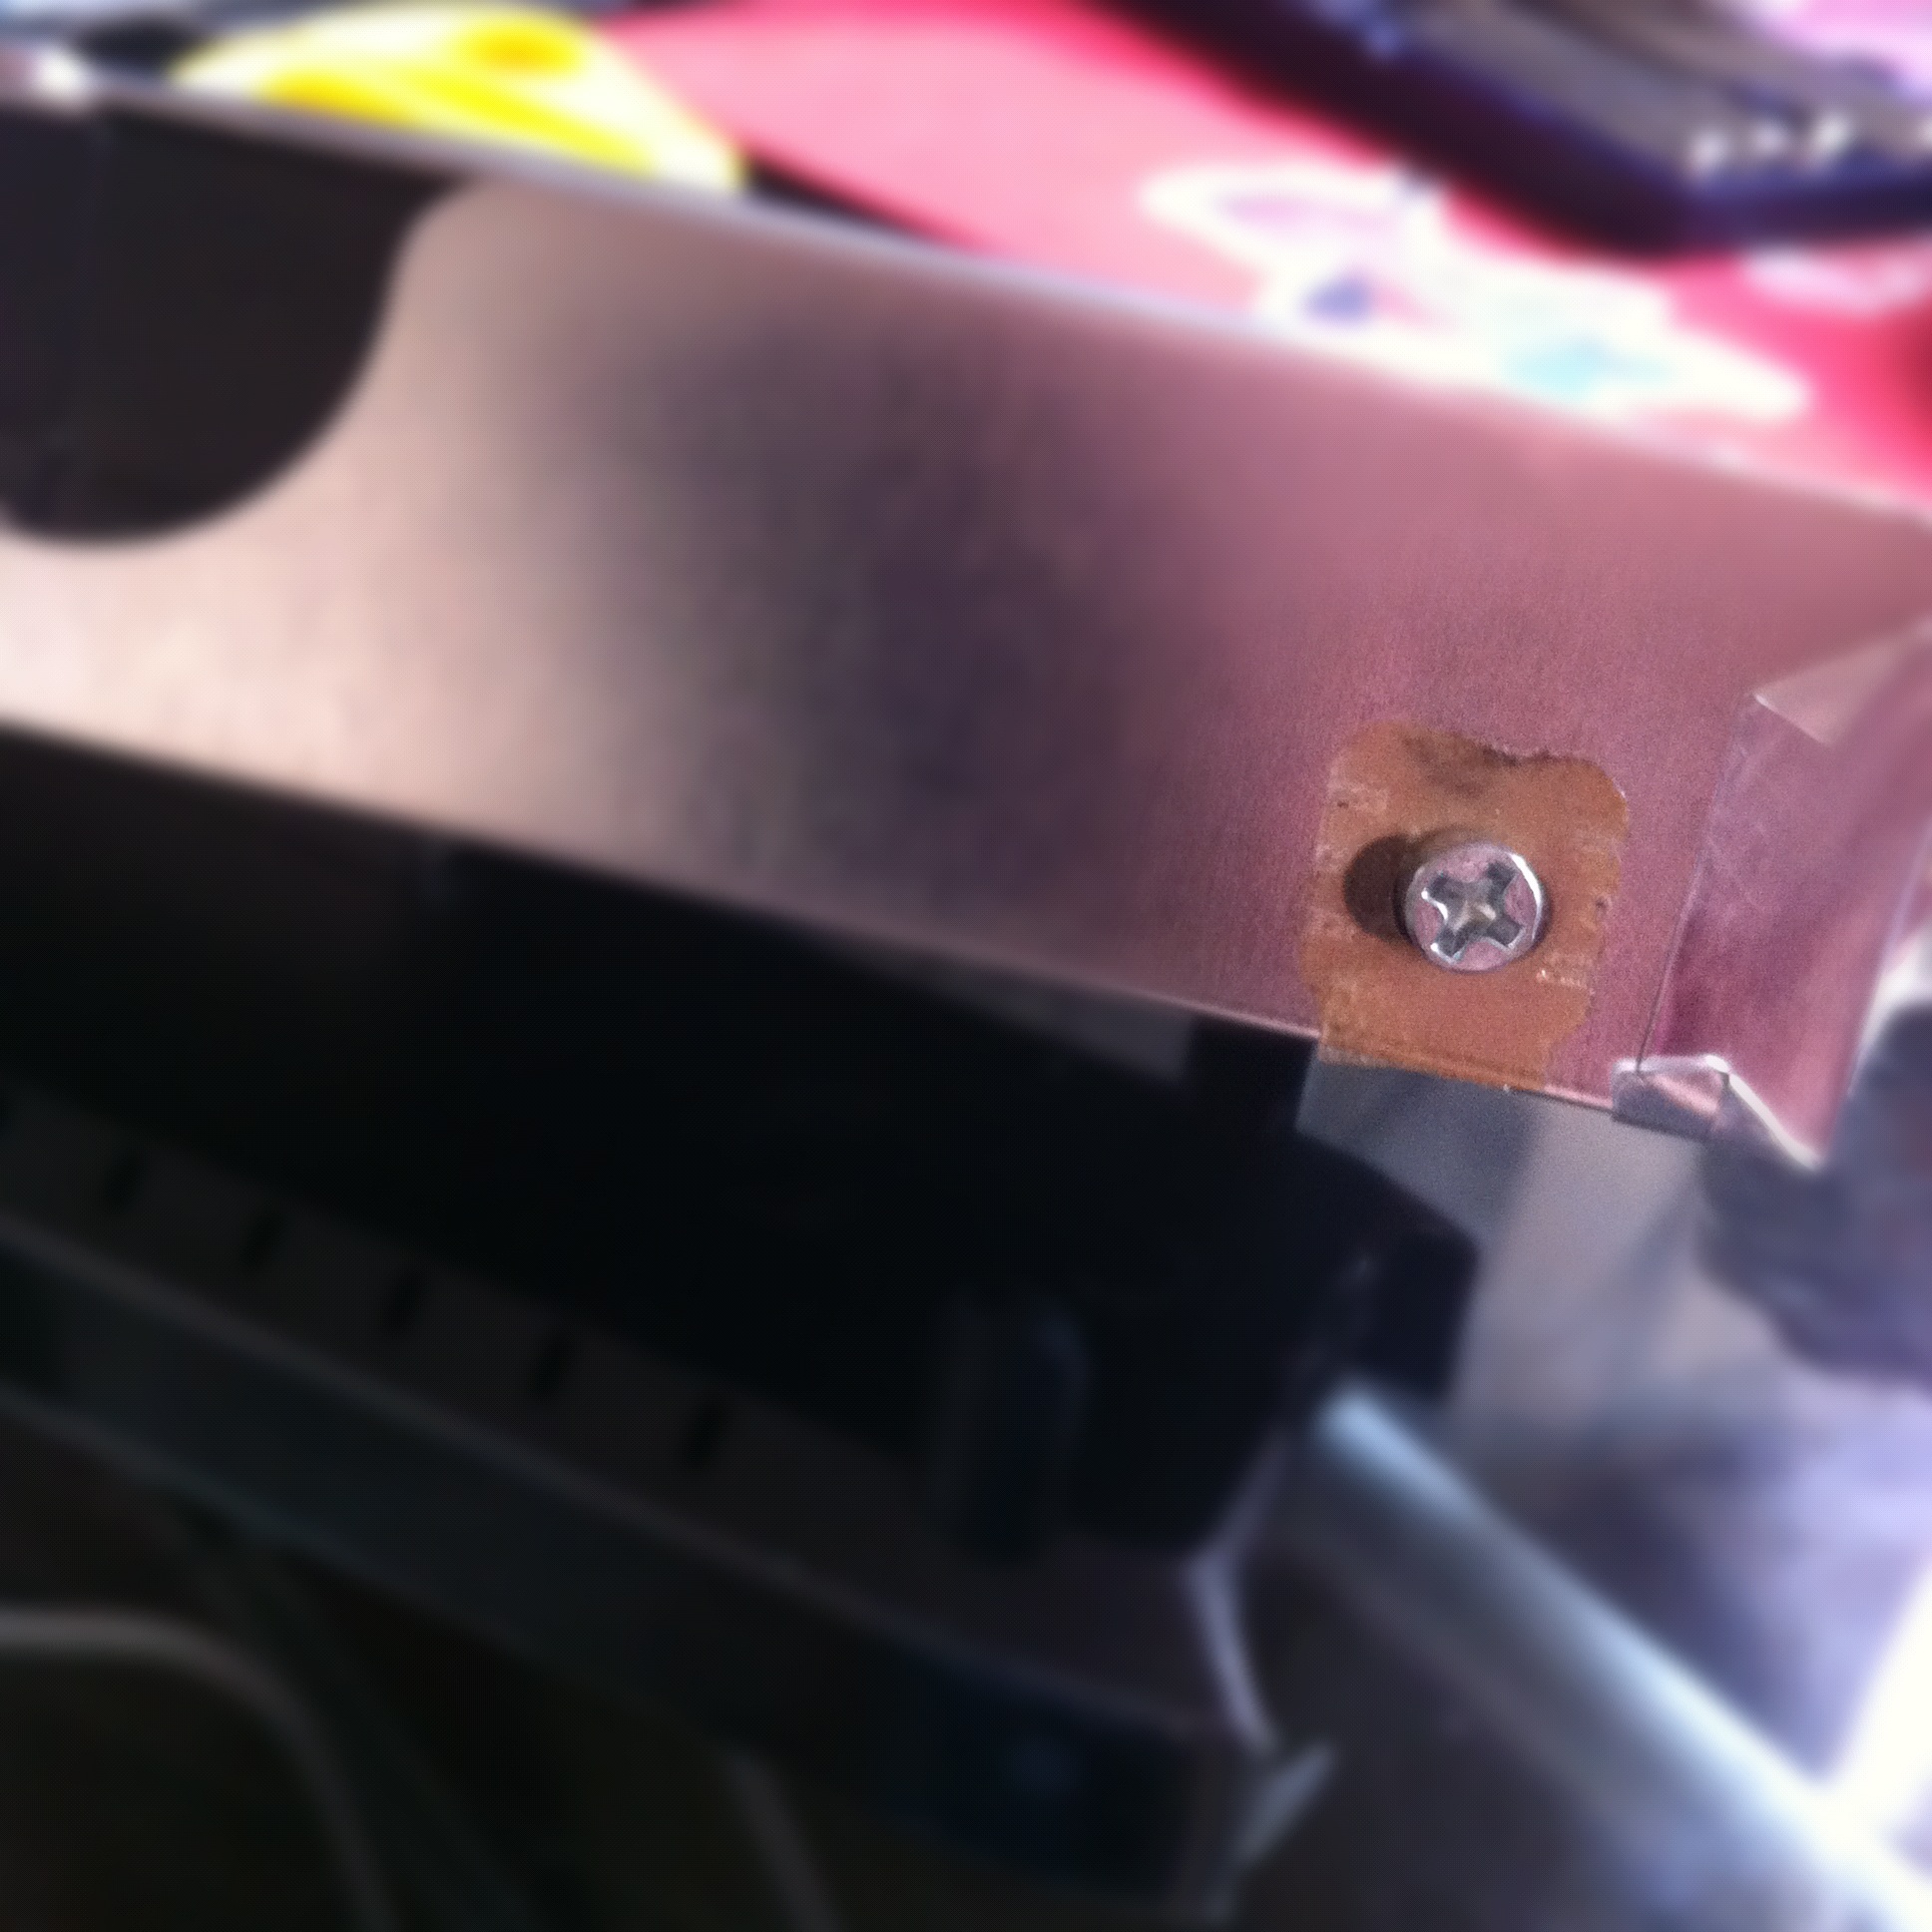
4. remove plastic feet and unscrew screws.
5. fold down metal sticker and remove drive.
If you get similar messages to this when you use apt-get
perl: warning: Setting locale failed.
perl: warning: Please check that your locale settings:
	LANGUAGE = (unset),
	LC_ALL = (unset),
	LC_CTYPE = "UTF-8",
	LANG = "en_US"
    are supported and installed on your system.
perl: warning: Falling back to the standard locale ("C").
locale: Cannot set LC_CTYPE to default locale: No such file or directory
locale: Cannot set LC_MESSAGES to default locale: No such file or directory
locale: Cannot set LC_ALL to default locale: No such file or directory
and the advice to
dpkg-reconfigure locales
doesn’t work, then try this –
export LANGUAGE=en_US.UTF-8
export LANG=en_US.UTF-8
export LC_ALL=en_US.UTF-8
locale-gen en_US.UTF-8
dpkg-reconfigure locales
Short and sweet solution.
8
Macbook Pro top replacement issue – or how I fixed my Macbook and sorted out the function keys.
I’ve been buying broken Macbook’s in SA when I’ve been home, for repair in China.
My latest purchase is a pre unibody Mac Book Pro that had been dropped – the top case was dented,and the screen shattered.
The LCD was fairly painless to replace – I’ve done quite a few already on various models, and I have a bazillion suppliers for raw panels.
The top case was a little more problematic – I ordered 2 consecutive replacements off of Taobao, but unfortunately the delivery company (ShenTong) destroyed both in shipping. Took about a month to sort that out and find a yet another replacement with explicit instructions please not to send via ShenTong (aka destroyer of parts).
The third case arrived in pristine condition, and I installed the keyboard from the previous case, only to find that the function keys didn’t work, and the caps lock didn’t work.
It wasn’t a hardware issue with the keyboard, as it worked fine in another laptop. I even ordered another one just to make sure.
A bit of googling revealed that the keyboard kext gets the layout from the USB hardware ID present in the top case.
As my top case didn’t quite match up hardware id wise, I was seeing that as an issue.
Fixing this is a bit tricky, but doable.
First up was to find out what the hardware id is for the USB case.
In my case this was as below (snarfed from System Information / USB)
Apple Internal Keyboard / Trackpad:

  Product ID:	0x0231
  Vendor ID:	0x05ac  (Apple Inc.)
  Version:	0,70
  Speed:	Up to 12 Mb/sec
  Manufacturer:	Apple, Inc.
  Location ID:	0x5d200000 / 3
  Current Available (mA):	500
  Current Required (mA):	40
Product ID is the useful bit – 0x0231 = 561 in decimal.
So, we need to lookup 561 in the kext (driver) for the keyboard.
In Lion / Snow Leopard, this is in the AppleUSBTopCase.kext over in System / Library / Extensions.
If you open up that kext, it has the plist for the keyboard layouts over here –
AppleUSBTopCase.kext » Contents » PlugIns » AppleUSBTCKeyEventDriver.kext » Contents » Info.plist
Open up the Info.plist, and look for the Product ID that matches your Product ID – in my case 560.
The key FnFunctionUsageMap contains the mapping for the keyboard. In my case I had to change it to this:
FnFunctionUsageMap
0x0007003a,0x00ff0005,0x0007003b,0x00ff0004,0x0007003c,0x000c00e2,0x0007003d,0x000c00ea,0x0007003e,0x000c00e9,0x0007003f,0x00070083,0x00070040,0x00ff0006,0x00070041,0x00ff0007,0x00070042,0x00ff0009,0x00070043,0x00ff0008
Each value is a pair – first the key number, then the value to set it to.
0x0007003a = F1
0x0007003b = F2
…
My above settings are for
F1 = brightness down
F2 = brightness up
F3 = mute
F4 = volume down
F5 = volume up
F6 = num lock
F7 = Expose
F8 = Keyboard Light off
F9 = Keyboard Light down
F10 = Keyboard Light Up
F11 = n/a
F12 = n/a
I got these values from here –
// usage IDs from the hid
#define FF_BRIGHTNESS_DOWN_ID_LAPTOP @”0x00ff0005″ // for laptops
#define FF_BRIGHTNESS_UP_ID_LAPTOP @”0x00ff0004″ // for laptops
#define FF_BRIGHTNESS_DOWN_ID_EXTERNAL @”0xff010021″ // for external keyboards
#define FF_BRIGHTNESS_UP_ID_EXTERNAL @”0xff010020″ // for external keyboards
#define FF_EXPOSE_ID @”0xff010010″
#define FF_DASHBOARD_ID @”0xff010002″
#define FF_ILLUMINATION_TOGGLE_ID @”0x00ff0007″
#define FF_ILLUMINATION_DOWN_ID @”0x00ff0009″
#define FF_ILLUMINATION_UP_ID @”0x00ff0008″
#define FF_VIDEO_MIRROR_ID @”0x00ff0006″
#define FF_REWIND_ID @”0x000C00B4″
#define FF_PLAYPAUSE_ID @”0x000C00CD”
#define FF_FASTFORWARD_ID @”0x000C00B3″
#define FF_MUTE_ID @”0x000C00E2″
#define FF_VOLUME_DOWN_ID @”0x000C00EA”
#define FF_VOLUME_UP_ID @”0x000C00E9″
Once I’d done that, I also needed to rebuild (or in my case build), the Kext cache so that the OS would use it on next reboot.
Heres how to do that in Lion
sudo kextcache -v 1 -a i386 -a x86_64 -m /System/Library/Caches/com.apple.kext.caches/Startup/Extensions.mkext /System/Library/Extensions
…oh, and lastly, reboot of course!
Post reboot my function keys were working normally.
The caps lock key is still non-functional, but I’m ok with that, as its means a bit more work for little effort.
I may look into setting up a special plist to override the usb_id its getting from the hardware via the method here –http://www.projectosx.com/forum/index.php?showtopic=798
..but again, time vs effort…
Still, my Macbook is working now more or less, so its good enough for me 🙂
Of course, subsequently to doing this the hard way, I found a program to do it all for me!
http://pqrs.org/macosx/keyremap4macbook/
Suggest unless you are a masochist, use that!
We use xcache as a php caching mechanism on our servers.
Its pretty painless for us for the most part.
One of our clients did complain that their app was now crapping out.
A check of the software forums for that app (ActiveCollab) showed that it was an issue with PHP5.3.2 and XCache and ActiveCollab.
So, needed to disable Xcache.
This should be relatively easy I thought, but the documentation sucks, so took a while to find out how.
Its pretty simple to do though.
Assuming you’ve allowed htaccess files in apache, you can do the below –
Add an htaccess file in the root folder of the website with the following info
php_flag xcache.cacher Off
php_flag xcache.size 0
php_flag xcache.stat Off
Thats it.
We’ve been using MODx for a number of years now for site development, and one thing that repeatedly comes up in all our sites is how to add Events.
This is actually pretty easy within MODx, as you’ll see.
Ditto and CALx are two plugins that make this doable.
First up, I recommend you setup a folder for the events to be held in. I usually sit this outside of the main site tree, and set it to be not shown in the menu.
Lets call this the Events Folder.
Heres one I made earlier that has some events inside.

Lets not get ahead of ourselves though.
So, now we have a folder to place stuff into.
Next, we need some details for our events.
At a minimum, we’ll need an Event Start Date, and End Date (although to be honest, most clients don’t use that many fields).
So, lets setup 2 Template Variables called… EventStartDate, and EventEndDate.
As we’ll be using Ditto and CALx, we need to tell MODx to use UnixTime for these, so that we can sort with them later. Make a new Template Variable, set the Input Type to Date, and set the Widget to UnixTime.
See below for an example. (do the same for both Template Variables)

Don’t forget to make sure that both template variables are accessible in whatever templates you will be using.
Ok, so now we have a folder, and two template variables.
Lets make some data.
Go to the Events folder you created, right click, and Create New Resource Here.
You should see the two template variables we created listed in the page. Set them to something appropriate.

Save the page.
Create another few entries with different dates so we’ll have something to sort by.
You should now have a folder, our template variables, and some sample data.
At this point we’ll need to make a chunk so that we can display the output of running Ditto against our data.
Make a new Chunk,call it chkShowEvent, and put this inside.
Title: [+title+]
Start: [+EventStartDate:date=`%d-%b-%y %H:%M`+]
End: [+EventEndDate:date=`%d-%b-%y %H:%M`+]
(You’ll note that we’re formatting the UnixTime based data automagically by using MODx’s built in formatting functions.)
Neat huh.
Ok, so now we have almost all our details together.
All we need now is to create some code to show off the data.
If you recall way back to the top of this page, we setup a Start Date and an End Date.
Our Start Date is called EventStartDate.
Lets make some code to show off a single event using Ditto.
[!Ditto? &startID=`4` &tpl=`chkShowEvent` &displayArchive=`0` &multiLevel=`1` &paginate=`0` &paginateAlwaysShowLinks=`0` &orderBy=`EventStartDate ASC` &extenders=`summary,dateFilter` &dateSource=`EventStartDate` &summarize=`1` &dateFormat=`%d. %b. %y` &filter=`EventStartDate,@EVAL return strtotime("now");,3`!]
Looks complicated, doesn’t it!.
Actually not that bad, what we’re doing is telling Ditto to give us one single result, ordered by date.
We then tell Ditto to filter out anything thats older than the current time/date.
This gives us one single result – our most recent upcoming event.
IMPORTANT – The StartID needs to be the same one that YOU are using. Make sure that your folder number and the Ditto call number match. My folder ID is 4, so I’m using 4. You’ll need to use whatever number shows in your MODx.
Ah, I hear you say, but how do I show more than one upcoming event?
Easy peasy. We’ll also need to add a little piece of code for the pagination underneath our Ditto call, so don’t forget to do that.
This Ditto call will show you a listing of upcoming events in date order (past events won’t be displayed)
[!Ditto? &startID=`4`&tpl=`events` &showInMenuOnly=`1` &displayArchive=`0` &multiLevel=`1` &paginate=`1` &paginateAlwaysShowLinks=`1` &orderBy=`EventStartDate ASC` &extenders=`summary,dateFilter` &dateSource=`EventStartDate` &summarize=`5` &dateFormat=`%d. %b. %y` &filter=`EventStartDate,@EVAL return strtotime("now");,3`!]

[+previous+] [+pages+] [+next+]
Again, remember to make sure that startID is the one YOU are using.
Ok, so thats pretty straightforward. Where does CALx come in?
Well, most of the time, people want a Calendar as well as an events listing.
As we’ve created the EventStartDate and EventEndDate as UnixTime, CALx doesn’t need any special help.
Here’s a sample call using the fields we’ve made
[!CALx? &getFolder=`4` &idMultiEvent=`4` &lang=`english` &useTV=`true` &dateStartTVName=`EventStartDate` &dateEndTVName=`EventEndDate` &showOtherMonth=`both` &getTypeProcess=`createCal` &popupType=`3`!]
This will show a calendar for the current month on the page its used on, and list the events for that month. Again, make sure that the folder id that YOU need is used – change getFolder=`4` to your folder ID.
Read up on CAlx, and Ditto at the MODx site for a rundown on the various parameters used.
This should give you an idea of how to setup and use them though.
Good luck.
Feel free to ask questions.
My coffee machine decided it would give up the ghost a while ago (due to lack of use I think).
I tried descaling, but that wasn’t working, and from what I could see (or hear in my case) happening looked like something simple had happened – one of the hoses had come off or wasn’t completely on, as not enough water was coming through the front, and the bottom had a small leak.
As I have successfully fixed other coffee machines in the past with similar issues, I thought I’d have a go at repairing mine.
First up was a quick google for my machine (Krups Cube XN5005) – unfortunately most of the posts were of people with similar issues, and no help.
I brought the machine to the office and took a closer look. First issue is that it uses security oval style screws on some of the parts. Thats a pain in the ass, as its hard to find the exact screwdriver.
I drove off to the local tools market and did some shopping around, but no luck, so I bought a selection of needle nosed pliers instead.
There is zero reason to use security screws unless you’re trying to piss off the consumer. If I’ve bought something I should be able to take it apart myself and repair it.
I also managed to find the Nespresso service manual for it (Krups Cube Nespresso Service Manual – xn5005 manual). While the external design is nice, the engineering is a bit crappy. If they weren’t trying to overcomplicate the design to keep the consumer out it would be a lot simpler. Sigh.
First to come off is the front chromed plastic part. Push both sides in and pull off.
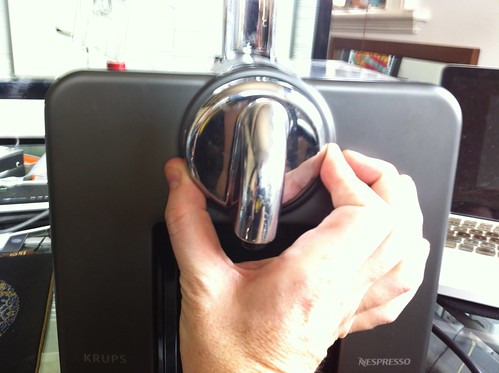
I managed to get one side off, then the other. Once you see how it clips on its fairly easy to get off.
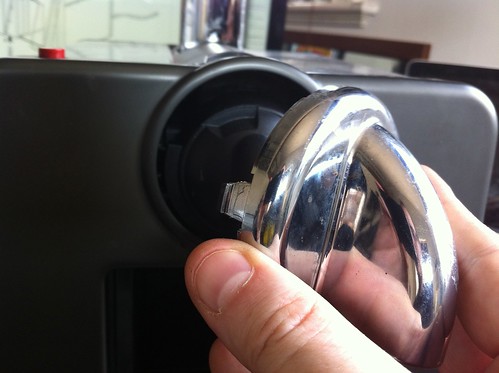
With that off, unclip the next plastic part on the nozzle.
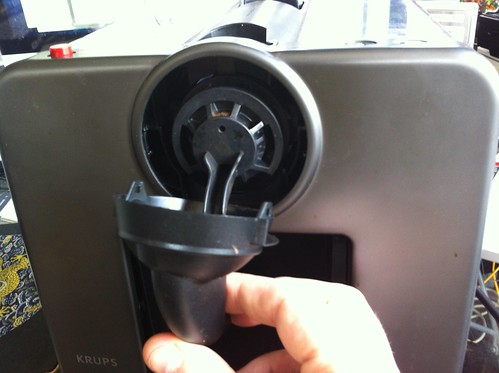
Next up is to remove the front faceplate.
Flip the unit upside down, then get 2 flat screwdrivers and put into both of the entry slots at the bottom. Twist slightly and it should come off. If you have trouble, do one side first, then the other. I usually get a credit card into the gap I make when I twist the screwdriver so that its easier to do.
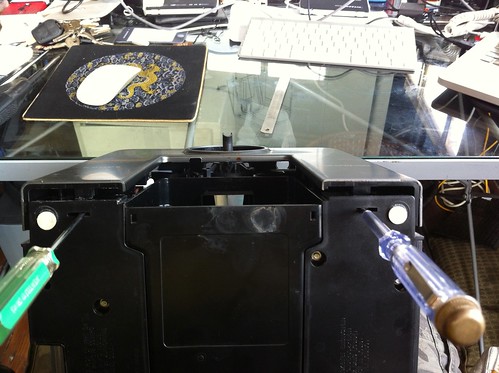
The top should come straight off without too much hassle once you have the evil clips off at the bottom.
Next up is the back panel, with the security screws. As I couldn’t find the exact screwdriver, I bought a selection of pliers and they came out fairly easily.
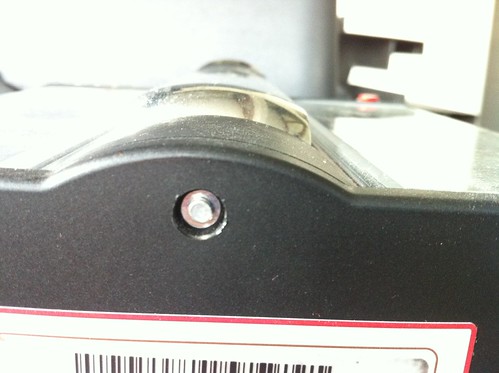
In case anyone can find them, the diameter is a 4mm oval shape.
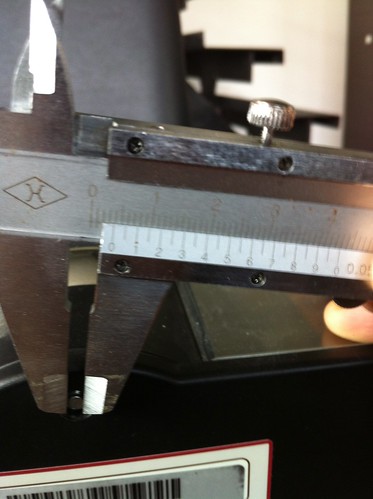
I basically sat and twisted gently to get the screws out.
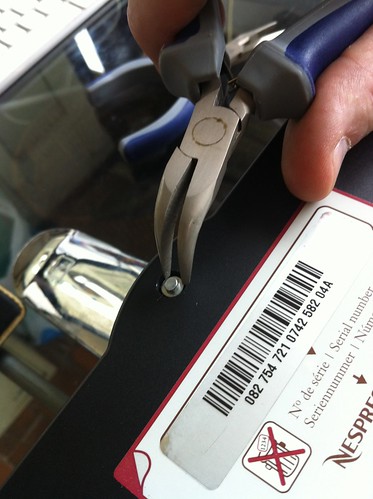
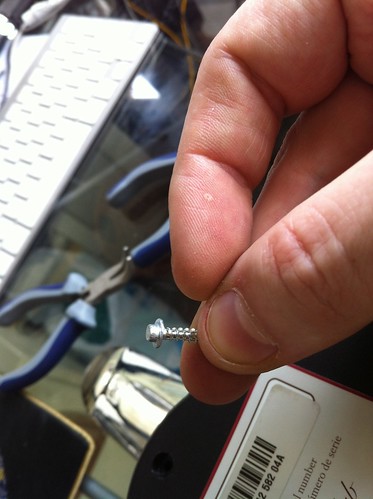
You need to remove the 3 at the back, and the two front ones at the bottom (closest to the back), for a total of 5 screws.
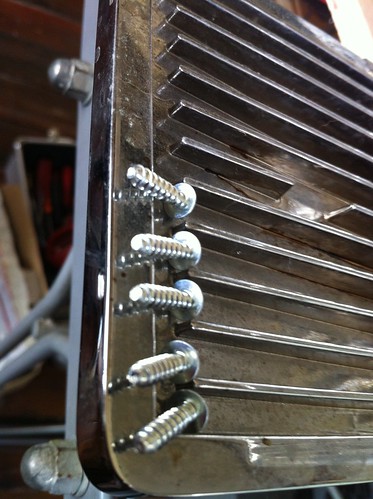
Once those five screws are out, the back can come off. Its a bit fiddly, as it didn’t want to budge much on the water tank side, but perseverance paid off.
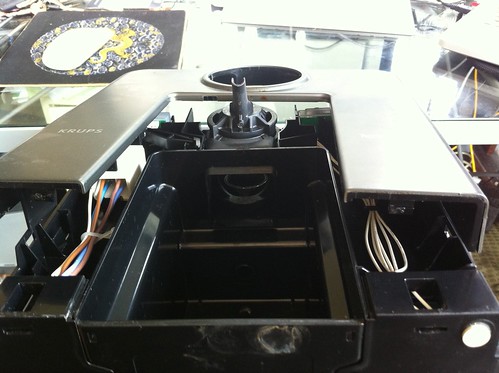
Once you have the back off, the machine is reasonably accessible.
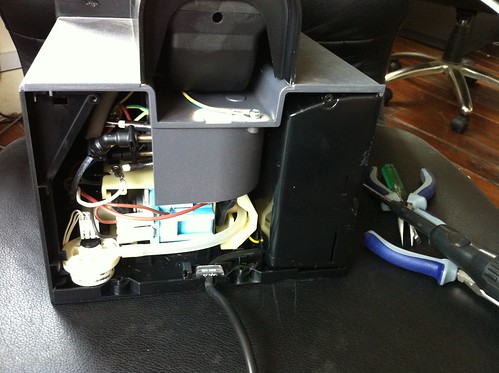
In my case, I just had to reseat one of the hoses, and retest.
The manual does give further instructions on how to get more of it disassembled from there, but thats as far as I needed to go.
While I was in there I gave it a bit of a clean also.
Compared to the other machine I have (a Saeco fully automatic), this is slightly better designed, but less serviceable. It still has the issue of electrics and water routing in the same area’s, which is silly, as that could be a failure/hazard point, but its safer than some i’ve seen.
Hopefully mine will now continue to give a few more years of service!.
If you need parts for them, this site appears to have some –
And of course after I finish this post, I find someone else doing similar things here –
https://chrisinmtown.github.io/blog/20100627_nespresso.html
Oh well..
Good luck!
24
Train Safety

The recent accident in Wenzhou has highlighted some of the issues that are present in train systems today.
The facts –
One high-speed rail train D301 from Beijing was headed for Fuzhou, this train was followed by train D3115 from Hangzhou to Fuzhou. At 20:34 or so, the train D3115 was hit by thunder, subsequently lost power and stopped.
Train D301 did not, and crashed into train D3115.
Two cars from train D3115 as well as four cars from D301 derailed, some falling off of a bridge.The trains are from different manufacturers –
D301 – CRH1 (Bombardier Regina, Swedish)
D3115 – CRH2 (Shinkansen E2, Japanese)
China wanted control over the internet, and now they have it.
2 years ago, China was a spammer haven, as domain registration was cheap, and USA based spammers (which still is the source of 99% of spam) registered a gazillion odd spam domains.
The powers that be decided to change that.
They changed the law.
First it only affected new domain registrations, you needed to provide real info for those registrations. Once they had that down, then they extended that to only Chinese people or Chinese organizations could register chinese domains. Then they started enforcing ICP registration for domains – each domain in china requires an ICP licence, or it can’t be hosted. For bonus annoyance points to do a ICP registration the website must be shutdown till the licence gets issued.
Then they extended that to no ICP licence, no domain – if your domain doesn’t have an ICP licence, bam, its put in suspended state at the registrar.
Now they’re rigorously enforcing ICP registrations to the n’th degree.
They’ve been cancelling those left right and center for no real reason, forcing people to resubmit.
Currently an ICP submission requires that you have an ISP licence, as only ISP’s can submit ICP’s for their hosted domains.
Each ISP has to verify sites as follows. Have the owner or representative for the site provide fill in 3 forms, make certified copies of business licence, copy of their ID, and take a photo of them in the ISP’s office. Which is the reason why all our clients need to come to our office now for photo’s and bring documents for their registrations.
These are scanned and submitted to the local Telecom authority through the ICP backend registration system. The user is then assigned a login and password where they can check their ICP licence at the MII official website.
Its been a pain in the ass for us recently as the Telco has been arbitrarily cancelling perfectly good ICP licences without notice or reason.
The Telecom bureau for each region does publish blacklists, but guess what – the cancelled ones don’t appear the blacklist.
If you host a domain with a cancelled licence (which unless you literally check all your clients licence stuff daily, you have no way of knowing about currently), then the Telco will also do fun lets call you at 6:30 on a Friday evening, and tell you that you have 30 minutes to remove that domain, or they shut down that ip address (shutting off hundreds of clients). What fun.
Its gotten to the point that I’m seriously considering moving all my non .cn clients to a new oversea’s server because we can’t keep up with their ever changing needs.
They keep changing the rules and regulations, they don’t have a decent mechanism in place for tracking stuff, and there is no warning if they arbitrarily cancel a licence.
What its meant for us is that domain management has gotten dramatically more time intensive over the last year, as the regulations and requirements for paperwork have changed a number of times now, requiring resubmissions, constant checks, and a lot more work. We have had to hire additional staff a few times already to cater for this at various points in time too.
All this does is increase our costs substantially, and annoy clients who ask why they need to do the ICP stuff yet again when they already did it.
Thank you China. Not.
As the law has changed regarding pet dogs in Shanghai (again), here are the steps to get your dog licensed.
The new rules state that people can only own 1 pet per household from now on.
The only exception to this is where you had more pets previously licensed in your household; you can continue to renew their licenses, but not add new dogs.
Note that the instructions below are for Xu Hui District, but are similar for other districts.
I suggest buy a plastic file, and keep all related paperwork together.
To succeed in this mission, you’ll need patience, some cash, and some kind of canine.
Ouch that hurt! aka vaccinations
Bring
Dog
Money (few hundred rmb).
In Xu Hui district (also would be ok for other districts), this is the large pet hospital at 2451 Xie Tu Lu
带狗去斜土路2451号打疫苗
You’ll need to ask for a “gou yi miao ban zheng” 办理狗证续证
The dog will get a vaccination shot, price for this varies depending on which vet you visit, but should be less than 100rmb.
You’ll also get a piece of paper. This is called a da zhen ping zheng. This is important, don’t lose it!
If your dog has never been licenced before, you will also need to get an id implanted too.
This is a small rfid tag that gets injected somewhere around the neck area.
This will also cost somewhere in the less than 100rmb range.
You’ll also get a piece of paper for that, again, don’t lose it.
If you don’t have the magic piece of paper, have the vet make another one for you. China runs on small bits of paper that are easily lost, so make sure that you have anything you possibly may need in a folder.
Lastly, don’t forget to get an official fapiao for the above, and keep that together with everything else.
The Joy of Paperwork! (at your local neighborhood police station)
Bring
The rental contract for where you live (or a property ownership book if you own your apartment).
Your Passport (with your work permit / residence permit inside).
The 2 or 3 papers from the vet that you got in step 1.
Your dog.
More money (500rmb)
In Chinese that looks like this – 带上狗证,房产证,护照去徐汇区湖南派出所登记
Take all of the above to your local police station.
(Not all do licenses, but they’ll be able to point you to which one in your district is responsible for doing dog licenses)
In Xu Hui district this is on Xiang Yang Lu, near Fuxing road (opposite the fake electronics mall)
电话:23037446
办公时间:8:30am-5:00pm
地址:襄阳南路203号靠近复兴中路( Xiangyang Nanlu 203#(Near fuxingzhonglu)
Give them all the paperwork you have so far, and 500RMB.
They should give you another slip of paper with a receipt, and a date to come back.
OR they’ll do it all there and then.
This depends on your districts setup.
Success!
Whichever of the above, at some point you’ll collect a pack of goodies!
This will include a dated sticker (this should be stuck on your door)
A Dog licence photo id card (this should be carried whenever you walk your dog).
A dog tag (which you should put on your dogs collar).
Plus some other assorted bits and pieces depending on which dog food company is sponsoring the gifts (last year was a bowl and some dog food).
I usually make copies of everything, and put into that file I told you to make in step one, and throw it into a safe place.
Currently you don’t need to bring photo’s, but from the 15th of June 2011, you’ll need to bring photos.
One side view, and one front view of your dog, in passport photo sized (1×3″) shots.
This was immense fun last time I tried to do this, as my dog doesn’t want to sit still for photo’s, and it took a while to get that done.
At time of writing this is all currently correct, but rules change (eg the we’re not sure about the photo’s thing yet), so have a chinese person call, and confirm first. Make sure that they ask for a clear answer that you understand, as its not unknown for people in China to forget to tell you about some essential item you need to bring, so ask clearly for what exactly is needed, and have them repeat it out to you.
Good luck!
17
Windows Drivers tips and tricks or How I learned to stop worrying and love the bom^H Microsoft.
Despite my pendance for semi obscure cultural references (its most of the title from a decent Peter Sellers satire), I do often find useful things that people can use.
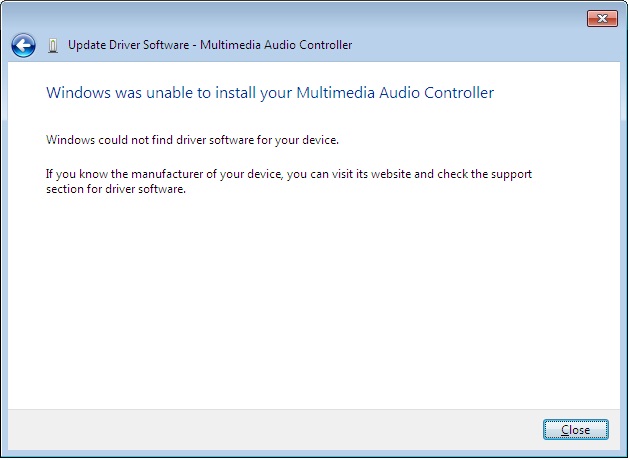
One of the things that is annoying about Windows especially is its resolute failure to find drivers when you run the “search the internet” option in XP, Vista^Hno such OS, and Win7
Example of this below:

At first we’re hopeful – maybe the gods will deign to assist us in our hour of need.

…but then reality comes crashing down, and we realise that we have to do the wild goosechase of running around trying to find drivers.
Wouldn’t it be nice if Microsoft actually got their act together, and put drivers online like they probably intended to?
Well, our prayers have been answered, but in typical Microsoft fashion, we still need to jump through multiple hoops to do so.
So… lets say we have some hardware in our computer that has the mystery yellow ? icon of unhappyness in Device Manager.
What to do?
First off, lets go visit Microsofts rather good, but also rather unpublicized site here:
http://catalog.update.microsoft.com
Install the cab file and sign away your life, rights and grandmother, as per standard clauses.
Bookmark this page, as its going to become very useful.
Done?
Ok, good. Now lets return to device manager.
As I’m writing this from a Win7 box, I’ll pick something that doesn’t appear to have Windows 7 drivers post install.
SIS900 Ethernet.
If you visit the SIS website, they don’t have drivers for Windows 7.
Not all is lost though.
Lets search that site we just bookmarked

Yes!
Windows 7 drivers for the SIS900. I’ll talk about the rather convoluted way we have to use these in a second.
For now, lets go with another example.
Lets say we have an unknown device in Device Manager in Windows, and we don’t really know what it is.
All devices have something called a hardware ID. This is what identifies the hardware so Windows can lookup what driver is appropriate.
I’ll pick another driver from this desktop I’m busy installing drivers for at the moment.

As you can see, we can see a list of hardware ID’s in the details tab of the property window for that device (Open up device manager, right click the ?’d device, and click properties to bring this window up)
In Windows 7 we can finally copy the text, yay!, in older Windows OS’s we need to write down those numbers.
Lets swing back to the Microsoft site, and search for that Device_ID&Ven_ID
PCI\VEN_1039&DEV_7012&SUBSYS_0C4C105B

Woohoo! Nice and easy – right?
Um no, remember, this is Microsoft, no Apple, so ts a little bit more complicated to use them.
Click on the driver thats appropriate for the OS in use, add to basket, then download. You may need to try a couple of different versions if the first one you try doesn’t solve the driver issue, so pick two or three different ones.
I suggest save to the desktop.
In a few minutes you’ll find that you have a folder on the desktop with the driver in a cab file.
A cab file? Hmm, thats not very useful, right?
Exactly…
So, we need to unpack that cab (cabinet file), and take out the juicy driver goodness so we can finally get our hardware working.
My favourite tool for this would be Winrar, so download WinRar, and install (http://www.rarlabs.com).
Installed?
Good, now right click on the cab file, and choose extract files…

Next, choose an appropriate folder name, as the defaults are too long, and winrar can’t extract the files.

In this case, as its an Audio driver, I used the cunning name of “Audio” for the folder.
Lets have a look at the folder, and see if it has an installer (usually something along the lines of Install.exe or Setup.exe. In this case it doesn’t, so off we go back to control panel, device manager.
We’ll try install using the driver we just downloaded.
Right click on the device, click Properties, Update Driver (usually something similar in most Windows OS’s)
Tell windows we have our own driver, and point it at the folder we just extracted.
If you are lucky you should see something like this:

Woohoo, win!
Whats strange is that Microsoft seemingly goes out of their way to make this more complicated than it really should be.
They’ve had a driver update from the internet option in Windows since XP days. They have this nice site with all the drivers. They make it rather convoluted to use though.
Wouldn’t it be nice if they put it all together and automated it?
Oh well, until we reach that perfect world, the instructions above should help you with any driver issues for Windows.
No more downloading from dodgy driver support sites, or trawling the internet for providers driver files. Get them from Microsoft instead!
Archives
- November 2024
- November 2019
- October 2019
- August 2019
- April 2019
- February 2017
- September 2016
- June 2016
- May 2016
- September 2015
- August 2015
- June 2015
- April 2015
- December 2014
- October 2014
- September 2014
- July 2014
- June 2014
- April 2014
- October 2013
- July 2013
- May 2013
- April 2013
- March 2013
- January 2013
- December 2012
- October 2012
- August 2012
- July 2012
- June 2012
- May 2012
- April 2012
- March 2012
- December 2011
- November 2011
- October 2011
- September 2011
- July 2011
- May 2011
- April 2011
- March 2011
- February 2011
- January 2011
- December 2010
- November 2010
- October 2010
- September 2010
- August 2010
- July 2010
- June 2010
- May 2010
- April 2010
- March 2010
- February 2010
- January 2010
- December 2009
- November 2009
- October 2009
- May 2009
- April 2009
- March 2009
- February 2009
- January 2009
- December 2008
- November 2008
- October 2008
- September 2008
Categories
- Apple
- Arcade Machines
- Badges
- BMW
- China Related
- Cool Hunting
- Exploits
- Firmware
- Food
- General Talk
- government
- IP Cam
- iPhone
- Lasers
- legislation
- MODx
- MySQL
- notice
- qmail
- requirements
- Reviews
- Service Issues
- Tao Bao
- Technical Mumbo Jumbo
- Things that will get me censored
- Travel
- Uncategorized
- Useful Info