As someone I know was interested in getting a new (old) laptop, I did some trawling of the intertubes, and saw that there were quite a few IBM Thinkpad’s in nice condition available on Taobao.
After checking away the requirements (one of which was not to go down in resolution to the crap they sell nowadays), I decided on a T6x series.
A T60 with a 1400×1050 screen was about RMB2500 on Taobao with fairly decent spec’s – DVD Writer, Bluetooth, Fingerprint Reader, SATA, Extended Battery. 3 month warranty, with a replacement 7 day swap for another unit. I sent my staff to go take a look at the shop, they liked, and I was soon the owner of an ex-corporate laptop that looked like it came from Singapore originally (according to the model / software licence sticker on the laptop). It even came with a legitimate licenced copy of Windows.
As I had ordered one for test purposes to see what the quality was like, I was pleasantly suprised. The one I received is pretty much in mint condition. In fact its in such good condition, that I decided I would keep it for myself!
I’m justifying it as I need a PC for development work. Although my collection of Mac’s are nice, sometimes you still need something with ‘old skool’ outputs – eg Parallel, Serial* for development work.
*No serial onboard but the docking bay has.
While I was doing the research into what exactly to get, I noticed a small piece in the Thinkpad Wiki where they mentions briefly that the screens on the 15" models can be replaced with higher resolution ones.
This was also something that was brought up on a recent Slashdot post where people mention the lack of good higher resolution screens.
I checked out the model number that they referenced – IAQX10N, and my favourite online site had sellers. As I’m in China, certain things are cheap, and luckily this happened to be one of them.
I ordered a suitable 15" donor screen from Taobao for the princely sum of 800rmb.
The LCD took a while to get here, mostly as it was shipped from Japan. We ordered on Friday, and it arrived Tuesday afternoon.

This screen is an original IPS IDTech, which is priced insanely well, considering what they used to charge for these!

Although I performed this upgrade on a T60 series, this upgrade can be done on any of the 15″ IBM (non-widescreen models), from the T43p -> T61p (post T61, they went lo-res widescreen, which sucked). Older Thinkpad laptops, and laptops with 1024×768 resolution also need a replacement LCD cable (which is roughly 100RMB on Taobao).
Removing the old LCD was easy (as IBM engineering is excellent).
I recommend you prepare by unplugging the power adaptor, and also removing the battery from the laptop, so that you don’t accidentally turn it on while disassembling it. Once you’ve done that, you can start.
First step was to remove the 3 bottom screws on the front.
Those are hidden behind round stickers, so use a small screwdriver, and gently nudge the stickers off.
Once you have those off, unscrew and place the screws / stickers into something suitable for storage (a clean ashtray is ideal).
Now do the same to the 3 sticker / screws located at the left side of the screen, and the 3 sticker / screws on the right side of the screen.
Put all the stickers and screws into your container. As all the screws are the same size, we don’t need to separate them.

The front cover will still be clipped in, pick a corner, and gently pull away using fingernails or a credit card inbetween the front / back edge. Keep going up until you have one side unclipped, then continue until the whole front is unclipped. The bottom part of the screen has some double sided tape affixed at the bottom. If the front doesn’t want to come off easily, be patient. Mine took about a minute to take apart (once the screws were off). Take your time, and don’t break anything.
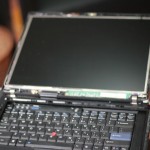
Eventually you should have separated the cover from the front.

Here’s what my screen looked like sans cover.

Once the cover is off, you should be able to slowly push the existing screen downwards towards the keyboard (make sure that you don’t drop it, use a hand to support it on its way down).
The IBM keylight is attached at the top of the case (connected to the LCD cable), it should pop out of its seat on its own, but if it doesn’t, carefully unlatch it while you pull the LCD downward.
You should see something similar to this now:

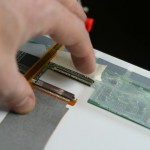
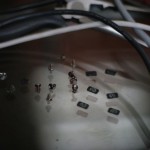
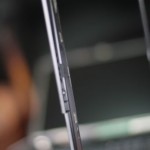
The LCD should be facedown flat on the keyboard by now, so lets unplug the connectors.
There are 2 connectors – 1 for power, and 1 for the screen. Lets start with the screen cable.
Peel the plastic covering the back up slightly, and you’ll see the cable and connector. In the photo below I’ve already unplugged the cable. Pull gently levering side to side to pull the connector out. In my case it was fairly easy to do.

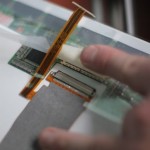
Here’s a closer look at the connector:

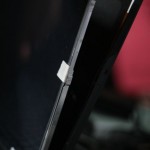
The bit hanging off the top of the connector is the ThinkLight. (aka the Keyboard light most people don’t know about!)
The other connector (the power one), should be fairly straightforward – pull gently, and unplug.
(No photo’s, as I forgot!).
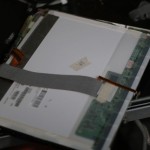
The LCD should be removable now.
We’ll also need the side mounts, so unscrew those from the LCD.

Place the old LCD somewhere safe face up. By this point, I’d unpacked my other LCD, so I placed it into the same packaging that the new one came in – an antistatic bag, and a boatload of bubble-wrap.
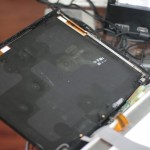
Start off by putting the new LCD facedown on the keyboard in the same orientation as the old LCD.
Plug in the screen connector, and the power connector.
Although the ThinkWiki said I’d need to bend a cable, my unit fit perfectly.
We’re ready to test now.
Carefully place the screen faceup, and plug in the power adaptor.
Hopefully you don’t see any magic smoke, and your Thinkpad makes the appropriate noises.
In my case, I lucked out, and I didn’t even need to flash the LCD EDID (as per the Wiki).
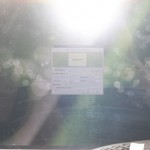
I booted into my OS (Linux Mint in this instance), and saw a login screen. Yay!

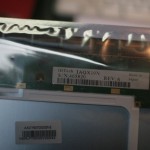
Note that the screen still has its protective shipping cover on, so looks a little dull.
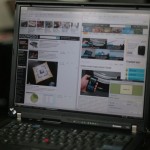
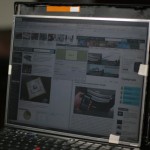
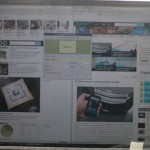
More test shots below:


As you can see, the laptop recognizes the resolution – both Gizmodo, and Engadget fit nicely side by side, and the control panel shows our 2048 x 1536 QXGA goodness.
Sadly, we now have to shut everything down again.
Unplug the power again, and place the screen face down again.
Carefully screw in the side mounts to both sides of the LCD. Remember, be gentle.
Put the LCD face up again, and lift into place in the case. Don’t force anything, everything goes in cleanly. You may need to route some of the cabling again – in my case I had to use a small screwdriver to push the left cabling back into the original positions.
Also don’t do what I did, and forget about the Keyboard light. In the photo below, you’ll see that although I have the screen installed nicely, I neglected to put the light in the top. Doh!

The light should fit into the top reasonably easily. Its a tight fit for the cable to reach, and would probably be easier with 3 hands helping out, but its doable on your own. Again, take it slowly, and carefully. If you get frustrated, take a break, and come back to it.
Once you have the LCD in, start by screwing in 1 screw on each side. You’ll need to lift the LCD slightly so that the screw holes line up. Once the first ones are in, the rest are easy. Do the sides (left, right) first.
We’re almost done.
Plug in the power again, and do another test run without the front facia, to make a final check.
All good?
Put the side stickers back on.
The front facia clicks onto the front. Line up the front facia carefully in its original position, and start pressing down. It should click nicely back into place. Go around the edges again, and push / click into place. Pay careful attention to the side cabling. If any cabling is in the way, use a small screwdriver to reposition the cable out of the way. Once the front is clicked into place, screw the remaining 3 bottom screws into place. Go around again, and make doubly sure that the front facia is clipped in 100%.
Slowly push the laptop lid closed, and make sure it all lines up ok.
From start to finish, mine took about 10 minutes total, so its relatively quick to do the replacement.
If you’ve never done something like this before, I’d estimate about 30 minutes max. Just remember – Be calm, go slowly, and be careful.
I’m now the proud owner of a laptop with a screen resolution that dates back to… 2002.
Yes, thats when they started making these screens.
Sadly, its all gone downhill from there, I’d love to be using something along the lines of 4096 x 4096 on my 24″ iMac, rather than having a laptop with better than HD resolution in a much smaller package.
Here’s the finished laptop –

Everything works perfectly, and the alignment / case fit is 100% perfect, which it should be, as IBM made the panels too!
As a non-vendor approved upgrade, this is probably the easiest upgrade I’ve done on a laptop too. Usually doing this stuff is fiddly.
Thankfully IBM Thinkpads (+-pre-Lenovo) are engineered properly..
So, after all this I now have a dual core laptop with a QXGA screen ( en.wikipedia.org/wiki/QXGA )
Total cost – RMB3300
Next step – upgrade it to a T61 motherboard, so I can install 8G ram…
References / Further Reading:
http://www.thinkwiki.org/wiki/Installing_a_QXGA_display_in_a_R/T60_or_61
http://forum.fatmanandcircuitgirl.com/forum_posts.asp?TID=590
http://wiki.keithl.com/index.cgi?QxGa – Flashing EDID (with i2C)
http://forum.thinkpads.com/viewtopic.php?f=29&t=77733
Thanks to Eric Rucker for taking the time to add to the Thinkpad wiki about it (otherwise I’d never have known!)
More pictures of the entire process below:

And for good measure, the EDID I used on my second build of this.
EDID BYTES:
0x 00 01 02 03 04 05 06 07 08 09 0A 0B 0C 0D 0E 0F
————————————————
00 | 00 FF FF FF FF FF FF 00 30 AE 49 40 00 00 00 00
10 | 00 13 01 03 80 1E 17 78 EA CD 71 91 55 4F 8B 26
20 | 21 54 56 21 08 00 81 80 A9 40 01 01 01 01 01 01
30 | 01 01 01 01 01 01 29 40 00 60 80 00 10 60 10 10
40 | 88 00 30 E4 10 00 00 1E 00 00 00 FD 00 30 32 4C
50 | 4D 11 00 0A 20 20 20 20 20 20 00 00 00 FE 00 49
60 | 44 54 65 63 68 0A 20 20 20 20 20 20 00 00 00 FE
70 | 00 49 41 51 58 31 30 4E 20 51 58 47 41 0A 00 D9
Do you like this article? Share It!


Archives
- November 2024
- November 2019
- October 2019
- August 2019
- April 2019
- February 2017
- September 2016
- June 2016
- May 2016
- September 2015
- August 2015
- June 2015
- April 2015
- December 2014
- October 2014
- September 2014
- July 2014
- June 2014
- April 2014
- October 2013
- July 2013
- May 2013
- April 2013
- March 2013
- January 2013
- December 2012
- October 2012
- August 2012
- July 2012
- June 2012
- May 2012
- April 2012
- March 2012
- December 2011
- November 2011
- October 2011
- September 2011
- July 2011
- May 2011
- April 2011
- March 2011
- February 2011
- January 2011
- December 2010
- November 2010
- October 2010
- September 2010
- August 2010
- July 2010
- June 2010
- May 2010
- April 2010
- March 2010
- February 2010
- January 2010
- December 2009
- November 2009
- October 2009
- May 2009
- April 2009
- March 2009
- February 2009
- January 2009
- December 2008
- November 2008
- October 2008
- September 2008
Categories
- Apple
- Arcade Machines
- Badges
- BMW
- China Related
- Cool Hunting
- Exploits
- Firmware
- Food
- General Talk
- government
- IP Cam
- iPhone
- Lasers
- legislation
- MODx
- MySQL
- notice
- qmail
- requirements
- Reviews
- Service Issues
- Tao Bao
- Technical Mumbo Jumbo
- Things that will get me censored
- Travel
- Uncategorized
- Useful Info