Had a client over today with some Mac issues.
Was getting disk full messages, despite having 130Gig free.
Did the usual stuff – disk repair, disk verify (caught some small things).
That fixed the disk full messages.
Then the client told me – oh, by the way, Safari doesn’t open.
Tailing the system log in console still revealed issues.
14/04/09 09:07:43 com.apple.launchctl.System[2] could not fetch history: Cannot allocate memory
14/04/09 09:07:43 com.apple.launchctl.System[2] BootCacheControl: could not stop cache/fetch history: Cannot allocate memory
A quick google of that error showed it was caused by…. Wacom drivers.
While Wacom have updated drivers for other tablets, the client uses a Bamboo, which hasn’t had driver updates since 2007.
Checking the logs while opening Safari revealed that it was trying to open a non-existent file called com.pentablet.defaults.xml
On the off chance that this would work, I created a blank file in terminal.
Terminal
sudo su

[enter in your password]

cd /Library/Preferences

ls -al com.pentablet.defaults.xml
If (and ONLY if) no file is found, do this:
echo > com.pentablet.defaults.xml

exit

exit
Safari will open again.
Hopefully Wacom will release newer less buggy drivers sometime soon.
One of my clients called asking why all his image attachments were suddenly postage stamp sized.
We both use Mac’s, and to be honest I had no idea, until I tried to send an image attachment myself.
Turns out that in Apple Mail, the simple stuff eludes us “smart” IT types by being obscure.
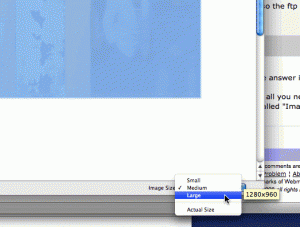
After attaching an image in Mail, Apple sneaks a new menu at the bottom of the page where you can choose the image size.
See below for an example:
Once we had that changed back to a more reasonable default (Medium in this case), all was well in the land, and we both learned something new!
Notes for Apple (just in case someone’s listening):
I like the idea, but I think the implementation leaves something to be desired. The UI for this is very non-intuitive, some kind of hinting wouldn’t go amiss here, or dare I say it, a total relocation of this to the top of the window with the other icons and menu options.
Archives
- November 2024
- November 2019
- October 2019
- August 2019
- April 2019
- February 2017
- September 2016
- June 2016
- May 2016
- September 2015
- August 2015
- June 2015
- April 2015
- December 2014
- October 2014
- September 2014
- July 2014
- June 2014
- April 2014
- October 2013
- July 2013
- May 2013
- April 2013
- March 2013
- January 2013
- December 2012
- October 2012
- August 2012
- July 2012
- June 2012
- May 2012
- April 2012
- March 2012
- December 2011
- November 2011
- October 2011
- September 2011
- July 2011
- May 2011
- April 2011
- March 2011
- February 2011
- January 2011
- December 2010
- November 2010
- October 2010
- September 2010
- August 2010
- July 2010
- June 2010
- May 2010
- April 2010
- March 2010
- February 2010
- January 2010
- December 2009
- November 2009
- October 2009
- May 2009
- April 2009
- March 2009
- February 2009
- January 2009
- December 2008
- November 2008
- October 2008
- September 2008
Categories
- Apple
- Arcade Machines
- Badges
- BMW
- China Related
- Cool Hunting
- Exploits
- Firmware
- Food
- General Talk
- government
- IP Cam
- iPhone
- Lasers
- legislation
- MODx
- MySQL
- notice
- qmail
- requirements
- Reviews
- Service Issues
- Tao Bao
- Technical Mumbo Jumbo
- Things that will get me censored
- Travel
- Uncategorized
- Useful Info


