![]()
小米 sells a small little wifi camera which works quite painlessly.
I’ve bought several over the last few years.
My recent ones don’t work oversea’s though (which is where I install them).
Its extremely bogus selling equipment that is limited to a country, especially when they don’t tell you about it.
Annoying, as my older models aren’t “region locked”, but the newer ones are.
There is a fix for it, although it will likely get more difficult to patch at xiaomi’s whim.
If so, I’ll probably stop buying the camera’s. Lovely how vendors want to mess with customers…
—
First up, enable telnet on the camera.
Get an SD card or take the card out of the camera.
Create a folder named test on the card.
Create a plain text file called equip_test.sh in that folder, and add the following bash script:
#!/bin/sh

# Telnet

if [ ! -f "/etc/init.d/S88telnet" ]; then

echo "#!/bin/sh" > /etc/init.d/S88telnet

echo "telnetd &" >> /etc/init.d/S88telnet

chmod 755 /etc/init.d/S88telnet

fi

dr=`dirname $0`

# fix bootcycle

mv $dr/equip_test.sh $dr/equip_test.sh.moved

reboot
The script will enable telnet on the camera, and then rename the script so it doesn’t run again on the next boot.
Stick the prepared card into the camera, power on, and it should reboot (twice).
If you check the open ports on the camera ip you should now see port 23 (telnet) is open.
Login with the default user/pass (as below) via telnet
User: root

Password: 1234qwer
Once telnet’d in, enter the following, line by line –
Find and kill the watchdog process
killall watch_process
Find and kill /home/cloud process so we can edit it without the watchdog watch_process restarting it
killall cloud
Change the check within /home/cloud executable to query a fake domain so it never returns a failure, then reboot.
 sed -i  's|api.xiaoyi.com/v4/ipc/check_did|api.xiaoyi.foo/v4/ipc/check_did|g' /home/cloud

 reboot
Notes – The camera checks for the country by running an executable called /home/cloud
This calls an api at api.xiaoyi.com which does a ip check, then returns a true or false value if it thinks you’re in China or not. We change the /home/cloud executable ip check call to a bad url, which means it can’t perform its check.
Worked on my camera’s running version 1.8.6.1Q_201607271501
16
SSL Updates
![]()
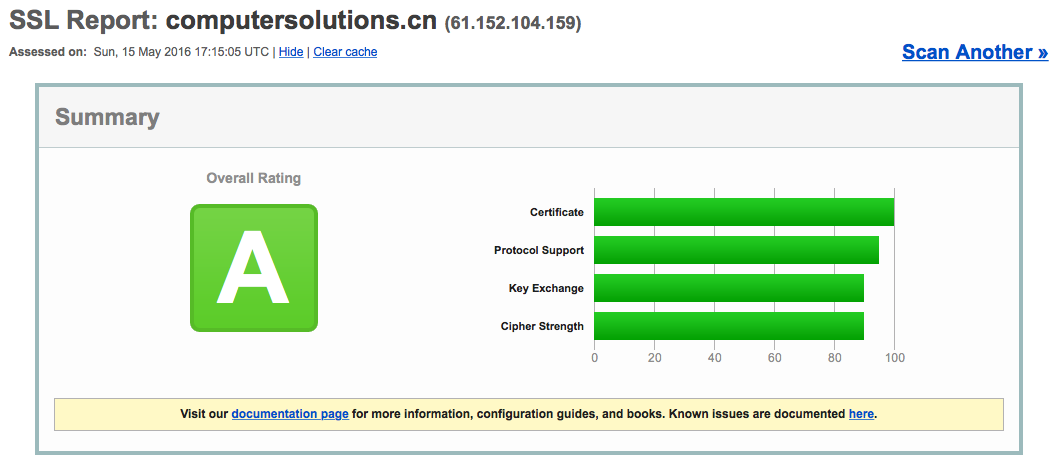
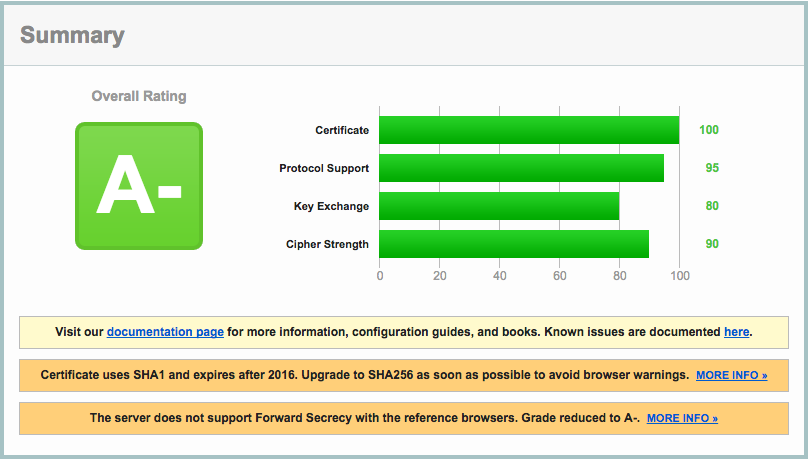
The SSL certificate for the all servers have been updated to use a wildcard certificate.
We *finally* changed over to use a wildcard cert, as pricing has come down enough to not warrant having separate certificates per server.
Our new wildcard certificate is valid until 2019.
What does this mean for you?
The bad news
Really old browsers won’t be able to open our site
If you are an XP user running IE6, you won’t be able to load our encrypted sites anymore. We strongly suggest you upgrade though if you fall into that category!
Same goes for those running Android 2.x (which is equally ancient in computer terms).
The good news
Email is now encrypted point to point using AES256 SHA encryption where possible, and webmail is SHA256 encrypted from server to your browser.
Mail servers that support it (i.e. all of ours, plus the major providers like Google, Yahoo etc, will send encrypted mail to our servers).
Mail Headers will include things like the below if encryption is supported –
Received: from usa4.computersolutions.cn (162.210.36.26) by mail.computersolutions.cn with AES256-SHA encrypted SMTP;
Lastly – our new cert gets us a test rating of A at the SSL Labs site.
https://www.ssllabs.com/ssltest/analyze.html?d=computersolutions.cn&latest
![]()
Some of our clients are experiencing delivery issues to some domains that use Gmail/Google for their email.
I previously covered that here – http://www.computersolutions.cn/blog/2015/04/gmail-and-other-google-hosted-mail-delivery-issues/
The issue is that China is still blocking Gmail/ Google hosted mail, and the recipient domain hasn’t setup their MX records correctly.
This is fine for servers outside of China, where all of googles mail servers (should) work, but breaks things for those inside China, where only a few servers are reachable.
Google hosted mail settings are here: https://support.google.com/a/answer/33915?hl=en
You’ll note that there are 5 different email servers that are listed in priority order.
Priority	Mail Server

1	ASPMX.L.GOOGLE.COM.

5	ALT1.ASPMX.L.GOOGLE.COM.

5	ALT2.ASPMX.L.GOOGLE.COM.

10	ALT3.ASPMX.L.GOOGLE.COM.

10	ALT4.ASPMX.L.GOOGLE.COM.
For mail servers, the higher number is more important, so a priority of 1 will be the first server tried, then the next highest number, and so on.
If I try to connect to the servers from China.
telnet ASPMX.L.GOOGLE.COM 25
Trying 74.125.200.27…
(times out)
telnet ALT1.ASPMX.L.GOOGLE.COM 25
Trying 173.194.72.26…
(times out)
telnet ALT2.ASPMX.L.GOOGLE.COM 25
Trying 74.125.25.26…
(times out)
telnet ALT3.ASPMX.L.GOOGLE.COM 25
Trying 64.233.169.26…
Connected to ALT3.ASPMX.L.GOOGLE.COM.
Escape character is ‘^]’.
(yay, we have a winner!)
telnet ALT4.ASPMX.L.GOOGLE.COM 25
Trying 74.125.70.27…
Connected to ALT4.ASPMX.L.GOOGLE.COM.
Escape character is ‘^]’.
(yay, we have a winner!)
So, we can see that alt3, alt4 work, but none of the others do (as of 9th September 2015 from Shanghai)
So, some rudimentary testing shows that some servers work, and some do not.
How does that apply to real world examples.
Lets look at a non-working domain – ihg.com
dig mx ihg.com
;; ANSWER SECTION:
ihg.com. 600 IN MX 100 aspmx3.googlemail.com.
ihg.com. 600 IN MX 50 alt1.aspmx.l.google.com.
ihg.com. 600 IN MX 50 alt2.aspmx.l.google.com.
ihg.com. 600 IN MX 100 aspmx2.googlemail.com.
ihg.com. 600 IN MX 10 aspmx.l.google.com.
You should easily be able to see 2 things.
1 – that the MX records are not as per Google settings.
2 – that the 2 working MX records are not listed.
This means that while their MX records probably work oversea’s, they will not be deliverable from China. They need to amend their MX records to Googles recommended settings.
Lets look at another example.
dig mx rsms-west.com
;; ANSWER SECTION:
rsms-west.com. 6238 IN MX 30 alt2.aspmx.l.google.com.
rsms-west.com. 6238 IN MX 10 aspmx.l.google.com.
rsms-west.com. 6238 IN MX 40 aspmx2.googlemail.com.
rsms-west.com. 6238 IN MX 50 aspmx3.googlemail.com.
rsms-west.com. 6238 IN MX 20 alt1.aspmx.l.google.com.
Once again, we can see that the alt3, and alt4 servers are missing, and unfortunately none of the other listed servers are connectable from China.
Lastly, lets look at a working server
dig mx teamsequel.com
teamsequel.com. 12878 IN MX 1 ASPMX.L.GOOGLE.com.
teamsequel.com. 12878 IN MX 5 ALT1.ASPMX.L.GOOGLE.com.
teamsequel.com. 12878 IN MX 5 ALT2.ASPMX.L.GOOGLE.com.
teamsequel.com. 12878 IN MX 10 ALT3.ASPMX.L.GOOGLE.com.
teamsequel.com. 12878 IN MX 10 ALT4.ASPMX.L.GOOGLE.com.
You can see that they have the correct Gmail settings as per Gmail / Google settings page, and mail to them is deliverable (as alt3, alt4 are currently not being blocked by the beneficent government of China).
Unfortunately as this is an issue that is out of our control (MX records are incorrect, and China is being difficult), we cannot mitigate against it. The affected domains will need to amend their MX records appropriately as per the page here- https://support.google.com/a/answer/33915?hl=en.
![]()
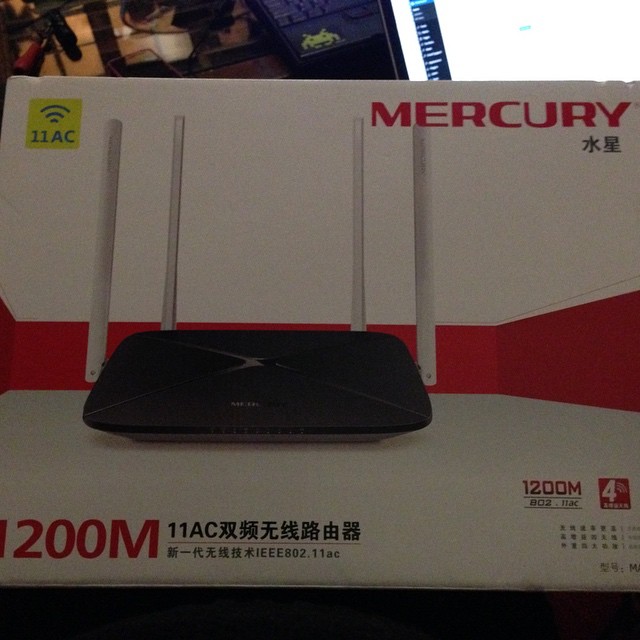
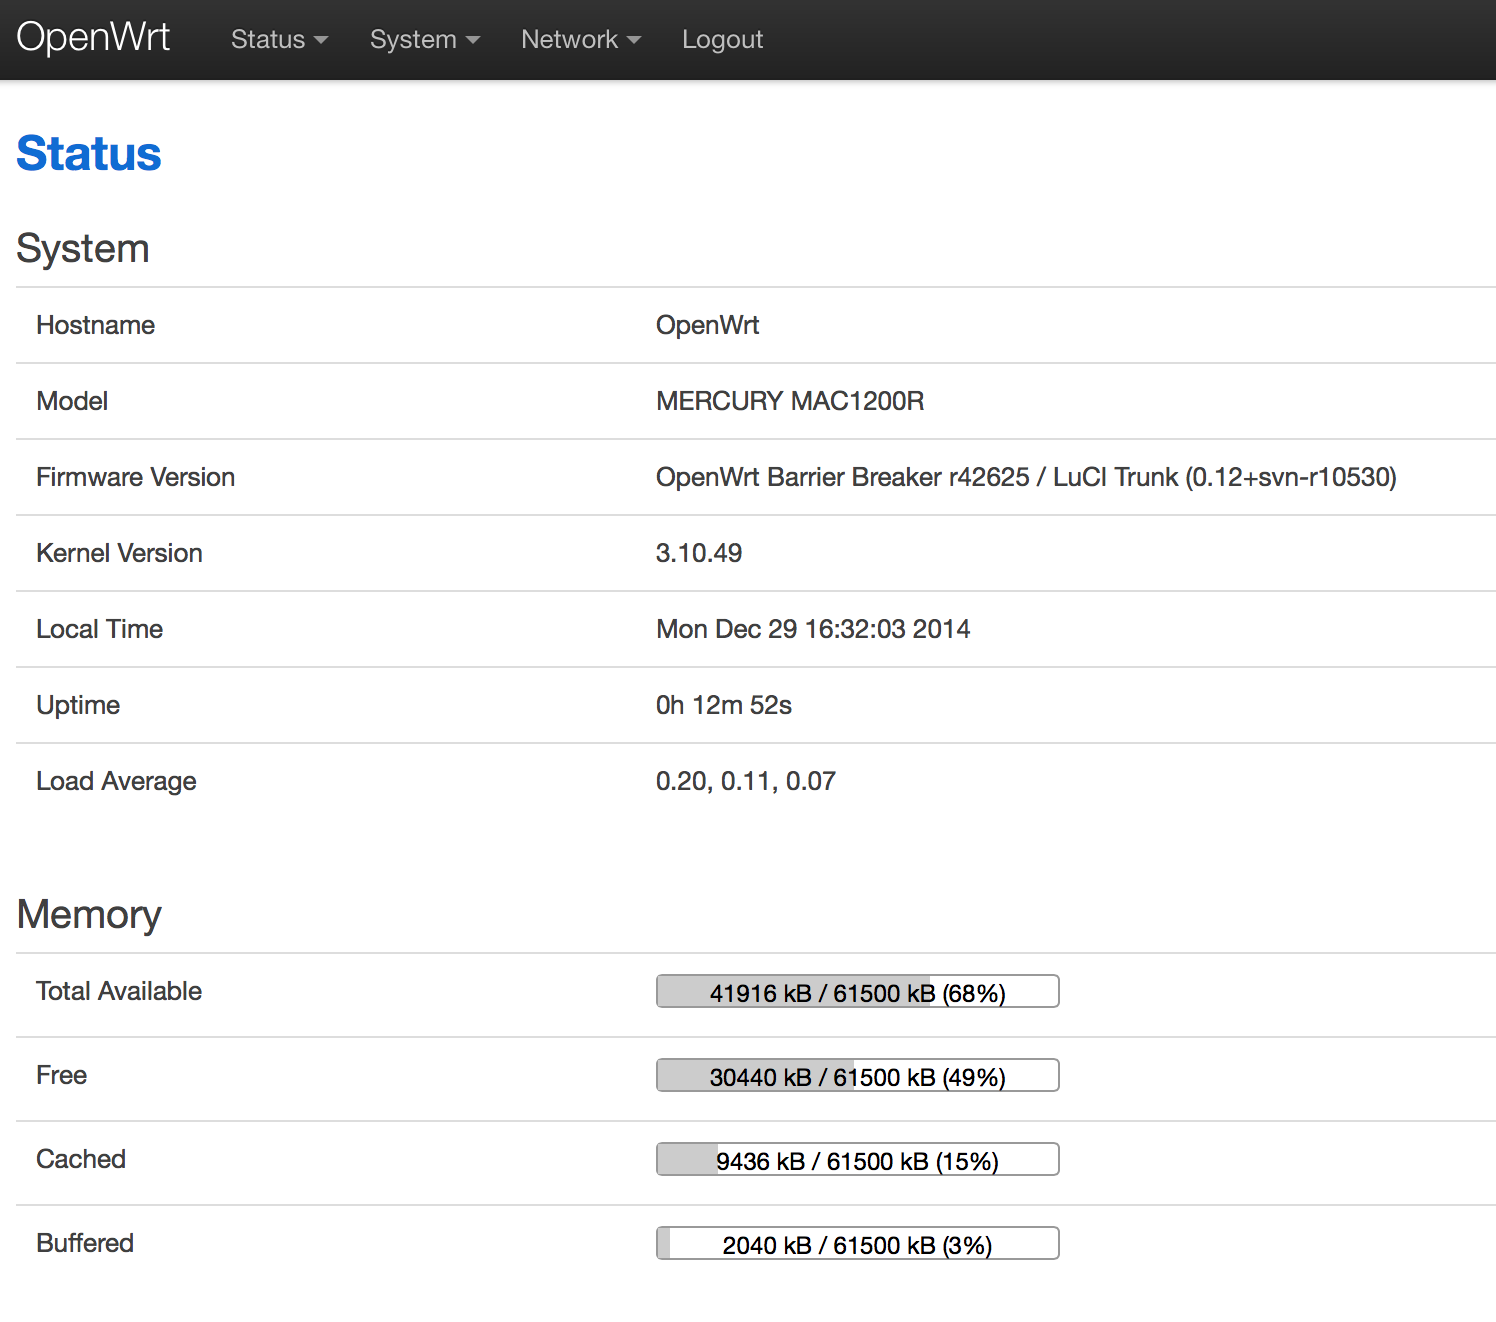
The Mercury MAC1200R (TPLINK WR6300) is one of the cheapest AC based routers on the planet, as I have a few AC devices I thought I’d buy one to try out. They’re available for under RMB120 or so online.
Mercury hardware is TPLink hardware, albeit using a different name. Same stuff, same factory, different casing.
The router has 64M ram, and 8M flash. CPU / Wifi AR9344 / QCA9882
OpenWRT says it has support, so I had a quick go at taking a look at flashing one.
First steps:
Open up the unit (remove the 2 screws underneath, then use a spare credit card or similar to jam open the plastic case).
The serial headers are to the right of the SoC.
You’ll need a rs232 to ttl or usb to ttl adaptor.
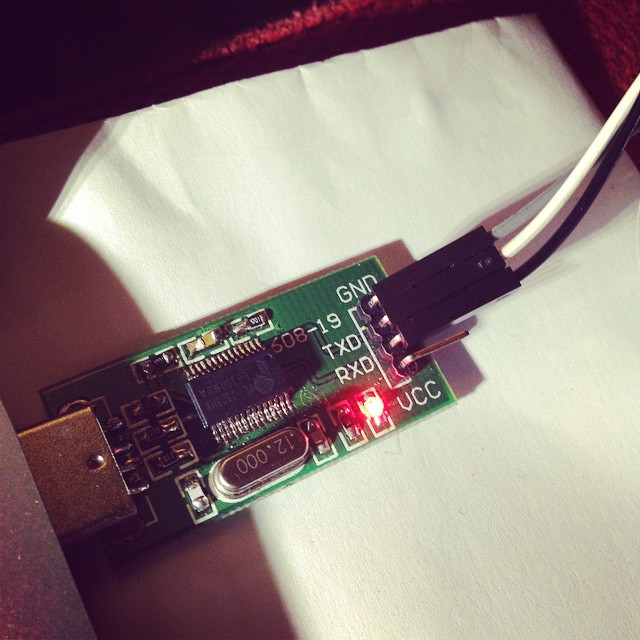
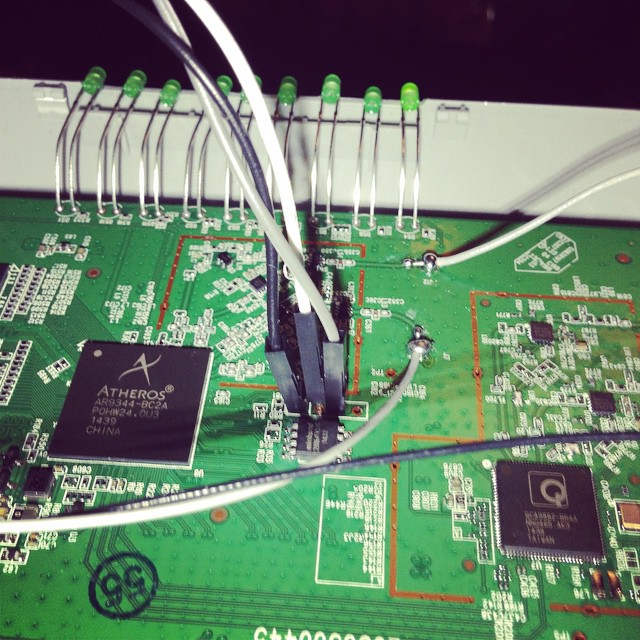
Pin 1 is GND
Pin 2 is TX (connect to rx)
Pin 3 is RX (connect to tx)
Pin 4 is VCC (don’t connect).
Port speeds are 115200,8,n,1
Connect up, and you should see a flurry of activity on boot.
To get into the bootloader (uBoot), you’ll need to type tpl
May take a few tries, so prepare to pull power and retry again, and again till you get in.
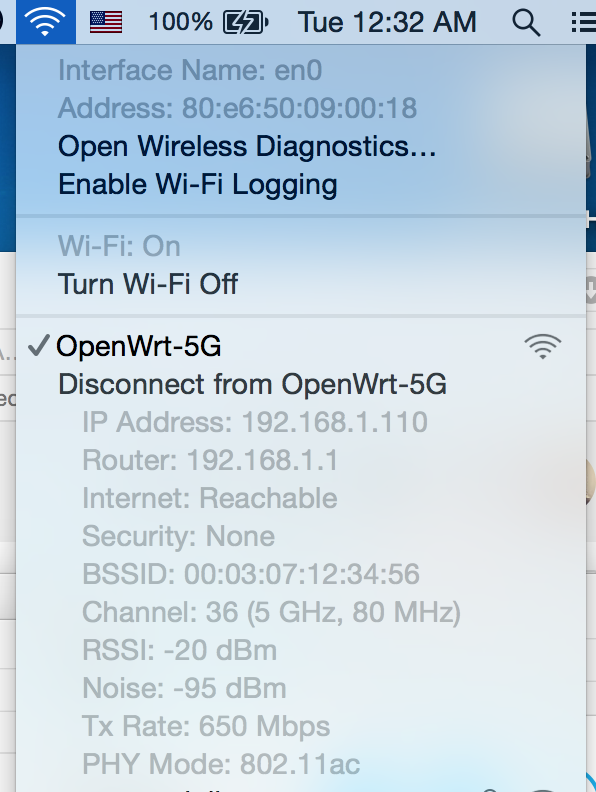
You’ll need a TFTPD server running on 192.168.1.100 to push files over. My Mac no haz ethernet (and Thunderbolt to Ethernet is crud), so I use my venerable X40 and tftpd software.
Firmware is up here. (Or you can compile your own) -> http://pan.baidu.com/s/1hqkVOfa
Firmware locations in flash (see below)
printenv

bootargs=console=ttyS0,115200 root=31:02 rootfstype=jffs2 init=/sbin/init mtdparts=ath-nor0:256k(u-boot),64k(u-boot-env),6336k(rootfs),1408k(uImage),64k(mib0),64k(ART)

bootcmd=bootm 0x9f020000

bootdelay=1

baudrate=115200

ethaddr=0xba:0xbe:0xfa:0xce:0x08:0x41

ipaddr=192.168.1.111

serverip=192.168.1.100

dir=

lu=tftp 0x80060000 ${dir}u-boot.bin&&erase 0x9f000000 +$filesize&&cp.b $fileaddr 0x9f000000 $filesize

lf=tftp 0x80060000 ${dir}db12x${bc}-jffs2&&erase 0x9f050000 +0x630000&&cp.b $fileaddr 0x9f050000 $filesize

lk=tftp 0x80060000 ${dir}vmlinux${bc}.lzma.uImage&&erase 0x9f680000 +$filesize&&cp.b $fileaddr 0x9f680000 $filesize

stdin=serial

stdout=serial

stderr=serial

ethact=eth0
Environment size: 686/65532 bytes
Upload to the uBoot
U-Boot 1.1.4--LSDK-10.1.389 (Apr 9 2014 - 15:23:02)
U-Boot DB120
Wasp 1.2
DRAM: 64 MB
Flash Manuf Id 0xef, DeviceId0 0x40, DeviceId1 0x17
flash size 8MB, sector count = 128
Flash: 8 MB
Using default environment
In: serial
Out: serial
Err: serial
Net: ag934x_enet_initialize...
No valid address in Flash. Using fixed address
No valid address in Flash. Using fixed address
wasp reset mask:c02200
WASP ----> S27 PHY
s27 reg init
: cfg1 0x80000000 cfg2 0x7114
eth0: ba:be:fa:ce:08:41
athrs27_phy_setup ATHR_PHY_CONTROL 4 :1000
athrs27_phy_setup ATHR_PHY_SPEC_STAUS 4 :10
eth0 up
WASP ----> S27 PHY
s27 reg init lan
ATHRS27: resetting s27
ATHRS27: s27 reset done
: cfg1 0x800c0000 cfg2 0x7214
eth1: ba:be:fa:ce:08:41
athrs27_phy_setup ATHR_PHY_CONTROL 0 :1000
athrs27_phy_setup ATHR_PHY_SPEC_STAUS 0 :10
athrs27_phy_setup ATHR_PHY_CONTROL 1 :1000
athrs27_phy_setup ATHR_PHY_SPEC_STAUS 1 :10
athrs27_phy_setup ATHR_PHY_CONTROL 2 :1000
athrs27_phy_setup ATHR_PHY_SPEC_STAUS 2 :10
athrs27_phy_setup ATHR_PHY_CONTROL 3 :1000
athrs27_phy_setup ATHR_PHY_SPEC_STAUS 3 :10
eth1 up
eth0, eth1
Setting 0xb8116290 to 0x30602d0f
Autobooting in 1 seconds
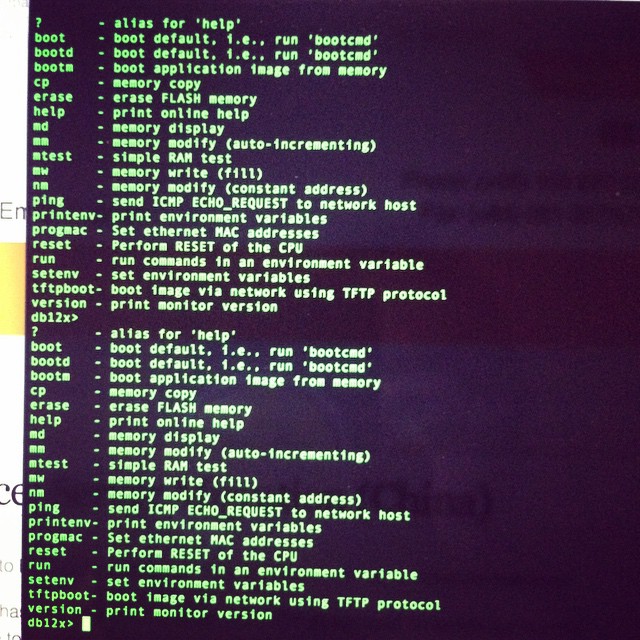
db12x>
db12x> tftpboot 0x81000000 image.bin
eth1 link down
enet0 port4 up
dup 1 speed 100
Using eth0 device
TFTP from server 192.168.1.100; our IP address is 192.168.1.111
Filename 'image.bin'.
Load address: 0x81000000
Loading: #################################################################
#################################################################
#################################################################
#################################################################
#################################################################
#################################################################
#################################################################
#################################################################
#################################################################
##############################
done
Bytes transferred = 3145732 (300004 hex)
db12x> erase 0x9f020000 +0x3c0000
Erasing flash... ............................................................
Erased 60 sectors
db12x> cp.b 0x81000000 0x9f020000 0x3c0000
Copy to Flash... ............................................................done
db12x> bootm 9f020000
It should boot into OpenWRT, you can flash from there.
...[long kernel bootlogs redacted]
- init complete -
BusyBox v1.22.1 (2014-12-15 18:46:26 CST) built-in shell (ash)
Enter 'help' for a list of built-in commands.
_______ ________ __
| |.-----.-----.-----.| | | |.----.| |_
| - || _ | -__| || | | || _|| _|
|_______|| __|_____|__|__||________||__| |____|
|__| W I R E L E S S F R E E D O M
-----------------------------------------------------
BARRIER BREAKER (14.07, r42625)
-----------------------------------------------------
* 1/2 oz Galliano Pour all ingredients into
* 4 oz cold Coffee an irish coffee mug filled
* 1 1/2 oz Dark Rum with crushed ice. Stir.
* 2 tsp. Creme de Cacao
-----------------------------------------------------
cat /proc/mtd
dev: size erasesize name
mtd0: 00020000 00010000 "u-boot"
mtd1: 0010206c 00010000 "kernel"
mtd2: 006cdf94 00010000 "rootfs"
mtd3: 004d0000 00010000 "rootfs_data"
mtd4: 00010000 00010000 "art"
mtd5: 007d0000 00010000 "firmware"
I highly recommend replacing the bootloader with an unlocked one.
i.e. this one – https://github.com/pepe2k/u-boot_mod
Bootloader sits at 0x9f000000 and is 64kb in size.
Suggest load in ram at 0x80060000 like they do, and flash from there.
eg from the bootloader –
tfpboot 0x80060000 uboot.bin

erase 0x9f000000 +0x20000

cp.b 0x80060000 0x9f000000 0x20000
Pray that it didn’t mess up (or you need an spi flasher…), and reboot!
Other bits n bobs –
You’ll need to adjust the opkg.conf file
ssh into the router @ 192.168.1.1 / root / root
mv /etc/opkg.conf /etc/opkg.conf.orig
echo 'dest root /
dest ram /tmp
lists_dir ext /var/opkg-lists
option overlay_root /overlay
src/gz barrier_breaker_base http://downloads.openwrt.org/barrier_breaker/14.07/ar71xx/generic/packages/base
src/gz barrier_breaker_management http://downloads.openwrt.org/barrier_breaker/14.07/ar71xx/generic/packages/management
src/gz barrier_breaker_oldpackages http://downloads.openwrt.org/barrier_breaker/14.07/ar71xx/generic/packages/oldpackages
src/gz barrier_breaker_packages http://downloads.openwrt.org/barrier_breaker/14.07/ar71xx/generic/packages/packages
src/gz barrier_breaker_routing http://downloads.openwrt.org/barrier_breaker/14.07/ar71xx/generic/packages/routing
src/gz barrier_breaker_telephony http://downloads.openwrt.org/barrier_breaker/14.07/ar71xx/generic/packages/telephony
src/gz barrier_breaker_luci http://downloads.openwrt.org/barrier_breaker/14.07/ar71xx/generic/packages/luci
#src/gz barrier_breaker_base http://downloads.openwrt.org/snapshots/trunk/ar71xx/packages/base
#src/gz barrier_breaker_management http://downloads.openwrt.org/snapshots/trunk/ar71xx/packages/management
#src/gz barrier_breaker_oldpackages http://downloads.openwrt.org/snapshots/trunk/ar71xx/packages/oldpackages
#src/gz barrier_breaker_packages http://downloads.openwrt.org/snapshots/trunk/ar71xx/packages/packages
#src/gz barrier_breaker_routing http://downloads.openwrt.org/snapshots/trunk/ar71xx/packages/routing
#src/gz barrier_breaker_telephony http://downloads.openwrt.org/snapshots/trunk/ar71xx/packages/telephony' >> /etc/opkg.conf
…and install Luci (the openwrt webui)
opkg update

opkg install luci
You should be able to visit http://192.168.1.1 and start changing settings.
![]()
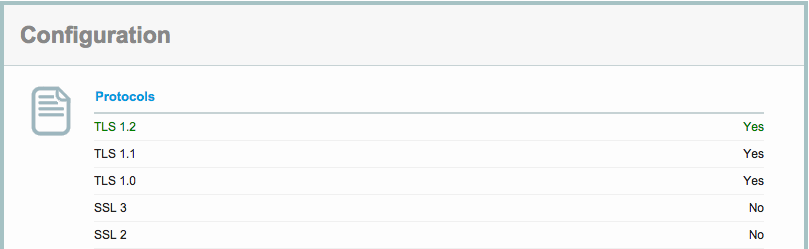
Yet another SSL vulnerability has hit the news – the Poodle SSLv3 vulnerability.
Our servers are already patched against this (we’ve disabled SSLv2 and SSLv3 functionality, and use TLS).
You can check this on the 3rd party site here –
https://www.ssllabs.com/ssltest/analyze.html?d=mail.computersolutions.cn&s=211.144.68.16
Unfortunately this now means that Windows XP and IE6 are no longer supported.
Our rating from the SSLLabs checker is below.
Note that the A- rating is due to our certificate, not our security!
(We can only update that in 2016 when it comes up for renewal).
SSL negotiation in use on our server
![]()
I’ve noticed a little spate of password attack attempts via Roundcube – a webmail program we use for mail over at https://mail.computersolutions.cn
Roundcube does have captcha plugins available which will mitigate this, but users will complain if they have to type in a captcha to login for mail.
Fail2ban provides an easy solution for this.
Roundcube stores its logs in a logs/errors file.
If I take a look at a sample login failure, it looks something like the example below
[09-Jun-2014 13:43:38 +0800]: IMAP Error: Login failed for admin from 105.236.42.200. Authentication failed. in rcube_imap.php on line 184 (POST /?_task=login&_action=login)
We should be able to use a regex like:
IMAP Error: Login failed for .* from
However fail2ban’s host regex then includes a trailing ., and fail2ban doesn’t recognise the ip.
I eventually came up with the overly complicated regex below, which seems to work:
IMAP Error: Login failed for .* from <HOST>(\. .* in .*?/rcube_imap\.php on line \d+ \(\S+ \S+\))?$
Lets add detection for that into fail2ban.
First up, we need to add roundcube into /etc/fail2ban/jail.conf
[roundcube]
enabled  = false
port     = http,https
filter   = roundcube
action   = iptables-multiport[name=roundcube, port="http,https"]
logpath  = [YOUR PATH TO ROUNDCUBE HERE]/logs/errors
maxretry = 5
findtime = 600
bantime = 3600
Note that we are not enabling the filter yet.
Change [YOUR PATH TO ROUNDCUBE HERE] in the above to your actual roundcube folder
eg /home/roundcube/public_html/logs/errors
Next, we need to create a filter.
Add /etc/fail2ban/filter.d/roundcube.conf
[Definition]
failregex = IMAP Error: Login failed for .* from <HOST>(\. .* in .*?/rcube_imap\.php on line \d+ \(\S+ \S+\))?$

ignoreregex =
Now we have the basics in place, we need to test out our filter.
For that, we use fail2ban-regex.
This accepts 2 (or more) arguments.
fail2ban-regex LOGFILE FILTER
For our purposes, we’ll pass it our logfile, and the filter we want to test with.
eg
fail2ban-regex /home/roundcube/public_html/logs/errors /etc/fail2ban/filter.d/roundcube.conf |more
If you’ve passed your log file, and it contains hits, you should see something like this:
Running tests
=============

Use regex file : /etc/fail2ban/filter.d/roundcube.conf
Use log file   : /home/www/webmail/public_html/logs/errors


Results
=======

Failregex
|- Regular expressions:
|  [1] IMAP Error: Login failed for .* from <HOST>(\. .* in .*?/rcube_imap\.php on line \d+ \(\S+ \S+\))?$
|
`- Number of matches:
   [1] 14310 match(es)

Ignoreregex
|- Regular expressions:
|
`- Number of matches:

Summary
=======

Addresses found:
[1]
    61.170.8.8 (Thu Dec 06 13:10:03 2012)
    ...[14309 more results in our logs!]
If you see hits, great, that means our regex worked, and you have some failed logins in the logs.
If you don’t get any results, check your log (use grep) and see if the log warning has changed. The regex I’ve posted works for roundcube 0.84
Once you’re happy, edit jail.conf, enable the plugin.
(set enabled = true), and restart fail2ban with
service fail2ban restart
![]()
Looks like Ubuntu 13 has changed the dev id’s for disks!
If you use ZFS, like us, then you may be caught by this subtle naughty change.
Previously, disk-id’s were something like this:
scsi-SATA_ST4000DM000-1CD_Z3000WGF
In Ubuntu 13 this changed:
ata-ST4000DM000-1CD168_Z3000WGF
According to the FAQ in ZFS on Linux, this *isn’t* supposed to change.
http://zfsonlinux.org/faq.html#WhatDevNamesShouldIUseWhenCreatingMyPool
/dev/disk/by-id/: Best for small pools (less than 10 disks)

Summary: This directory contains disk identifiers with more human readable names. The disk identifier usually consists of the interface type, vendor name, model number, device serial number, and partition number. This approach is more user friendly because it simplifies identifying a specific disk.

Benefits: Nice for small systems with a single disk controller. Because the names are persistent and guaranteed not to change, it doesn't matter how the disks are attached to the system. You can take them all out, randomly mixed them up on the desk, put them back anywhere in the system and your pool will still be automatically imported correctly.
So… on a reboot after upgrading a clients NAS, all the data was missing, with the nefarious pool error.
See below:
root@hpnas:# zpool status

pool: nas

state: UNAVAIL

status: One or more devices could not be used because the label is missing

or invalid. There are insufficient replicas for the pool to continue

functioning.

action: Destroy and re-create the pool from

a backup source.

see: http://zfsonlinux.org/msg/ZFS-8000-5E

scan: none requested

config:
NAME STATE READ WRITE CKSUM
nas UNAVAIL 0 0 0 insufficient replicas
raidz1-0 UNAVAIL 0 0 0 insufficient replicas
scsi-SATA_ST4000DM000-1CD_Z3000WGF UNAVAIL 0 0 0
scsi-SATA_ST4000DX000-1CL_Z1Z036ST UNAVAIL 0 0 0
scsi-SATA_ST4000DX000-1CL_Z1Z04QDM UNAVAIL 0 0 0
scsi-SATA_ST4000DX000-1CL_Z1Z05B9Y UNAVAIL 0 0 0
Don’t worry, the data’s still there. Ubuntu has just changed the disk names, so ZFS assumes the disks are broken.
Simple way to fix it is to export the pool, then reimport with the new names.
Our pool is named “nas” in the example below:
root@hpnas:# zpool export nas

root@hpnas:# zpool import -d /dev/disk/by-id nas -f
As you can see, our pool is now a happy chappy, and our data should be back
root@hpnas:# zfs list

NAME USED AVAIL REFER MOUNTPOINT

nas 5.25T 5.12T 209K /nas

nas/storage 5.25T 5.12T 5.25T /nas/storage

root@hpnas:/dev/disk/by-id# zfs list

NAME USED AVAIL REFER MOUNTPOINT

nas 5.25T 5.12T 209K /nas

nas/storage 5.25T 5.12T 5.25T /nas/storage

root@hpnas:/dev/disk/by-id# zpool status

pool: nas

state: ONLINE

scan: none requested

config:
NAME STATE READ WRITE CKSUM
nas ONLINE 0 0 0
raidz1-0 ONLINE 0 0 0
ata-ST4000DM000-1CD168_Z3000WGF ONLINE 0 0 0
ata-ST4000DX000-1CL160_Z1Z036ST ONLINE 0 0 0
ata-ST4000DX000-1CL160_Z1Z04QDM ONLINE 0 0 0
ata-ST4000DX000-1CL160_Z1Z05B9Y ONLINE 0 0 0
errors: No known data errors
Bit naughty of Ubuntu to do that imho…
![]()
Our underlying hardware uses Dell equipment for the most part inside China.
We use Debian as an OS, and Dell has some software available on their linux repo’s specifically tailored for their (often rebranded from other peoples) hardware.
Eg RAC (Remote Access) bits and pieces, RAID hardware, and BIOS updates.
So, enough about why, how do we use their repo?
First add it as a source
echo 'deb http://linux.dell.com/repo/community/deb/latest /' > /etc/apt/sources.list.d/linux.dell.com.sources.list
…then add gpg keys –
gpg --keyserver pool.sks-keyservers.net --recv-key 1285491434D8786F

gpg -a --export 1285491434D8786F | apt-key add -
apt-get update, to make sure that you have the latest repo bits added, then you can install their goodies.
apt-cache search dell will show you whats in their repo. Pick wisely!
Archives
- November 2019
- October 2019
- August 2019
- April 2019
- February 2017
- September 2016
- June 2016
- May 2016
- September 2015
- August 2015
- June 2015
- April 2015
- December 2014
- October 2014
- September 2014
- July 2014
- June 2014
- April 2014
- October 2013
- July 2013
- May 2013
- April 2013
- March 2013
- January 2013
- December 2012
- October 2012
- August 2012
- July 2012
- June 2012
- May 2012
- April 2012
- March 2012
- December 2011
- November 2011
- October 2011
- September 2011
- July 2011
- May 2011
- April 2011
- March 2011
- February 2011
- January 2011
- December 2010
- November 2010
- October 2010
- September 2010
- August 2010
- July 2010
- June 2010
- May 2010
- April 2010
- March 2010
- February 2010
- January 2010
- December 2009
- November 2009
- October 2009
- May 2009
- April 2009
- March 2009
- February 2009
- January 2009
- December 2008
- November 2008
- October 2008
- September 2008
Categories
- Apple
- Arcade Machines
- Badges
- BMW
- China Related
- Cool Hunting
- Exploits
- Firmware
- 食物
- General Talk
- government
- IP Cam
- iPhone
- Lasers
- legislation
- MODx
- MySQL
- notice
- qmail
- requirements
- Reviews
- Service Issues
- Tao Bao
- Technical Mumbo Jumbo
- Things that will get me censored
- 旅游
- Uncategorized
- Useful Info